
Operating instructions


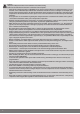
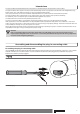
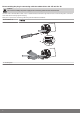
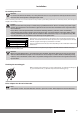

Table Of Contents
- Front cover
- Table of contents
- Contents
- General
- Warranty
- Safety instructions
- Intended use
- Assembling and disassembling the plug-in connecting cable
- Installation
- Assembling the drive
- Undoing the mounting pin
- Drive adapter for obstacle detection
- Assembling the drive adapter with drive adapter safety catch
- Assembling the drive adapter with screw connection
- Securing the drive against axial displacement
- Fixing the drive adapter to the barrel dia. 45
- Mounting the drive in the tube
- Confirming the drive
- First operation
- Programming the master transmitter
- Checking that the running direction is correct
- Intelligent installation management
- Setting the limit positions
- Changing the set limit positions
- Deleting the limit positions
- Intermediate positions I + II
- Programming additional transmitters
- Deleting transmitters
- Overwriting the master
- Upper anti-freeze mechanism
- Obstacle detection
- Fly screen protection function
- Programming the run times
- Deleting the run times
- Disposal
- Maintenance
- Technical data dia. 45
- What to do if...?
- Sample wiring diagram
- Declaration of conformity
- Last page
Assembling the drive adapter with drive adapter safety catch
Put the drive adapter (1) onto the drive shaft of the tubular drive. You can see which
way to insert the safety catch (2) from its shape. When inserting the drive adapter
safety catch (2) into the hole (4), make sure that the locking lug (3) engages. You will
hear a click. Check that the safety catch is securely in position by pulling on the drive
adapter (1).
Assembling the drive adapter with screw connection
Put the drive adapter (1) onto the drive shaft of the tubular drive. For the assembly,
use an M6 x 12 screw (3) with appropriate washer (2) and suitable screw retainer.
Threaded hole (4)
Securing the drive against axial displacement
-10 mm
In order to secure the drive against axial displacement, we recommend screwing the
drive adapter to the tube.
Attention
When drilling into the barrel, never drill near the tubular drive!
Fixing the drive adapter to the barrel dia. 45
Size of drive
[mm]
Diameter of barrel
[mm]
Torque
max. [Nm]
Fastening screws
for drive adapter (4 pc.)
dia. 45 60 - 70 mm
plastic or
diecast drive adapter
40 Self-tapping screw
dia. 4.8 x 9.5 mm
We also recommend screwing the opposite end bracket to the barrel.
Attention
Do not hammer or drop the tubular drive into the barrel! The curtain can only be secured using springs or anti-
lifting devices.
10