
Operating instructions
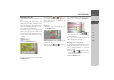
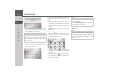

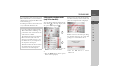
Table Of Contents
- Index
- Safety information
- The Navigation device
- OVERVIEW OF SCOPE OF SUPPLY
- OVERVIEW OF NAVIGATION DEVICE
- General operation
- Maintenance and care
- Battery quality declaration
- Display quality declaration
- Start-up
- Power supply
- TMC antenna (depending on the model)
- GPS-antenna
- Cable for vehicle integration (depending on the model, optional)
- Memory card
- Unit bracket
- Switching the Navigation device on/off
- Basic information about the touch screen
- Basic information about the menus
- Radio remote control
- Content Manager
- Transferring music tracks, pictures and videos
- Faults
- Navigation mode
- What is navigation?
- Selecting navigation
- Last destinations list
- The New or New Destination Menu (depending on device)
- Navigation settings
- Traffic announcements using TMC (depending on the model)
- The map display
- Calling up the map display
- Structure of the map display
- Using the map display
- Map display options
- Point of interest on the route
- TMC on the route (depending on the model)
- Cancel route guidance
- Changing route options
- Block route
- Switching the map mode
- Changing the map orientation
- Route calculator (depending on the model)
- Setting day/night display
- Selecting/setting the vehicle profile
- Entering a destination
- Enter/delete waypoint
- Displaying the entire route
- Displaying the destination list
- Skipping destination
- Displaying current position
- Saving a position
- Calling up the telephone (depending on the model)
- Switching off the display
- Defining fast access buttons
- TELEPHONE MODE
- Extras
- Settings
- Specialist words
- Keywords
- MODEL OVERVIEW AND TECHNICAL SPECIFICATIONS
- NOTICE

94
>>> NAVIGATION MODE
> D
> GB
> F
> I
> E
> PL
> CZ
> H
> RU
> Select
Block for current route to block
the section of the route for the current
route guidance session only.
> Select
Block permanently to block the
section of the route for future route
guidance sessions too.
You can now set whether or not the road
should be blocked for each day of the
week.
> Press the buttons with the days on
which the road should not be blocked
(the clock symbol under the day disap-
pears).
> Confirm your settings by pressing the
OK button.
or
> Press the button under one of the
days and set up to two times when the
road should be blocked.
> Using the buttons set the first peri-
od when the road is to be blocked on
this day.
> Using the buttons set the second pe-
riod when the road is to be blocked on
this day if necessary.
> Confirm your settings by pressing the
OK button.
Note:
If the route section is more than 10 kilo-
metres long, you can choose, in another
menu, whether to block the entire section
or just part of it.
1 1 1 1
2 2 2 2
1
2
Note:
Press the
Block 24 h button to set a block
for an entire day.
Press the
Use setting for... button to also
use the block on other days.
Note:
The list of roads that you have perma-
nently blocked can be edited as described
under “The Blocked roads button” on
page 72.