
Operating instructions
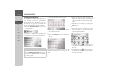
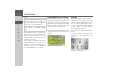

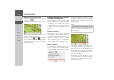

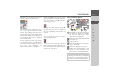
Table Of Contents
- Index
- Safety information
- The Navigation device
- OVERVIEW OF SCOPE OF SUPPLY
- OVERVIEW OF NAVIGATION DEVICE
- General operation
- Maintenance and care
- Battery quality declaration
- Display quality declaration
- Start-up
- Power supply
- TMC antenna (depending on the model)
- GPS-antenna
- Cable for vehicle integration (depending on the model, optional)
- Memory card
- Unit bracket
- Switching the Navigation device on/off
- Basic information about the touch screen
- Basic information about the menus
- Radio remote control
- Content Manager
- Transferring music tracks, pictures and videos
- Faults
- Navigation mode
- What is navigation?
- Selecting navigation
- Last destinations list
- The New or New Destination Menu (depending on device)
- Navigation settings
- Traffic announcements using TMC (depending on the model)
- The map display
- Calling up the map display
- Structure of the map display
- Using the map display
- Map display options
- Point of interest on the route
- TMC on the route (depending on the model)
- Cancel route guidance
- Changing route options
- Block route
- Switching the map mode
- Changing the map orientation
- Route calculator (depending on the model)
- Setting day/night display
- Selecting/setting the vehicle profile
- Entering a destination
- Enter/delete waypoint
- Displaying the entire route
- Displaying the destination list
- Skipping destination
- Displaying current position
- Saving a position
- Calling up the telephone (depending on the model)
- Switching off the display
- Defining fast access buttons
- TELEPHONE MODE
- Extras
- Settings
- Specialist words
- Keywords
- MODEL OVERVIEW AND TECHNICAL SPECIFICATIONS
- NOTICE

71
NAVIGATION MODE >>>
> D
> GB
> F
> I
> E
> PL
> CZ
> H
> RU
The Format button
In the Format settings window you can
set the measurement units to be used for
times and distances.
> Press
Format in the settings menu.
The Format settings window appears.
Press the field next to
Time to switch be-
tween the 12 hour clock and the 24 hour
clock.
Press the field next to
Distance to switch
between kilometres and miles.
> Confirm your settings by pressing the
OK button.
The Time button
You can select the time zone relevant for
your location in the Time settings win-
dow. This setting is important for the cor-
rect calculation of the estimated time of
arrival.
> Press
Time in the settings menu.
The Time settings window appears.
Using the button next to
Time zone you
can set whether the time zone should be
set automatically by Navigation device or
not (automatic mode on automatic
mode off ).
If the automatic function is switched off,
you can select the desired time zone by
pressing the button below
Time zone.
Pressing the button below
Daylight
saving time
allows you to select whether
daylight saving time should be set auto-
matically by Navigation device or whether
you switch daylight saving time on and off
yourself.