
Operating instructions
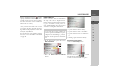
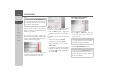
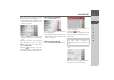
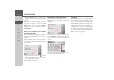
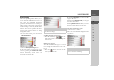

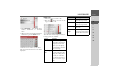
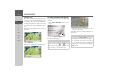
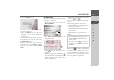
Table Of Contents
- Index
- Safety information
- The Navigation device
- OVERVIEW OF SCOPE OF SUPPLY
- OVERVIEW OF NAVIGATION DEVICE
- General operation
- Maintenance and care
- Battery quality declaration
- Display quality declaration
- Start-up
- Power supply
- TMC antenna (depending on the model)
- GPS-antenna
- Cable for vehicle integration (depending on the model, optional)
- Memory card
- Unit bracket
- Switching the Navigation device on/off
- Basic information about the touch screen
- Basic information about the menus
- Radio remote control
- Content Manager
- Transferring music tracks, pictures and videos
- Faults
- Navigation mode
- What is navigation?
- Selecting navigation
- Last destinations list
- The New or New Destination Menu (depending on device)
- Navigation settings
- Traffic announcements using TMC (depending on the model)
- The map display
- Calling up the map display
- Structure of the map display
- Using the map display
- Map display options
- Point of interest on the route
- TMC on the route (depending on the model)
- Cancel route guidance
- Changing route options
- Block route
- Switching the map mode
- Changing the map orientation
- Route calculator (depending on the model)
- Setting day/night display
- Selecting/setting the vehicle profile
- Entering a destination
- Enter/delete waypoint
- Displaying the entire route
- Displaying the destination list
- Skipping destination
- Displaying current position
- Saving a position
- Calling up the telephone (depending on the model)
- Switching off the display
- Defining fast access buttons
- TELEPHONE MODE
- Extras
- Settings
- Specialist words
- Keywords
- MODEL OVERVIEW AND TECHNICAL SPECIFICATIONS
- NOTICE

59
NAVIGATION MODE >>>
> D
> GB
> F
> I
> E
> PL
> CZ
> H
> RU
> Press the
Details button.
Where available, the address of your cho-
sen point is displayed.
> Press the
Start button to begin route
guidance to your chosen destination
straight away.
You can also search for points of interest
in the vicinity of your chosen point using
the
POI nearby button.
However, you can also store your chosen
point in fast access mode (
Save) or display
the route to the point of interest (
Show
route
).
Coordinate entry
You can also enter your destination using
geographic coordinates.
> In the main menu, press the button
New destination.
> Press
Enter geo-coordinates in the
navigation menu.
> Using select the value you wish to
change.
> Using the two buttons indicated by
select the direction required for the geo-
graphic longitude and latitude (east/
west or north/south).
> Then enter the desired values using the
buttons to .
You can enter coordinates in three differ-
ent ways.
The following formats can be used:
• Degrees Minutes Seconds.Decimal sec-
onds e.g. 42°52’46.801“
• Degrees Minutes.Decimal minutes e.g.
48° 53.56667'
• Decimal degrees e.g. 48.89277778
> Press the button.
Where possible, an address matching the
coordinates will be displayed. You can
view the destination on the map, store it,
display the route to the destination or start
the route guidance straight away.
1
2
3
2
1
Notes:
• The coordinates entered must corre-
spond to WGS84 (World Geodetic
System 1984).
• If you press button your current ge-
ographic position will be entered into
the fields.
3