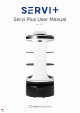
Servi Plus User Manual ver 1.0.
About This Manual This document describes how to use and maintain Servi Plus. Please read this manual before starting to use the product for proper use. y The content of this manual is based on the default settings and screens. y The content of this manual as well as the exterior and specifications of the product are subject to change for improvement without prior notice. Target Audience This manual is designed for Servi Plus users.
Standards Approvals (only USA) This device complies with part 15 of the FCC Rules. Operation is subject to the condition that this device does not cause harmful interference (1) this device may not cause harmful interference, and (2) this device must accept any interference received, including interference that may cause undesired operation. Any changes or modifications not expressly approved by the party responsible for compliance could void the user’s authority to operate the equipment.
Content About This Manual 2 Target Audience 2 Conventions 2 Copyrights 2 Standards Approvals (only USA) 3 Safety Precautions 5 Robot Components 8 Components 8 Part Names 9 Servi Plus User Manual How to Use 10 Check before use 10 Coverage - Space and Recognition 10 Turning On/Off 11 Charging the Robot 11 E-stop 12 Using Trays 13 About Lights 13 Using Servi Plus 16 Using Robot Workflow 20 Status Messages 27 Robot Settings 28 General 28 About 29 Wi-Fi 29 Localiz
Safety Precautions These instructions are provided to help ensure user safety and prevent any damage or loss of property. To ensure proper use, please read the instructions below. Warning Warning A warning indicates a possible risk that may lead to a death or severe injury. Power Supply y Take measures to prevent the risk of electric shock or fire. – Be careful not to damage the power cord. It may cause a fire or electric shock.
Safety Precautions Charging/Battery y y y y Charge the robot using the charging adapter provided as components. Failing to do so may result in damage to the robot or its battery. Unplug the charging adapter when not using for an extended period of time. After removing the charging adapter from the robot, be sure to close the charging cover. Leaving it open may allow foreign objects to enter. Otherwise, a failure or a fire can occur. Do not charge the robot in areas where water is present.
Safety Precautions y y y y y y Take care when placing hot dishes or objects on the robot tray to avoid burns. Be careful not to get your foot or small objects caught in the robot's bottom drive unit while it is moving or rotating. Do not turn off the robot's volume completely. If you do not hear the sound of its movement or guidance, it can cause a risk of collision. Do not scratch or press the touch screen with sharp objects. Be careful not so that conductive materials do not touch the touch screen.
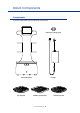
Robot Components Components The robot is delivered with the following components.
Robot Components Part Names Below are the part names and locations.
How to Use Check before use Below are the recommended environmental conditions for the robot operation. y The optimal operating temperature range for the robot is 50 – 95 ˚F (10 – 35 ˚C), and the optimal humidity range is 10 – 80%. y Use the robot in an indoor space with no moisture and good ventilation. y Use the robot on a flat floor without vibrations or risk of shocks. y Clear the path of the robot's movement.
How to Use Turning On/Off You can find the power button of the robot at the bottom right of its body. 1. Open the charging cover and press the black power button on the left to turn on the robot. y The boot screen displayed on the touch screen, and the pillar light and base LEDs will light up. 2. To turn off the robot, press and hold the power button for 5 seconds. Charging the Robot The below instructions describe how to charge the robot battery.
How to Use How to Charge 1. Open the charging cover at the bottom of the robot main body. 2. Insert the charging adapter into the charging terminal of the robot, and plug the power plug into the outlet. Connect the charger and turn it to the right. If it clicks then it starts charging. ※ Servi and Servi Plus can share the same charger. E-stop In case an object or person suddenly appears in front of the robot, please press the E-stop button. y Activating the E-stop will cause the wheels to lock.
How to Use Using Trays Four trays are provided with the robot by default, but the number and location of trays can be changed. You can ask our installation engineer to change the number of trays. Note Please do not change the tray location arbitrarily. It can cause a malfunction. About Lights 3-Sided Custom Display Located nearby the upper-most tray, the 3-Sided Custom Display displays guidance messages.
How to Use Food light Each tray has lighting installed to help users easily recognize their servings. The tray lighting turns on when food is loaded. Pillar light It helps to identify the tray with the ordered food. Upon the robot's arrival at the table, the lighting on both sides of the tray containing the customer's ordered food will turn on.
How to Use Base LED It is located at the bottom of the robot, and the color of the base LED changes per the robot's operational status.
How to Use Using Servi Plus Preparing for Use To use the robot, you must have registered the robot and completed the mapping process by following the touch screen instructions. Bear Robotics offers a cloud-based service that includes robot monitoring, robot workflow, robot guide and troubleshooting measures anytime, anywhere. In order to install the robot, you will need to sign up for the Universe, the Servi management system. Please contact Bear Robotics, for the sign-up process. https://universe.
How to Use ○ Step 3. Finish Mapping Wrap up the mapping on the touch screen, select the Maps tab in Universe, and press Refresh (F5). You can see the map image and destination taken from the robot. Specify tables, chairs, and restricted spaces in the tool box to further define the range. Maps ○ Step 4. Go to Settings Press and hold the robot name (2 – 3 seconds) on the left top of the touch screen and go to the Settings screen.
How to Use Tray Selection Settings Go to Settings > Advanced. You can enable or disable tray selection depending on the serving conditions or to your preferences. y Tray Selection – OFF: This is the default value. The robot delivers to the destination without separate tray selection. The destination names are displayed in order. – ON: You can enable different trays for different destinations.
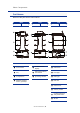
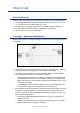
How to Use Robot Workflow Settings Servi Plus helps delivery and bussing in various modes. You can set it up for different modes including serving, bussing, etc. On the initial screen, the tray selection is off. To change the behavior, follow the instructions below. ○ Robot Workflow Default Screen Go to Settings > Robot Workflow. The image below shows the Robot Workflow screen with default settings. y y y y y Type – Serving: It is a default value item.
How to Use y Station At y It is displayed when the user select the bussing type and then a station in service mode. You can specify Return To. Return To y To change Return To to the other position, press Change and select a saved destination. Empty Tray y If it is turned ON, the robot starts the next delivery when the tray is unloaded. Full Tray y The bussing type is changed from Empty Tray to Full Tray. Timer y The timer defines how long the robot stays at a destination.
How to Use ○ Tray Selection ON The screen shows the default Robot Workflow screen with the Tray Selection ON. Enter the destination and press the GO button. The serving order is automatically assigned from top to bottom, but you can designate a serving destination by selecting the desired tray. If you entered a wrong destination to the tray, press the tray again to enter the correct the destination.
How to Use Bussing This is the Robot Workflow screen with default bussing mode. ○ Service Mode > Station The robot will move to a pre-defined station whenever it completes bussing. ○ Thank you Message You can turn Thank you Message ON/OFF. The voice prompt occurs irrespective of this setting (whether ON or OFF), when the robot detects weight on the tray. (Voice prompt: Thank you.) ○ Station At This feature designates specific points to be used as stations.
How to Use Setting Routes Setting Routes will enable Patrol in the Robot Workflow service mode. ○ Setting 1. Press and hold the upper left corner of the screen for 2 – 3 seconds. y Go to the Settings screen. 2. Press GENERAL at the top left of the screen. 3. Press Create Routes to go to the route creation screen. Create a route by following the on-screen instructions. 4. After creating the route, return to the previous screen and set Routes to ON.
How to Use ○ Creating 1. Press the destinations to enter the route in order. y If you find any wrong destination, you can delete it by pressing right next to the destination name. 2. After entering all destinations, press SAVE. 3. After entering the route name, press SAVE. y The Home screen appears and the created route will be displayed at the left top.
How to Use ○ Editing You can change the route name. 1. On the Creating Routes screen, press at the bottom left. 2. Press the route you wish to rename and press EDIT. 3. Enter the route name and press SAVE.
How to Use ○ Deleting You can delete routes. 1. On the Creating Routes screen, press at the bottom left. 2. Press the route you wish to delete and press DELETE. y A confirmation message appears. 3. Select the right check box 4. Press the left to proceed. to cancel the deletion.
How to Use Status Messages A status message appears on the screen when the robot cannot perform a mission due to an obstacle in the path or when a position error occurs. In that case, the base LED at the bottom of the robot main body turns red, orange, and yellow. Status Message Required Actions Screen I’m stuck. y Relocate the robot to the location from where it starts serving. y Remove any obstacles in the robot's path and manually push the robot to reposition it.
Robot Settings You can set the general functions and use environment of the robot. General y Home Display y Set how the Home screen should appear. – Table: Displays the table name. – Keypad: A number pad is displayed so that you can enter the name of the table. Language y You can change the display language. English, Japanese, and Korean are available. Pause on y Set Pause on during robot movement. – Single Tap: If you touch the screen once, the robot pauses.
Robot Settings About You can check the robot information such as the specifications of the software and hardware installed in the robot, the locations and maps set on the robot. y You can rename the robot by pressing Change right next to the robot’s name. Wi-Fi You can check the Wi-Fi connections enabled with the robot. Press the Wi-Fi you wish to use from the list, enter the password, and press JOIN.
Robot Settings Localization This feature is used to reset the destination location. When relocating the robot, make sure relocate it in the same destination and direction (as set by our installation engineer) to ensure the relocation accuracy. For quick reposition, long-press the destination on the home screen and the robot will relocate. Zero Weight If foreign objects or small dishes are left on the tray, the robot recognizes them does not move to the next destination.
Robot Settings Manual Drive You can manually operate the robot by using the arrows displayed on the screen, and/or pushing and moving the robot with your hands. Also, when the robot's wheels are locked, you can use manual drive to move the robot to the desired location. Caution When pushing the robot with your hands, be careful not to touch the tray part, as the weight sensor may fail in so doing. Sound Contextual voice prompts are defined.
Robot Settings Robot Workflow For detail information on Robot Workflow, refer to Page 19. Advanced y Robot Mode y You can set the robot's serving mode. Mapping is used by administrators when mapping is required. By default, it is set to Navigation when using the robot after setting is complete. Deliver Speed You can adjust the robot's movement speed. Adjust the drive speed considering the environment conditions such as floor conditions.
Robot Settings y Return Speed y Adjust return speed after serving. Tray Selection y A robot image is displayed on the Home screen depending on the tray selection. If you wish to manually select the tray, set it to ON, or OFF otherwise. Multi-Robot y If you are using 2 or more robots, press View to view detailed settings of the multi-robot. Wheel Unlock y It is used when you wish to move the robot by pushing it with your hands.
Managing Robots Installation ○ Silicone Pad 1. For the top tray pads, insert the display part first, and then align them by inserting them on both sides. (Refer to Figure 1) 2. When assembling the center tray pad, make sure that the pads do not play to touch the inner surface of the robot structure. y If the tray pad is not installed properly, it may affect the weight sensor mounted at the edge of the tray and cause robot malfunction. (Refer to Figure 2) 3.
Managing Robots ○ Sensors Fingerprints or foreign substances on the sensor should be removed using a microfiber cloth and glass cleaner. Foreign matters on the surface may cause malfunction of the product. Wipe it again with a dry microfiber cloth at the end to make sure you don’t leave any smudges behind, then shine your phone’s flash sideways to see if any spots remain. ○ Wheels Caution Make sure to turn off the robot before cleaning the wheels.
Managing Robots 2. If the wheel cover is separated from the robot main body, open the cover as shown in the figure below. 3. After cleaning, put the wheel cover back on and turn it to the right as shown in the image in 1 above. The center line should run parallel the edges of the robot main body. Transportation/Storage The below instructions describes how to properly transport and store the robot.
Product Specifications Robot Specification Item Dimensions 21.1 x 23.2 x 48.4 in (535 x 590 x 1230 mm) Screen size 10.4 in Weight 136.7 lbs (62 kg) Tray dimensions 18.9 x 18.1 in (480 x 460 mm) Number of trays 4 (depends on optional purchase) Load capacity Sensors Drive speed Power voltage Battery type 22 lbs (10 kg) per tray, max. 88.1 lbs (40 kg) 2D LiDAR, 3D depth sensor, weight sensor, IMU Safe drive condition - up to 2.6 ft/s (0.8 m/s) (max. 3.9 ft/s (1.2 m/s)) 25.
Product Specifications Charger Item Specification Dimensions 8 x 4.1 x 1.8 in (202.7 x 104.0 x 45.4 mm) Power voltage AC input: AC 100 – 240 V Free volt, frequencies of 50 – 60 Hz DC output: Factory setting Vfloat 28.6 V, 8A Power consumption Up to 228.
Bear Robotics, Inc. Contacts & Customer Center y Korea Office 4th floor, Seoul Forest ITCT Knowledge Industry Center, 10, Seongsuil-ro, Seongdong-gu, Seoul Phone: 1833-8165 Email: sbrs@bearrobotics.atlassian.net y US Office 785 Broadway, Redwood City, CA 94063, United States of America Phone: 1-844-729-2327 E-mail: support@bearrobotics.