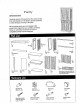
IMPORTANT . * Do aot tighten ug all the screws until each part is properly assembled. *¥u should keep Hex Wrench in a safe place as you may need ta tighten up the Head Cap Bolts in the future, * After assembly item must be levee to work properly. Use the included adjustable levelers o vale, Arm Lock Screw Gam Lock Screw STEP 1 Put Cam Lock Screws into the per-drilled holes of Top (A), (K) Side Panels (D), (F) Base (L) and tighten.
STEP 2 Almach Stretcher (F), (G) and Back Stretcher (H) to Side Panel (B) using Cam Locks. Attach Back Stretcher (1) to Back Stretcher (H). Slide Back Panels (J} into place. Attach Back Stretcher (H} to unit using Cam Lock. Attach Side Panel (C) to unit using Cam Locks. STEP 3 Attach unit from Step 2 to Base (L) using Cam Locks.
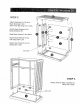
STEP 4 Attach Door (P) and (Q) to unit by sliding the door lift hinges into the Side Panel lift hinges. (see Figure 1) Attach Top (K) to unit using Cam Locks {Figure 1} Cam Lock STEP 5 Almach Stretcher (G) and Back Stretcher (H) to Side Panel (D) using Cam Locks. Attach Back Stretcher () to Back Stretcher (H). Slide Back Panels (J) into place. Attach Back Stretcher (H) to unit using Cam Lock. Attach Side Panel (E) to unit using Cam Locks.
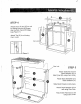
STEP 6 Attach unit from Step 5 to Top (K) using Cam Locks Attach Door (N} and (O) {o unit by sliding the door lift hinges into the Side Panel lift hinges. Place Top (A) onto unit using Cam Locks. (Figure 2) {Figure 3) Adjustable Pin Wood Screw (hart) {Figure 4) STEP 7 Attach the Door Pull Handle to " Doors (N), (0), (P) and (Q) using Machine Screws. (see Figure 2) Insert the Adjustable Pins into both Side Panels at the desired level. Place Shelves (M) and Drawer (R) into position.
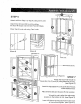
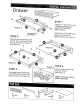
Attach R1 to R3 and R4, using a Phillips screwdriver ang long wood screws (4X), tighten halfway, Attach R2 to R3 and R4 using long wood screws (4X), tighten halfway. (see Figure 1) MAKE SURE ROLLER 15 ON THE BACK STEP 2 Slide R5 into the grooves in R3 and R4. Be sure to push R5 all the way forward to it meets R1. (see Figure 2) (Figure 3) STEP 4 Attach hardware pulls with machine screws, {see Figure 4) STEP 3 Insert short wood screws (6X) into the per-drilled holes in R5, tighten screws.
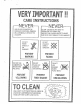
CARE INSTRUCTIONS NEVER -NEVER— USE GALES CLEANERS ON ALLOW LIQUIDS QF ANY KIND TO FINISHED FURNITURE. AMMONIA REMAIN ON THE FURNITURE. WILL CHEMICALLY ATTACK THE: ABSORPTION CAUSES WOOD TO WARP LACQUER. . AND SPLIT AND FINISHES TO LAMINATE. DO NOT o DO NOT WRITE 4o PLACE IN DIRECTLY DIRECT ON DS, SUNLIGHT, SURFACE. PREVENT | |PREVENT MARKING FADING CONTUSE DO NOT H DONOR COMMERCIAL W PLACE HOT USE WAXES AND OBJECTS RUBBER POLISHES. ON SURFACE. BASED : ’ PLACE MATS.