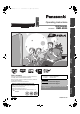
水曜日 午前11時44分 Operating Instructions DVD Recorder DMR-ES20 Convenient functions Transfer (Dubbing) Editing Playing back Model No. Getting started 2005年8月31日 Recording DMR-ES20-P10_1.fm 1 ページ Dear customer If you have any questions contact 1-800-211-PANA(7262) 1-800-561-5505 For U.S.A. only The warranty can be found on page 43. For Canada only Region number supported by this unit The warranty can be found on page 43.
DMR-ES20-P10_1.fm 2 ページ 2005年8月31日 水曜日 午前11時44分 Getting started CAUTION! THIS PRODUCT UTILIZES A LASER. USE OF CONTROLS OR ADJUSTMENTS OR PERFORMANCE OF PROCEDURES OTHER THAN THOSE SPECIFIED HEREIN MAY RESULT IN HAZARDOUS RADIATION EXPOSURE. DO NOT OPEN COVERS AND DO NOT REPAIR YOURSELF. REFER SERVICING TO QUALIFIED PERSONNEL. CAUTION! DO NOT INSTALL OR PLACE THIS UNIT IN A BOOKCASE, BUILT-IN CABINET OR IN ANOTHER CONFINED SPACE. ENSURE THE UNIT IS WELL VENTILATED.
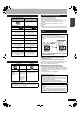
DMR-ES20-P10_1.fm 3 ページ 2005年8月31日 水曜日 午前11時44分 Table of contents Getting started Recording Recording television programs . . . . . . . . . . . . . . . . . . . .15 Selecting audio to be recorded. . . . . . . . . . . . . . . . . . . . . . . . 16 Playing while you are recording . . . . . . . . . . . . . . . . . . . . . . . 17 Flexible Recording . . . . . . . . . . . . . . . . . . . . . . . . . . . . . . . . . 17 Scheduled recording . . . . . . . . . . . . . . . . . . . . . . . . . . . .
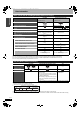
DMR-ES20-P10_1.fm 4 ページ 2005年8月31日 水曜日 午前11時44分 Disc information Getting started Discs you can use for recording and play [12 cm (5″) / 8 cm (3″)] Disc type DVD-RAM • 4.7 GB/9.4 GB, 12 cm (5″) • 2.8 GB, 8 cm (3″) (Chart continues on page 5.) DVD-R (DVD-Video format) • 4.7 GB, 12 cm (5″) • 1.4 GB, 8 cm (3″) Logo Indication in these instructions RAM Main use Before finalizing -R After finalizing DVD-V Re-writable discs One time recording discs (recordable until the disc is full) Approx.
DMR-ES20-P10_1.fm 5 ページ 2005年8月31日 水曜日 午前11時44分 • 2.6 and 5.2 GB DVD-RAM, 12 cm (5″) • 3.95 and 4.7 GB DVD-R for Authoring • DVD-R recorded in DVD Video Recording format • DVD-R (DVD-Video format), DVD-RW (DVD-Video format), +R +R • 4.7 GB, 12 cm (5″) recorded on another unit and not finalized (Ô page 36). –––– Before finalizing -RW(V) Before finalizing +R After finalizing DVD-V After finalizing DVD-V Re-writable discs One time recording discs (recordable until the disc is full) Approx.
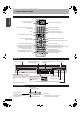
DMR-ES20-P10_1.fm 6 ページ 2005年8月31日 水曜日 午前11時44分 Control reference guide Getting started Remote control DVD POWER Turn the unit on (Ô page 10) Input select (IN1 or IN2) TV POWER VOLUME CH INPUT SELECT TV/VIDEO Channel select (Ô page 15) Select channels and title numbers, etc.
DMR-ES20-P10_1.fm 7 ページ 2005年8月31日 水曜日 午前11時44分 STEP 1 Connection in English only.) http://www.panasonic.com/consumer_electronics/dvd_recorder/dvd_connection.asp • Before doing any connection, turn off all equipment and read the appropriate operating instructions. • Peripheral equipment and optional cables are sold separately unless otherwise indicated.
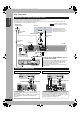
DMR-ES20-P10_1.fm 8 ページ 2005年8月31日 水曜日 午前11時44分 Getting started STEP 1 Connection Connection with a cable TV box/satellite receiver • You need to subscribe to a cable TV service to enjoy viewing their programming. • Consult your service provider regarding appropriate cable TV box. The connection will allow the video cassette recorder to be used for playback when this unit is turned off. For optimum operation, it is recommended that this unit be connected as shown below.
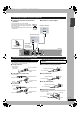
DMR-ES20-P10_1.fm 9 ページ 2005年8月31日 水曜日 午前11時44分 n To enjoy multi-channel surround sound on DVD-Video Getting started Connecting an amplifier or system component n Connection to a stereo amplifier Connect an amplifier with a built-in decoder displaying these logo marks using an optical digital audio cable and change the settings in Digital Audio Output (Ô page 33). • You cannot use DTS Digital Surround decoders not suited to DVD.
DMR-ES20-P10_1.fm 10 ページ 2005年8月31日 水曜日 午前11時44分 Getting started STEP 2 Plug-in Auto Tuning OPEN/CLOSE 1 Press [^ DVD POWER]. Select Language Seleccione el idioma REC CH IN2 POWER 8 English 2 CH 1 DVD POWER ^ DVD POWER Press ENTER Pulse ENTER Appuyer sur ENTER TV POWER INPUT SELECT TV/VIDEO CH VOLUME 2 Numbered buttons 1 2 CH • If you mistakenly select the wrong language, press and hold AUDIO [1 CH] and [2 CH] on the main unit at the same time for more than 5 seconds.
2005年8月31日 水曜日 午前11時44分 n If the clock is an hour slower or faster than the actual time Select “–1” or “+1” in “Adjust Time Zone” in the SETUP menu (Ô page 34). n If the unit couldn’t set the clock automatically Adding and deleting channels Add or delete channels if necessary channels are not set or unnecessary channels are set. 1 Set the time manually (Ô page 34, Set Clock Manually). n To start Plug-in Auto Tuning again (after relocation, for example) Antenna Mode (Airwaves) e.g.
DMR-ES20-P10_1.fm 12 ページ 2005年8月31日 水曜日 午前11時44分 Getting started STEP 3 Channel settings 1 Press [SETUP]. SETUP DVD POWER TV POWER INPUT SELECT TV/VIDEO CH Channel Setup Disc Video Audio Display TV Screen VOLUME AUDIO CANCEL SKIP SLOW/SEARCH DIRECT NAVIGATOR Set Channels Automatically Channel Captions Preset Channel Captions Manual Channel Captions VCR Plus+ Ch. Setting 2 Press [e, r] to select “Channel” and press [q]. 3 Press [e, r] to select “VCR Plus+ Ch.
DMR-ES20-P10_1.fm 13 ページ 2005年8月31日 水曜日 午前11時44分 Channel captions 1 Press [SETUP]. SETUP Channel Setup Disc Video Audio Display TV Screen 2 Signal Source (RF IN) Cable TV Set Channels Automatically Channel Captions Preset Channel Captions Manual Channel Captions VCR Plus+ Ch. Setting Press [e, r] to select “Channel” and press [q]. Preset Channel Captions 3 Manual Channel Captions Press [e, r] to select “Preset Channel Captions” and press [ENTER].
DMR-ES20-P10_1.fm 14 ページ 2005年8月31日 水曜日 午前11時44分 STEP 4 Set up to match your television and remote control Getting started Television operation DVD POWER TV POWER CH INPUT SELECT TV/VIDEO VOLUME TV operation buttons You can configure the remote control TV operation buttons to turn the television on/off, change the television input mode, select the television channel and change the television volume.
DMR-ES20-P10_1.fm 15 ページ 2005年8月31日 水曜日 午前11時44分 Recording television programs 1 1 Press [; OPEN/CLOSE] to open the tray and insert a disc. • Press the button again to close the tray. Insert label-up. OPEN/CLOSE REC CH 2 DVD POWER g q 4 Insert with the arrow facing in. Insert fully so it clicks into place. TV POWER INPUT SELECT TV/VIDEO CH VOLUME 2 Press [1 2 CH] to select the channel.
DMR-ES20-P10_1.fm 16 ページ 2005年8月31日 水曜日 午前11時44分 Recording television programs Refer to the control reference on page 15. When the format confirmation screen is displayed Recording modes and approximate recording times Depending on the content being recorded, the recording times may become shorter than indicated. (Unit: hour) DVD-RAM Single-sided (4.7 GB) Double-sided (9.4 GB) DVD-R DVD-RW +R (4.
DMR-ES20-P10_1.fm 17 ページ 2005年8月31日 水曜日 午前11時44分 Playing while you are recording Flexible Recording (Recording that fits the remaining disc space) Note You cannot use the following play operations for about 10 or so seconds after starting recording. Playing from the beginning of the title you are recording—Chasing playback RAM Press [q] (PLAY) during recording. RAM -R -RW(V) +R The unit sets the best possible picture quality that fits the recording within the remaining disc space.
DMR-ES20-P10_1.fm 18 ページ 2005年8月31日 水曜日 午前11時44分 Scheduled recording 3 DVD POWER ^ DVD POWER Press [ENTER].
2005年8月31日 水曜日 午前11時44分 You can enter up to 16 programs up to a month in advance. (Each daily or weekly program is counted as one program.) • When connecting a cable TV box or satellite receiver, select the channel on the cable TV box or satellite receiver before the scheduled recording starts. Manually programming scheduled recordings RAM 1 -R -RW(V) Press [SCHEDULE].
DMR-ES20-P10_1.fm 20 ページ 2005年8月31日 水曜日 午前11時44分 Playing discs n Selecting recorded programs (titles) to play 1 RAM -R -RW(V) +R -RW(VR) 1 Press [DIRECT NAVIGATOR]. OPEN/CLOSE g DVD POWER CH AUDIO VCR Plus+ CM SKIP CANCEL SKIP SLOW/SEARCH DIRECT NAVIGATOR AUDIO CM SKIP t, y -- -- Page 02/02 S SUB MENU Select Previous Next Next 2 Press [e, r, w, q] to select the title and press [ENTER]. You can also select titles with the numbered buttons. e.g.
DMR-ES20-P10_1.fm 21 ページ 2005年8月31日 水曜日 午前11時44分 Operations during play Press [g]. The stopped position is memorized. (Excluding when playing from the Direct Navigator and when playing a playlist.) Resume play function Press [q] (PLAY) to restart from this position. • Depending on the disc, resume play function may not be effective. VCD Stop Stopped position • If [g] is pressed several times, the position is cleared. • The position is cleared if the unit is turned off or the tray is opened.
DMR-ES20-P10_1.fm 22 ページ 2005年8月31日 水曜日 午前11時44分 Using menus to play MP3 and still pictures (JPEG) Playing MP3 Numbered buttons CD This unit plays MP3 files recorded Playback mode is set to MP3. on CD-R/RW designed for audio If you want to play picture (JPEG), select JPEG Menu from Menu in FUNCTIONS. recording that are finalized (Ô page 36) on a computer. The screen shown at right is displayed ENTER when you insert a disc containing MP3 files and still pictures (JPEG).
DMR-ES20-P10_1.fm 23 ページ 1 2005年8月31日 水曜日 午前11時44分 To display still pictures one by one Press [TOP MENU]. JPEG Menu CD(JPEG) After Step1 (Ôpage 22, Playing still pictures (JPEG)) 2 Picture(JPEG) View Folder image006 001 002 003 004 005 006 007 008 009 --- --- --- Page 01/01 Previous Press [e, r, w, q] to select “Folder” and press [SUB MENU].
DMR-ES20-P10_1.fm 24 ページ 2005年8月31日 水曜日 午前11時44分 Using on-screen menus Disc menu–Setting disc content Soundtrack DVD POWER TV POWER RAM CH INPUT SELECT TV/VIDEO -R -RW(V) +R -RW(VR) The disc’s audio attributes appear. VOLUME DVD-V Select the audio and language (Ô below, Audio attribute, Language).
DMR-ES20-P10_1.fm 25 ページ 2005年8月31日 水曜日 午前11時44分 FUNCTIONS window and Status messages Video menu–Change picture quality FUNCTIONS window RAM -R -RW(V) +R DVD-V -RW(VR) To select the picture mode • Normal: Default setting • Cinema: Mellows movies MPEG-DNR RAM -R -RW(V) By using the FUNCTIONS window you may access the main functions quickly and easily. 1 +R DVD-V Press [FUNCTIONS]. -RW(VR) FUNCTIONS Reduces noise and picture degradation.
DMR-ES20-P10_1.fm 26 ページ 2005年8月31日 水曜日 午前11時44分 Editing titles/chapters DVD POWER Editing titles/chapters and playing chapters TV POWER INPUT SELECT TV/VIDEO Preparation Release protection (Ô page 30). VOLUME CH 1 2 AUDIO SKIP u, i During play or while stopped Press [DIRECT NAVIGATOR]. Press [e, r, w, q] to select the title.
DMR-ES20-P10_1.fm 27 ページ 2005年8月31日 水曜日 午前11時44分 Title operations Erase Title RAM -R -RW(V) +R Press [w, q] to select “Erase” and press [ENTER]. • Once erased, the recorded contents are lost and cannot be restored. Make certain before proceeding. • The available recording space on DVD-R or +R does not increase when you erase titles. • Available recording space on a DVD-RW (DVD-Video format) increases only when the last recorded title is erased. It does not increase if other titles are erased.
DMR-ES20-P10_1.fm 28 ページ 2005年8月31日 水曜日 午前11時44分 Playing playlists View Chapters After Step4 (Ôleft, Playing playlists) 5 AUDIO VCR Plus+ CM SKIP CANCEL SKIP SLOW/SEARCH Press [SUB MENU], then [e, r] to select “View Chapters” and press [ENTER]. Properties View Chapters DIRECT NAVIGATOR FUNCTIONS FUNCTIONS TOP MENU e, r, w, q ENTER RETURN SUB MENU SUB MENU RETURN 6 Press [e, r, w, q] to select the chapter and press [ENTER].
DMR-ES20-P10_1.fm 29 ページ 2005年8月31日 水曜日 午前11時44分 Recording from a video cassette recorder INPUT SELECT TV/VIDEO INPUT SELECT CH 2 VOLUME Press [REC MODE] to select the recording mode. Start play on the other equipment. Press [* REC]. 3 4 Recording starts. AUDIO VCR Plus+ CM SKIP CANCEL SKIP To skip unwanted parts Press [h] to pause recording. (Press again to restart recording.) SLOW/SEARCH g To stop recording Press [g].
DMR-ES20-P10_1.fm 30 ページ 2005年8月31日 水曜日 午前11時44分 Disc management Erasing all titles–Erase All Titles VCR Plus+ CM SKIP CANCEL CANCEL SKIP RAM SLOW/SEARCH g Preparation • Release protection (Ô left). steps 1-3 (Ô left) h DIRECT NAVIGATOR FUNCTIONS FUNCTIONS 4 Press [e, r] to select “Erase All Titles” and press [ENTER].
DMR-ES20-P10_1.fm 31 ページ 2005年8月31日 水曜日 午前11時44分 Entering text -R -RW(V) RAM +R steps 1-3 (Ô page 30) 4 5 6 7 Press [e, r] to select “Playback will start with:” and press [ENTER]. Press [e, r] to select “Top Menu” or “First Title” and press [ENTER]. You can select whether to show the top menu after finalizing. Top Menu: The top menu appears first. First Title: The disc content is played without displaying the top menu.
DMR-ES20-P10_1.fm 32 ページ 2005年8月31日 水曜日 午前11時44分 Changing the unit’s settings Summary of settings See page 34 for details on menu operation. The settings remain intact even if you switch the unit to standby. Tabs Menus Channel Setup Options (Underlined items are the factory presets.) Signal Source (RF IN) (Ô page 11) • Antenna Set Channels Automatically (Ô page 11) – Preset Channel Captions (Ô page 13) – Manual Channel Captions (Ô page 13) – VCR Plus+ Ch.
DMR-ES20-P10_1.fm 33 ページ 2005年8月31日 Tabs 水曜日 午前11時44分 Menus Options (Underlined items are the factory presets.) Black Level Control Video Select normal, lighter or darker for adjusting the black level control to the desired setting for picture enhancement. • Lighter • Darker Continued Input Level Adjusts the black level of the input signal. Audio Output Level (Composite/SVideo) Adjusts the black level of the output signal from the VIDEO OUT and S VIDEO OUT terminal.
DMR-ES20-P10_1.fm 34 ページ 2005年8月31日 水曜日 午前11時44分 Changing the unit’s settings Set Clock Automatically SETUP Numbered buttons Auto Clock Setting is complete. Channel Setup Disc Video Audio AUDIO VCR Plus+ CM SKIP CANCEL SKIP SLOW/SEARCH 4/4/2002 12:15 AM DST............. On Time Zone.... CST • If the time was not set correctly, use manual clock setting or time zone adjust. DIRECT NAVIGATOR • DST, Daylight Saving Time, shows the summertime setting.
DMR-ES20-P10_1.fm 35 ページ 2005年8月31日 水曜日 午前11時44分 Specifications Optical pick-up: DVD Video Recording format (DVD-RAM), DVD-Video format (DVD-R), DVD-Video format (DVD-RW) System with 1 lens (662 nm wavelength for DVDs, 780 nm wavelength for CDs) Recordable discs: DVD-RAM : Ver. 2.0 Ver. 2.1/3×–SPEED DVD-RAM Revision 1.0 Ver. 2.2/5×–SPEED DVD-RAM Revision 2.0 DVD-R : for General Ver. 2.0 for General Ver. 2.0/4×–SPEED DVD-R Revision 1.0 for General Ver. 2.x/8×–SPEED DVD-R Revision 3.0 DVD-RW : Ver. 1.
DMR-ES20-P10_1.fm 36 ページ 2005年8月31日 水曜日 午前11時44分 Glossary Bitstream This is the digital form of multi-channel audio data (e.g., 5.1 channel) before it is decoded into its various channels. CPRM (Content Protection for Recordable Media) CPRM is technology used to protect broadcasts that are allowed to be recorded only once. Such broadcasts can be recorded only with CPRM compatible recorders and discs. Dolby Digital This is a method of coding digital signals developed by Dolby Laboratories.
DMR-ES20-P10_1.fm 37 ページ 2005年8月31日 水曜日 午前11時44分 Frequently asked questions Set up Page Do the Audio/Video cables need to be connected to the TV in order to see the Menus? • If your television does not have AUDIO/VIDEO terminals, an RF modulator is necessary. Consult your local dealer for more information. What equipment is necessary to play multi channel surround sound? • DVD-Video: Are the headphones and speakers directly connected to the unit? • You cannot directly connect to the unit.
DMR-ES20-P10_1.fm 38 ページ 2005年8月31日 水曜日 午前11時44分 Error messages On the television Cannot finish recording completely. Page • The program was copy-protected. • The disc may be full. • There are already 99 recorded titles ( +R 49 recorded titles). — — — Cannot play. • You inserted an incompatible disc (Discs recorded in PAL video, etc.). — Cannot record on the disc. • The disc may be dirty or scratched. 42 Unable to format. Please check the disc. Cannot record. Disc is full.
DMR-ES20-P10_1.fm 39 ページ 2005年8月31日 水曜日 午前11時44分 Troubleshooting guide Before requesting service, make the following checks. If you are in doubt about some of the check points, or if the remedies indicated in the chart do not solve the problem, refer to the “Customer Services Directory” on page 43 if you reside in the U.S.A., or refer to the “Product information” on page 42 if you reside in Canada. The following do not indicate a problem with this unit: • Regular disc rotating sounds.
DMR-ES20-P10_1.fm 40 ページ 2005年8月31日 水曜日 午前11時44分 Troubleshooting guide Displays Page The display is dim. • Change “Front Display” in the SETUP menu. 33 “12: 00A” is flashing on the unit's display. • Set the clock. 34 Compared to the actual recorded time, less remaining time is displayed. • The displayed recording/play time is converted from the number of frames at 29.97 frames — The time recorded on the disc and the available time shown do not add up.
DMR-ES20-P10_1.fm 41 ページ 2005年8月31日 水曜日 午前11時44分 Recording/Scheduled recording Cannot record. Page • You haven’t inserted a disc or the disc you inserted cannot be recorded on. Insert a disc the unit can record onto. • The disc is unformatted. Format the disc. RAM -RW(V) • The write-protect tab on the cartridge is set to PROTECT, or the disc is protected with DISC MANAGEMENT. • Some programs have limitations on the number of times they can be recorded. (CPRM) • The disc is full or nearly full.
DMR-ES20-P10_1.fm 42 ページ 2005年8月31日 水曜日 午前11時44分 Disc handling • Do not drop, stack, or impact discs. Do not place objects on them. • Do not use the following discs: n How to hold a disc Do not touch the recorded surface. n Concerning non-cartridge discs Be careful about scratches and dirt. n If there is dirt or condensation on the disc Wipe with a damp cloth and then wipe dry. n Handling precautions • Do not attach labels or stickers to discs.
DMR-ES20-P10_1.fm 43 ページ 2005年8月31日 水曜日 午前11時44分 Limited Warranty (ONLY FOR U.S.A.) Panasonic Consumer Electronics Company, Division of Panasonic Corporation of North America One Panasonic Way Secaucus, New Jersey 07094 Panasonic Puerto Rico, Inc. Ave. 65 de Infantería, Km. 9.
DMR-ES20-P10_1.fm 44 ページ 2005年8月31日 水曜日 午前11時44分 Instalación básica • Las conexiones del equipo descritas son ejemplos. • Antes de hacer la conexión, apague todos los equipos y lea los manuales de instrucciones apropiados. • El equipo periférico y los cables opcionales se venden por separado a menos que se indique lo contrario. Conexión con un televisor y videograbadora La conexión permitirá utilizar la videograbadora para reproducir cuando esté apagada esta unidad.
DMR-ES20-P10_1.fm 45 ページ 2005年8月31日 水曜日 午前11時44分 Ajuste de canales guía VCR Plus+ DVD POWER ^ DVD POWER Establezca estos canales guía para poder utilizar el sistema VCR Plus+ para hacer grabaciones programadas. Antes de iniciar los ajustes, prepare una gráfica que muestre los canales, nombres de emisoras y canales guía. Ej.
DMR-ES20-P10_1.fm 46 ページ 2005年8月31日 水曜日 午前11時44分 Grabación de programas de televisión n Para detener la grabación DVD POWER ^ DVD POWER Pulse [g]. TV POWER INPUT SELECT TV/VIDEO Desde el inicio al final de una grabación se denomina título. CH n Para hacer una pausa en la grabación VOLUME Pulse [h].
DMR-ES20-P10_1.fm 47 ページ 2005年8月31日 水曜日 午前11時44分 Reproducción de discos n Cuando aparece una pantalla de menúen el televisor DVD POWER DVD-V TV POWER CH INPUT SELECT TV/VIDEO Pulse [e, r, w, q] para seleccionar el elemento y pulse [ENTER]. Algunos elementos también se pueden seleccionar con los botones numerados. VOLUME VCD Pulse los botones numerados para seleccionar el elemento. Ej.
DMR-ES20-P10_1.fm 48 ページ 2005年8月31日 水曜日 午前11時44分 Index Angle. . . . . . . . . . . . . . . . . . . . . . . . . . . . .24 Audio attribute . . . . . . . . . . . . . . . . . . . . . . .24 language . . . . . . . . . . . . . . . . . . . . . .32 playback . . . . . . . . . . . . . . . . . . . . . . .20 Channel adding, deleting . . . . . . . . . . . . . . . . .11 audio . . . . . . . . . . . . . . . . . . . . . . . . .24 captions . . . . . . . . . . . . . . . . . . . . . . .13 Set Channels Automatically . . . . .