Digital Still Camera Instruction Manual GB DSC-T70/T75/T200 For details on advanced operations, please read “Cybershot Handbook” (PDF) and “Cyber-shot Step-up Guide” on the CD-ROM (supplied) using a computer. Operating Instructions Before operating the unit, please read this manual thoroughly, and retain it for future reference.
Owner’s Record The model and serial numbers are located on the bottom. Record the serial number in the space provided below. Refer to these numbers whenever you call upon your Sony dealer regarding this product. Model No. DSC-T70/T75/T200 Serial No. ___________________________ WARNING To reduce fire or shock hazard, do not expose the unit to rain or moisture. For Customers in the U.S.A.
[ Cleaning Unplug the set from the wall outlet before cleaning or polishing it. Do not use liquid cleaners or aerosol cleaners. Use a cloth lightly dampened with water for cleaning the exterior of the set. long periods of time, unplug it from the wall outlet and disconnect the antenna or cable system. This will prevent damage to the set due to lightning and power-line surges.
Read this first CAUTION Replace the battery with the specified type only. Otherwise, fire or injury may result. Do not expose the batteries to excessive heat such as sunshine, fire or the like. For Customers in the U.S.A. and Canada [ RECYCLING LITHIUM-ION BATTERIES Lithium-Ion batteries are recyclable. You can help preserve our environment by returning your used rechargeable batteries to the collection and recycling location nearest you.
[ CAUTION You are cautioned that any changes or modifications not expressly approved in this manual could void your authority to operate this equipment. [ Note: This equipment has been tested and found to comply with the limits for a Class B digital device, pursuant to Part 15 of the FCC Rules. These limits are designed to provide reasonable protection against harmful interference in a residential installation.
[ Notice for the customers in the countries applying EU Directives The manufacturer of this product is Sony Corporation, 1-7-1 Konan Minato-ku Tokyo, 1080075 Japan. The Authorized Representative for EMC and product safety is Sony Deutschland GmbH, Hedelfinger Strasse 61, 70327 Stuttgart, Germany. For any service or guarantee matters please refer to the addresses given in separate service or guarantee documents.
Table of contents IMPORTANT SAFEGUARDS .................................................................... 2 Read this first ............................................................................................ 4 Notes on using your camera .................................................................... 8 Getting started ................................................................................. 9 Checking the accessories supplied .........................................................
Notes on using your camera [ Internal memory and “Memory Stick Duo” back up Do not turn off the camera or remove the battery pack or “Memory Stick Duo” while the access lamp is lighted, as the internal memory data or “Memory Stick Duo” data may be destroyed. Always protect your data by making a back up copy. [ Notes on recording/playback • Before you start recording, make a trial recording to make sure that the camera is working correctly.
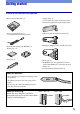
Getting started Checking the accessories supplied • Battery charger BC-CSD (1) • Adaptor plate (1) You can place the camera on the Cyber-shot Station (not supplied) using the adaptor plate.
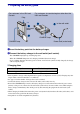
1 Preparing the battery pack For customers in the USA and Canada Plug For customers in countries/regions other than the USA and Canada to the wall outlet to the wall outlet CHARGE lamp CHARGE lamp Power cord (mains lead) 1 Insert the battery pack into the battery charger. 2 Connect the battery charger to the wall outlet (wall socket). The CHARGE lamp lights up, and charging starts. When the CHARGE lamp turns off, charging is finished (Practical charge).
2 Inserting the battery pack/a “Memory Stick Duo” (not supplied) Battery/ “Memory Stick Duo” cover Insert the “Memory Stick Duo” with the terminal side facing the lens. Open Close Battery eject lever Align the v mark of the battery slot with the v mark on the side of the battery pack. Press and hold the battery eject lever and insert the battery pack. 1 Open the battery/“Memory Stick Duo” cover. 2 Insert the “Memory Stick Duo” (not supplied) all the way in until it clicks. 3 Insert the battery pack.
[ To check the remaining battery charge Press POWER button to turn on and check the remaining battery on the LCD screen. Battery remaining indicator Battery remaining guidelines Sufficient power remaining Battery almost fully charged Battery half full Battery low, recording/ playback will stop soon. Change the battery with fully charged one, or charge the battery. (The warning indicator flashes.
3 Turning the camera on/setting the clock POWER button Lens Touch panel Lens cover 1 Press the POWER button or slide the lens cover downward. 2 Set the clock by touching the button on the touch panel. 1 Touch the desired date display format, then touch [t]. 2 Touch each item, then set its numeric value by touching v/V. 3 Touch [OK]. On the touch panel buttons Perform settings on this camera by lightly touching the buttons or icons on the screen with your finger.
[ To set the date and time again Touch [HOME], then touch (Settings) t [ Clock Settings] (pages 22, 23). [ When you turn on the power • Once the battery is inserted in the camera, it may take time before operation becomes possible. • If the camera is running on battery power and you do not operate the camera for about three minutes, the camera turns off automatically to prevent wearing down the battery pack (Auto power-off function).
Shooting images easily (Auto Adjustment mode) Zoom (W/T) lever Shutter button Microphone Self-timer lamp Flash DSC-T70/T75 Lens cover Microphone Tripod receptacle (bottom) 1 Open the lens cover. 2 Hold the camera steady, keeping your arm at your side. Position the subject in the center of the focus frame or touch the point for focusing. • is displayed if a face is detected in the touched position or other than a person’s face is detected. is displayed if an object 3 Shoot with the shutter button.
Image size/Self-timer/Shooting mode/Flash/Macro/Display A B C D E F Changing the image size Using the self-timer Changing the shooting mode Selecting a flash mode for still images Shooting close-up Changing the screen display [ Changing the image size Touch the image size setting icon on the screen. Touch the desired item, then [BACK]. Still image For prints up to A3 (11 × 17") Shoot in 3:2 aspect ratio For prints up to A4(8.
[ Changing the shooting mode Touch the shooting mode setting icon on the screen. Touch the desired item, then [BACK]. Auto Adjustment Allows you to shoot still images with the setting adjusted automatically. Scene Selection Allows you to shoot with preset settings according to the scene. Program Auto Allows you to shoot with the exposure adjusted automatically (both the shutter speed and the aperture value). Also you can select various settings using the menu.
[ Flash (Selecting a flash mode for still images) Touch the flash mode setting icon on the screen. Touch the desired item, then [BACK]. Flash Auto ( ): Strobes when there is insufficient light or backlight (default setting) Flash On ( ) Slow Synchro (Flash forced on) ( ): The shutter speed is slow in a dark place to clearly shoot the background that is out of flash light. Flash Off ( ) [ Macro/Close focus (Shooting close-up) Touch the Macro/Close focus mode setting icon on the screen.
Viewing/deleting images (Playback) button Zoom (W/T) lever DSC-T70/T75 Speaker Multi connector (bottom) Speaker 1 Press (Playback) button. If you press (Playback) when the camera is powered off, the camera is turned on automatically and set to playback mode. To switch to the shooting mode, press (Playback) again. 2 Touch (previous) / (next) on the screen to select an image. Movie: Touch B to playback a movie. Fast forward/Rewind: m/M (Touch B or x to return to normal playback.
[ To view an index screen Touch (Index) to display the index screen. Touch / to display the previous/next page. To return to the single image screen, touch the thumbnail image. • You can also access the index screen by selecting [ Image Index] in (View Images) on the HOME screen. • If you touch [DISP] in index mode, you can set the number of images displayed in the index screen. [ To delete images in index mode 1 Touch while the index screen is displayed.
Connect the camera to the HDTV with the HD Output Adaptor Cable (DSC-T75 only). COMPONENT VIDEO IN AUDIO White/Red To the multi connector Green/Blue/Red HD Output Adaptor Cable (DSC-T75 only) • The cable for video jacks (Green/Blue/Red) is the same color as the respective jacks.
Learning the various functions – HOME/Menu Using the HOME screen The HOME screen is the gateway screen for all the functions of your camera. You can access this screen regardless of whether the camera is in shooting mode or playback mode. 1 Touch [HOME] to display the HOME screen. Item Category [HOME] 2 Touch the category you want to set. 3 Touch the item in the category you want to set. [ When you select the (Manage Memory) or (Settings) category 1 Touch the category you want to change the settings.
For details on the operation 1 page 22 HOME items Touching [HOME] displays the following items. Details on the items are displayed on the screen by the guide. Category Items Shooting Auto Adjustment Scene Selection Program Auto Movie Mode View Images Single Image Image Index Slideshow Printing, Other Print Music Tool Download Music Manage Memory Memory Tool Memory Stick Tool Format Change REC.
Using the menu items 1 Touch [MENU] to display the menu. Touch [?] to hide this guide. [MENU] • Different items will become visible depending on the selected mode. 2 Touch the desired menu item. • If the desired item is hidden, keep touching v/V until the item appears on the screen. 3 Touch the desired setting item. 4 Touch [BACK] to turn off the menu.
For details on the operation 1 page 24 Menu items The available menu items vary depending on the mode setting (shooting/viewing), and shooting mode. Only the available items are displayed on the screen. Menu for shooting REC Mode Selects the continuous shooting method. EV Adjusts Exposure. Focus Changes the focus method. Metering Mode Selects the metering mode. White Balance Adjusts the color tones. Color Mode Changes the vividness of the image or adds special effects.
Enjoying your computer You can display images shot with the camera on the computer. Also, you can use still images and movies from the camera more than ever by taking advantage of the software. For details, refer to “Cyber-shot Handbook” on the CD-ROM (supplied). Supported Operating Systems for USB connection and application software “Picture Motion Browser” (supplied) For Windows users For Macintosh users USB connection Windows 2000 Professional SP4, Windows XP* SP2/Windows Vista* Mac OS 9.1/9.
Viewing “Cyber-shot Handbook” “Cyber-shot Handbook”, which is provided on the CD-ROM (supplied), describes in detail how to use the camera. Adobe Reader is required for viewing the handbook. [ For Windows users 1 Turn on your computer, and insert the CDROM (supplied) into the CD-ROM drive. The screen below appears. [ For Macintosh users To view the “Cyber-shot Handbook” 1 Turn on your computer, and insert the CDROM (supplied) into the CD-ROM drive. 2 Select the [Handbook] folder and copy “Handbook.
Indicators on the screen Touch [DISP] on the screen to change to the display selection screen (page 18). [ When shooting still images Screen operation You can change the settings by touching the following: 1, 2, 3. • Touching an icon displays the guide about the touched item. To hide this guide, touch [?] (page 13). A Display Indication HOME Displays the HOME screen.
Screen indicators Display Screen indicators 4 to 7 show the current setting status.
[ When playing back still images B Display Indication BACK Backs to the previous screen. Adjusts the volume. x Stop N Playback Playback zoom Turns v/V/b/B on/off. Displays the previous/next image. [ When playing back movies mM Fast forward/Rewind DISP Changes the screen display. Screen indicators Screen indicators 3 to 5 show the current setting status.
D Display Indication PictBridge connecting Playback Media (“Memory Stick Duo”, internal memory) Playback folder 8/8 12/12 Image number/Number of images recorded in selected folder PictBridge connecting Change folder Recording folder E Display Indication Low battery warning 125 Shutter speed F3.5 Aperture value ISO400 ISO number +2.
Battery life and memory capacity Battery life and number of images that you can record/view The tables show the approximate number of images that you can record/view and the battery life with the battery pack (supplied) at full capacity and at an ambient temperature of 25°C (77°F). The numbers of images that can be recorded or viewed take into account changing the “Memory Stick Duo” as necessary. Note that the actual numbers may be less than those indicated in the table depending on the conditions of use.
Number of still images and recording time of movies The number of still images and the length of time for movies may vary depending on the shooting conditions. The number of still images and movie recording times may vary, even if the indicated capacities are the same as shown below. [ The approximate number of still images (Units: Images) Capacity Internal memory Approx.
Troubleshooting If you experience trouble with your camera, try the following solutions. 1 Check the items below, and refer to “Cyber-shot Handbook” (PDF). If a code such as “C/E:ss:ss” appears on the screen, refer to “Cyber-shot Handbook.” 2 Remove the battery pack, and insert the battery pack again after about one minute, and turn on the power. 3 Initialize the settings (page 23). 4 Consult your Sony dealer or local authorized Sony service facility.
The battery remaining indicator is incorrect. • This phenomenon occurs when you use the camera in an extremely hot or cold location. • The displayed battery remaining differs from the current one. Fully discharge and then charge the battery pack to correct the display. • The battery pack is discharged. Insert the charged battery pack (page 10). • The battery pack is dead. Replace it with a new one. The battery cannot be charged while inside the camera.
Precautions [ Do not use/store the camera in the following places • In an extremely hot, cold or humid place In places such as in a car parked in the sun, the camera body may become deformed and this may cause a malfunction. • Under direct sunlight or near a heater The camera body may become discolored or deformed, and this may cause a malfunction. • In a location subject to rocking vibration • Near strong magnetic place • In sandy or dusty places Be careful not to let sand or dust get into the camera.
Specifications Camera [Power, general] [System] Power: Rechargeable battery pack NP-BD1, 3.6 V NP-FD1 (not supplied), 3.6 V AC-LS5K AC Adaptor (not supplied), 4.2 V Power consumption (during shooting): DSC-T200 1.0 W DSC-T70/T75 1.0 W Operating temperature: 0 to 40°C (32 to 104°F) Storage temperature: –20 to +60°C (–4 to +140°F) Dimensions: DSC-T200 93.5 × 59.3 × 20.4 mm (3 3/4 × 2 3/8 × 13/16 inches) (W/H/D, excluding protrusions) DSC-T70/T75 90.0 × 56.4 × 20.
Rechargeable battery pack NP-BD1 Used battery: Lithium-ion battery Maximum voltage: DC 4.2 V Nominal voltage: DC 3.6 V Capacity: 2.4 Wh (680 mAh) Design and specifications are subject to change without notice. Trademarks • • • • • • • • • 38 , “Cyber-shot” are trademarks of Sony Corporation. “Memory Stick,” , “Memory Stick PRO,” , “Memory Stick Duo,” , “Memory Stick PRO Duo,” , “Memory Stick PRO-HG Duo,” , “Memory Stick Micro,” “MagicGate,” and are trademarks of Sony Corporation.
Additional information on this product and answers to frequently asked questions can be found at our Customer Support Website. Printed on 70% or more recycled paper using VOC (Volatile Organic Compound)-free vegetable oil based ink.