® AMANO PIX-21 Electronic Time Recorder Operation Manual
Thank you… for purchasing another fine product from Amano Cincinnati, Inc. Important Note that the government standard for Daylight Saving Time (DST) is subject to change. Your clock is factory-set for correct DST based upon when it was manufactured, but any revision to DST begin or end dates may require updating the system-set DST calendar.
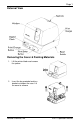
Page 1 External View Removing the Cover & Packing Materials 1. Lift the printer block and remove the spacer. 2. Insert the key provided and turn clockwise to open the case. Lift the cover to remove Amano Cincinnati, Inc.
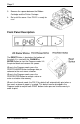
Page 2 3. Remove the spacer between the Ribbon Cartridge and the Printer Carriage. 4. Re-install the cover. Your PIX-21 is ready for use! Front Panel Description The RESET Button is located on the bottom of the clock. It is used with the CHANGE or ENTER Button to start the Program mode. Lift the printer block and remove the spacer. When in the Program mode, press the PRINT/CHANGE Button to change data, or advance to the next menu selection.
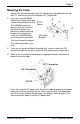
Page 3 Mounting the Clock 1. Remove the mounting bracket from the clock by pushing forward on the top tabs “A” and then pushing the tabs down “B” (See below). 2. If you are using the Mobile Mounting Unit gooseneck and special mounting bracket (P/N AJR-208800), mount the gooseneck to the vehicle in the desired location first. Mount the special mounting bracket to the gooseneck using the three #M5 acorn nuts and washers provided. You may discard the original PIX mounting bracket if you wish. 3.
Page 4 Program Modes The PIX-21 has two programming modes, Normal and Quick. Either mode can be accessed by simply entering a specific 4-digit code. The Quick Program Mod allows the user to change the following features: date, time, daylight saving time start/end dates, and print style. To enter the Quick Program Mode use the appropriate code listed in Chart 1, which correlates to the print style of your choice.
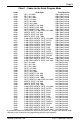
Page 5 Chart 1 - Codes for the Quick Program Mode Code Print Style Print Direction 6510 DAY, 12H, 60th Right Side Printing 6210 DAY, 24H, 10th Right Side Printing 6810 DAY, 24H, 100th Right Side Printing 6520 DATE, 12H, 60th Right Side Printing 6620 DATE, 24H, 60th Right Side Printing 6820 DATE, 24H, 100th Right Side Printing 6540 DATE, MONTH, 12H, 60th Right Side Printing 6640 DATE, MONTH, 24H, 60th Right Side Printing 6840 DATE, MONTH, 24H, 100th Right Side Printing 6680 DATE, MONTH, 2-digit YEAR, 24H, 60
Page 6 3. Entering the Quick Program Mode These instructions must be followed in the order given. The following steps describe how to get into and use the Quick Program mode. Note: Please refer to Chart 1 for the code listing. 1. Press and hold down the RESET button on the bottom of the clock. (Refer to page 3 for location.) 2. While holding down the RESET button, press and hold down the ENTER button. While holding down the ENTER button, release the RESET button. 3. 4.
Page 7 5. Setting the Time Note: Use 24 hour and 60 minute format when setting the time. For example: 2:00 pm = 14:00. 1. When the display flashes P2 Clock, press the ENTER button. 2. Press the CHANGE button to choose 12 hour AM/PM display or 24 hour military time, then press the ENTER button. 3. Press the CHANGE button until the correct hour appears, then press the ENTER button. 4. Press the CHANGE button until the correct minutes appear, then press the ENTER button. 5.
Page 8 7. Setting the End Date of Daylight Saving Setting Note: The government standard for DST is subject to change. Your clock is factory set for correct DST based upon when it was manufactured, but any revision to DST begin or end dates may require updating the system-set DST calendar. The steps below change the end date for DST. Updating the end date for DST needs to be done just one time, since the clock’s rolling calendar function will auto-calculate the end date for each year thereafter.
Page 9 Normal Program Mode 1. Plug In the Power Cord 2. The Reset Button Note: To exit the programming mode and return to the time display, press the RESET button at any time. The RESET Button is located in the lower right corner on the bottom of the clock 3. Entering the Normal Program Mode These instructions must be followed in the order given. The following steps describe how to get into and use the Normal Program mode. Note: The code (password) is printed inside the top of the cover case: “8088”. 1.
Page 10 4. Setting the Year, Month and Date 1. When the display flashes , press the ENTER button. 2. Press the CHANGE button until the correct year appears, then press the ENTER button. 3. Press the CHANGE button until the correct month appears, then press the ENTER button. 4. Press the CHANGE button until the correct date appears, then press the ENTER button. 5. When the display flashes the correct year, month and date, press the ENTER button. 6.
Page 11 6. Setting the Print Style Note: The maximum printed line length equals 152 dots across. Please refer to the chart below for codes representing the print styles, number of dots and line lengths. Refer to page 13 for sample print styles. , press the ENTER 1. When the display flashes button. 2. Press the CHANGE button until the correct character code you want to print appears, then press the ENTER button. 3.
Page 12 7. Setting the Language 1. When the display flashes P6 LAn9, press the ENTER button 2. Press the CHANGE button until the correct language appears, then press the ENTER button. Please refer to the Language Table for selections. 3. When the display flashes P6 LAn9, press the CHANGE button to move to the Print Direction. Language Table Language English Spanish French German Italian Portuguese Roman Japanese Common Code 8. Setting the Print Direction 1.
Page 13 10. Setting the Leading Zero On or Off Note: The leading Zero appears on the print out before single digit times and dates (for example: DEC. 06, 08:00). 1. When the display flashes P9 2ErO, press the ENTER button. 2. When the display flashes OFF or on, pressing the CHANGE button will alternate between off and on. Press the ENTER button to select. 3. When the display flashes P9 2ErO, press the CHANGE button to move to the Diagnostics Mode. 11.
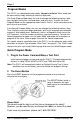
Page 14 Replacing the Ribbon To Remove: To Insert: Pull the two catches upward “B” and hold with index and middle fingers. Remove the ribbon cassette. 1. If the print mechanism is down and a piece of paper cannot be inserted, press the RESET button to move the carriage up. This will make the ribbon installation easier. 2. Insert a new ribbon between the ribbon guide (C) and the printer head (D). 3. Turn the knob on the cassette clockwise one turn to take up any slack in the ribbon. 4.
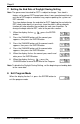
Page 15 Using the DC Power Cord 1. The DC version of the PIX-21 is meant to be used only in motor vehicles with a 12-volt negative ground electrical system 2. Power to the cigarette lighter should be present with the ignition key in the “Off” position. If this is not known, it can easily be determined by plugging in the PIX-21 power cord and observing the LED in the cigarette lighter plug. If power is not present, the internal lithium battery will be prematurely depleted. 3.
Page 16 Error Messages Possible Error Messages Display Error Home sensor, motor carriage stuck Timing sensor, carriage stuck Home sensor Carriage stuck General Print Error Daylight saving time program For error messages E1 through E4, turn off the power before checking to see that the carriage is not stuck or jammed. Also, check to see that the ribbon cables are in good condition. After clearing any jams, restore the power and press the RESET button.
AJR-209003 • Copyright © 2007 • Printed in U.S.A.