
Service manual


– 9 –
KDF-E42/50A11E
RM-ED002
20
GB
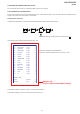
Overview of the menus
The following options are available in each menu. For
details on navigating through menus, see (page 19).
Also, see page in parentheses for details of each menu.
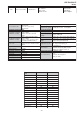
1 Picture Adjustment
Picture Mode (21)
Contrast/Brightness/Colour/Hue/
Sharpness (21)
Colour Tone (21)
Reset (22)
Noise Reduction (22)
Iris (22)
2 Sound Adjustment
Sound Effect (23)
Treble/Bass/Balance (23)
Reset (23)
Dual Sound (24)
Auto Volume (24)
3 Screen
Auto Format (25)
Screen Format (25)
RGB Center (25)
4 Features
AV2 Output (26)
TV Speakers (26)
PC Adjustment (27)
Select: Set: End:
OK
MENU
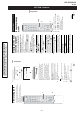
Picture Mode
Contrast
Brightness
Colour
Hue
Sharpness
Colour Tone
Reset
Noise Reduction
Iris
Custom
Max
50
50
0
15
Warm
Auto
High
Picture Adjustment
1
2
3
4
5
6
5 Timer
Sleep Timer (28)
Clock Set (28)
Timer (28)
6 Set Up
Auto Start Up (29)
Language (29)
Country (29)
Auto Tuning (30)
Programme Sorting (30)
Programme Labels (31)
AV Preset (31)
– Label/Skip
Manual Programme Preset (31)
– Programme/System/Channel/Label/AFT/
Audio Filter/Skip/Decoder/ATT/Confirm
Digital Set Up (34)
– Digital Tuning/Digital Set-up
21
GB
Using the Menu
Picture Adjustment menu
Selects the picture mode.
1 Press OK to select “Picture Mode”.
2 Press m/M to select one of the following picture modes, then press OK.
Vivid: For big lighted spaces.
Standard: Optimal picture for home use.
Custom: Allows you to store your own prefered settings.
Tip
You can change the picture mode by pressing repeatedly.
1 Press OK to select the option.
2 Press </, to set the level, then press OK.
Tip
“Hue” can only be adjusted for an NTSC colour signal (e.g., U.S.A. video tapes).
“Brightness”, “Colour”, “Hue” and “Sharpness” only appear and can be adjusted if “Picture Mode”
is set to “Custom”.
1 Press OK to select “Colour Tone”.
2 Press m/M to select one of the following, then press OK.
Cool: Gives the white colours a blue tint.
Neutral: Gives the white colours a neutral tint.
Warm: Gives the white colours a red tint.
Tip
“Warm” only appears and can be adjusted if “Picture Mode” is set to “Custom”.
You can select the options listed below on the Picture
Adjustment menu. To select options, see “Navigating
through menus” (page 19).
Tip
When you set the “Picture Mode” option to “Vivid” or
“Standard,” you can adjust only “Contrast,” and “Reset.”
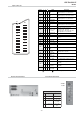
Picture Mode
Contrast/Brightness/Colour/Hue/Sharpness
Colour Tone
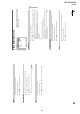
Select: Set: Back:
OK
End:
MENU
Picture Mode
Contrast
Brightness
Colour
Hue
Sharpness
Colour Tone
Reset
Noise Reduction
Iris
Custom
Max
50
50
0
15
Warm
Auto
High
Picture Adjustment
Continued