
Installation Guide

Installation Instructions
Instructions d’installation
JLDSK4W44
LIGHT SOURCE (INCLUDED)
SOURCE LUMINEUSE (INCLUSE)
INTEGRATED LED
DEL INTÉGRÉES
10W
JUNCTION BOX / BOÎTE DE JONCTION
LIGHT PANEL / PANNEAU D’ÉCLAIRAGE
CLIPS / CLIPS
CONNECTOR / CONNECTEUR
KNOCKOUT HOLE / TROUS PRÉ-PERCÉ
PARTS LIST / LISTE DES COMPOSANTES
WARNING - ATTENTION
Luminaires must be installed by a certied electrician. Check with local and national codes for proper installation.
To prevent electrical shock, disconnect electrical supply before installation or servicing.
Do not modied this xture. Any modications may render the product unsafe and void the warranty. This product is suitable for damp locations.
Les luminaires doivent être installés par un électricien certié. Vérier les normes et les codes du bâtiment de votre région.
Pour réduire les risques d’électrocution lors de l’installation ou de l’entretien, couper l’alimentation électrique.
Ne pas modier cet appareil. Toute altération risque de rendre l’appareil dangereux et d’annuler la garantie. Ce produit convient aux endroits humides.
RECESSED FIXTURE
LUMINAIRE ENCASTRÉ
WARRANTY
BAZZ’s warranty applies to manufacturing defects affecting its products which existed at the time of the purchase of the
product, that are non-apparent, and are unknown to the buyer, for a period of 3 years. This warranty applies to the product
only and does not cover the installation of the product. The warranty does not apply to material, economic, and/or physical
damages or losses caused by the product. This warranty will not apply to any damages and/or losses caused by an incorrect
use, installation or maintenance of the product. The manufacturer is therefore not liable for damages to the product or
material, economic and/or physical damages or losses caused by an incorrect use, installation or maintenance of the
product. If the buyer considers that the product is affected by a defect, the buyer should return the product to the point of
purchase or send an email to service@bazz.ca. Should the buyer decide to send an email to service@bazz.ca, a description
of the alleged problem should be included in the email and a proof of purchase as well as the picture clearly illustrating the
alleged defect should be attached to the email. The buyer should also return the product to BAZZ at his/her own expense.
After product inspection, if the warranty applies, BAZZ will repair or replace the product free of charge.
GARANTIE
BAZZ garantit ce produit contre tout vice de fabrication existant au moment de la vente, non apparent et non connu de
l’acheteur, et ce, pour une période de 3 ans. La garantie se limite au produit seulement et ne vise pas l’installation du
produit. La garantie ne s’applique pas aux dommages ou pertes matérielles, économiques et/ou physiques causés par
le produit. La garantie est inapplicable si les dommages ou les pertes sont causés par une mauvaise utilisation, une
mauvaise installation, ou un mauvais entretien du produit. Le fabricant n’est donc pas responsable des dommages au
produit ainsi que des dommages matériels, physiques et/ou économiques découlant d’une mauvaise utilisation, d’une
mauvaise installation, ou d’un mauvais entretien du produit. Si l’acheteur considère que le produit comporte un vice, il devra
retourner le produit au point d’achat ou envoyer un courriel à service@bazz.ca. Si l’acheteur choisit d’envoyer un courriel
à service@bazz.ca, il devra décrire le problème allégué et joindre une preuve d’achat ainsi qu’une photo du produit faisant
clairement état du vice allégué. Il doit également retourner à ses frais le produit en question à BAZZ. Après inspection du
produit, si la garantie s’applique, BAZZ réparera ou remplacera le produit à ses frais.
JLDSK4W44-INST_V1
31
4 5 6
2
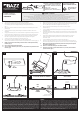
1. Turn Off power from the electrical panel prior to installation.
2. Determine the location where you want to install the xture and cut a
4 ¼" (108 mm) hole in the ceiling according to the template on the box
(g. 1).
3. Open the junction box cover and remove the appropriate knockout(s) on the side
panel (g. 2).
4. Insert the electrical supply cable through the knockout and secure with a wire
connector.
5. Using quick-connect push-in terminals, connect the ground wire to the ground wire
terminal; black wire to black wire terminal; white wire to white wire terminal (g. 2).
6. Place all wiring and connections back into the junction box and close the cover.
Connect the junction box to the light panel with the quick connect system.
7. Insert the junction box through the mounting hole (g. 3).
8. Push clips on the xture upwards and insert xture base into the
mounting hole. Release the clips and xture will be pulled ush to the ceiling (g. 4).
9. NOTE: The back of the unit and the junction box must not be exposed to damp
locations (g. 5).
10. Use a silicone sealant for damp locations.
11. You must keep a minimum space of ½" (12.7 mm) between the junction box and
the disk (g. 6).
1. Couper l’électricité à partir du panneau électrique avant de commencer l’installation.
2. Déterminer l’endroit ou vous désirez installer l’encastré. Mesurer et couper un trou
de 4 ¼" (108 mm) conformément au gabarit sur la boîte (g. 1).
3. Ouvrir le couvercle de la boîte de jonction et ouvrir le trou pré-percé
approprié (g. 2).
4. Insérer le câble d’alimentation électrique par le trou pré-percé et le xer avec un
connecteur de l.
5. À l’aide des connecteurs de ls, brancher le l de mise à la terre au connecteur du l
de mise à la terre; le l noir au connecteur du l noir; le l blanc au connecteur du l
blanc (g. 2).
6. Placer tout le câblage et les connexions dans la boîte de jonction et fermer le
couvercle. Brancher la boîte de jonction et le luminaire avec le système de
connexion rapide.
7. Insérer la boîte de jonction à travers le trou de montage (g. 3).
8. Pousser les clips du luminaire vers le haut et inserer la base du luminaire dans le
trou de montage. Relâcher les clips et le luminaire sera tiré au ras du plafond (g. 4).
9. NOTE: L’arrière de l’appareil et la boîte de jonction ne doivent pas être exposés
aux endroits humides. (g. 5).
10. Utiliser un scellant de silicone pour les endroits humides.
11. Vous devez conserver un espace minimum de ½" (12.7 mm) entre la boîte de
jonction et le disk (g. 6).
4 ¼"
108 MM
½"
12.7 mm
minimum
DRY
SEC
DAMP
HUMIDE
Silicone sealant
Scellant de silicone
OPTIONAL FOR DAMP LOCATIONS
OPTIONNEL ENDROITS HUMIDES
MANDATORY
OBLIGATOIRE