
Mobile Audio CS Amplifier Installation Manual


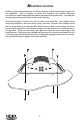
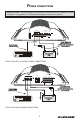


Connect the amplifier to the car's battery.
At times, the amplifier will need to draw large levels of current that cannot be
provided by any circuit in the car's fuse box. We recommended using an 4 to 8
gauge power wire for your connections depending on the amplifier and length of
the wire. Strip one end of the wire to connect to the terminal on the amplifier
marked +12V. Loosen screw terminal and connect bare wire and tighten. Use
caution to make sure no stray wire stands come in contact with surrounding
terminals causing short circuits. Run the wire directly to the positive terminal of the
car's battery. Make sure to use an in-line fuse within 12” of the car's battery to
protect the electrical system and amplifier against short circuits and/or power
surges.
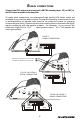
Connect the ground terminal of the amplifier to the car's chassis.
For the ground connection, use an 4 to 8 gauge wire (black) to connect to the
terminal marked GND and then connect it to the car's chassis. Try to keep the
length of the cable as short as possible, preferably less than 6". Also make sure that
the point on the car where the connection is to be made is free of paint and dirt.
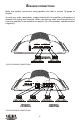
Connect the remote terminal of the amplifier to a switchable +12V source.
This connection allows the amplifier to be turned on and off with the power control
of the radio. If the radio has a REMOTE output terminal, connect it to the
amplifier's terminal marked REMOTE (using a 16 gauge wire or heavier). Now
when the radio is turned on, the amplifier will automatically turn on. This
connection can also be made to the radio’s Power Antenna wire.
7