
Troubleshooting guide


IV.Imaging with FLAMINGOS
A. Overview
FLAMINGOS may be used for imaging through J-, H-, K-, and Ks-band filters. Sky emission in these bands is
variable and may be bright
3
. Exposure times are kept reasonably short as a result and guiding is not required.
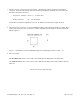
The general observing procedure is to point the telescope in a dither pattern about the source, taking one or
more images at each location. FLAMINGOS has a dither script with several different dither patterns available.
They all are oriented in a square grid in (RA, Dec); the ordering through the pattern is executed in the same
psuedo-random order every time (it is not a raster).
For deep imaging, exposure times up to 120 seconds in the J-band, and up to 30 – 90 seconds in the H- and K-
bands are common. The shortest possible exposure time used with FLAMINGOS for scripted observing is 2
seconds. There is also a special script which will take a single exposure at the fastest possible exposure time of
1500 milliseconds immediately upon execution.
NOTE: FLAMINGOS has two integration timers, a milliseconds timer for exposure times ≤ 60 seconds, and a
seconds timer for exposure times ≥ 60 seconds. The seconds timer was determined to have a total timing error
range of ~ 1 second
4
; the array controller hardware code was updated in August 2003, and this problem should
have been eliminated, however we have not yet evaluated the engineering data. Some observers choose to use
60 seconds as the maximum exposure time they will use for their observations, in order to use only the
milliseconds timer.
The default bias for imaging is 1.0 V; the present value may be obtained by hitting the Update All Items button
on the UFSTATUS GUI. The MCE4 array controller supplies this bias automatically on boot, after initflam.pl
has been executed.
The general outline for imaging observations is:
1. For every new target, verify telescope pointing on a SAO or Fixed Bright star close to the target position
by imaging the star on FLAMINGOS, offseting the telescope until it is well centered on the science array,
then Z the telescope (cf. § III . B. Nightly Startup Tasks: Startup on the sky).
2. Acquire target close to the center of the FLAMINGOS field of view.
3. Check focus.
4. Execute imaging dither pattern.
5. Repeat steps 1 – 5 on standard, if desired; there are a number of IR standard star caches at the 2.1-m,
including the HST/NICMOS, UKIRT, and ARNICA standards. Some observers choose to use 2MASS
sources within the target fields.
6. Take any required dome flats. These may be done in the afternoon.
7. Take darks (10 - 20 each) at every exposure time that was used if sky flats are desired. These may be
done in the afternoon.
The following list of commands is useful for imaging and for spectroscopy (described in the next section). A
more detailed explanation of several of these scripts directly follows the list.
NOTE: After the home switch on the Grism wheel failed in 2009, new scripts for relative motion of the wheels
were generated. The relative MOS wheel script must be used, as there is no home switch. We recommend
using [Initialize Wheels] for the first motion of the Decker, Filter, and Grism wheels to ensure the home is
correct and [Move Wheels] thereafter, since the motions are shorter.
3 In the J and H-bands the emission is mostly generated by OH in the atmosphere at elevations of 90 km.
4 Mark Dickinson discovered this problem. See his analysis at: www-int.stsci.edu/~med/flamingos/fewompt_plus.html.
FLAMINGOS@2.1-m, Ver. 2.39, 2011 May 13 Page 19 of 46