
Instructions / Assembly

8
ASSEMBLY INSTRUCTIONS
READ ALL SAFETY WARNINGS & ASSEMBLY INSTRUCTIONS CAREFULLY BEFORE ASSEMBLING OR
OPERATING YOUR COOKER. Inspect contents in the box to ensure all parts are included and undamaged.
FOR MISSING PARTS OR ASSISTANCE, PLEASE CALL 1-800-864-6194 M-F 8am - 5pm CST.
Proof of purchase will be required.
TOOLS REQUIRED:
Adjustable Wrench
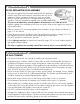
PARTS INCLUDED:
COOKER ASSEMBLY
TOOLS REQUIRED:
Adjustable Wrench
PARTS INCLUDED:
ASSEMBLED UNIT
COOKER ASSEMBLY
Philips Screwdriver
1 - Long Bolt
1 - Nut
1- Regulator
Hose Assembly
1- Heat Sheild
1- Frame
SP40
1- Frame
1 - Long Bolt
1 - Nut
1- Regulator
Hose Assembly
1- Heat Sheild
ASSEMBLED UNIT
SP2
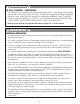
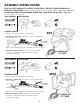
1. Remove components from the box and packing.
2. Attach Hose to Orifice Bar - Screw Hose on to end of Orifice Bar.
Wrench tighten.
Refer to Connecting Regulator Hose Assembly to Cooker on page 11.
3. Attach Hose Guard to Cooker - Line up hole on Hose Guard
with hole on Support Bar. Attach using Hex Bolt and Nut.
Use Wrench to tighten.
Turn CLOCKWISE
Wrench Tighten
Orifice Bar
from SP1 Jet Cooker
Philips Screwdriver
1. Remove components from the box and packing.
2. Attach Hose to Orifice Bar - Screw Hose on to end of Orifice Bar.
Wrench tighten.
Refer to Connecting Regulator Hose Assembly to Cooker on page 11.
3. Attach Hose Guard to Cooker - Line up hole on Hose Guard
with hole on Support Bar. Attach using Hex Bolt and Nut.
Use Wrench to tighten.
Turn CLOCKWISE
Wrench Tighten
Orifice Bar
from SP1 Jet Cooker
18" WIDE
22" WIDE