
Instructions / Assembly


6
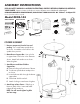
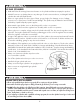
5. Attach Regulator Hose Assembly to Bur
ner
-
Insert brass male end of hose into the threaded
hole at the end of the cast iron burner. Use
an adjustable wrench to tighten the hose to
the burner.
Do not over tighten brass hose
connector to burner, the air control shutter
must be able to easily turn for adjustment of
flame quality. If you have over tightened the
brass hose connector to the burner and the
shutter cannot turn, then unscrew the brass
hose connector until the shutter can be easily
turned... Very Important!
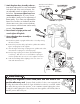
6. Return frame to upright position and
wrench tighten all leg bolts.
7. Connect Regulator Hose Assembly to
LP Gas Cylinder.
Turn CLOCKWISE
Wrench T
ighten
Turn Air Control Shutter to
adjust flame quality
Screws may need tightening
DO NOT over tighten!
5
6
Turn Coupling Nut
CLOCKWISE
to Attach
Hand Tighten!
Turn Brass Valve
CLOCKWISE
to OFF position
Upright
position
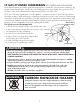
A. Check that cylinder is upright and the valve is closed by tur
ning
the knob clockwise.
B. Remove the protective safety cap from the cylinder valve and the
Type-1 Coupling Nut on the regulator
C. Insert the nipple of the large coupling nut into cylinder valve outlet.
Insure that the coupling nut is centered properly.
D. Turn the large coupling nut clockwise by hand and tighten
to a full stop. Take care not to cross thread the coupling nut
onto the cylinder valve. Do not use tools to tighten connection.
E. Leak check all fittings before lighting cooker. See section on
"Gas Leak Test Instructions".
C
A
B
D
Always turn Regulator Control Knob/Valve and Tank Knob to OFF
position after every use!
Propane Tanks, and this Cooker, come equipped with
a safety device that restricts the flow of gas should the hose be cut or severed. While
the safety device protects the operator, it can sometimes impair lighting the cooker.
To reduce trouble lighting the cooker, always turn the regulator control knob/valve to
the OFF position after every use.
CAUTION
7