READ MANUAL BEFORE USE MODEL #KDS-144 LP GAS COOKER OWNER’S MANUAL SAFETY ALERTS, ASSEMBLY & OPERATING INSTRUCTIONS GENERAL MAINTENANCE & STORAGE This manual is for Barbour International "Bayou Classic" products only. If you are using another manufacturer’s product, refer to the manual supplied with that product. KEEP THIS MANUAL FOR FUTURE REFERENCE This Instruction Manual contains important information necessary for the proper assembly and safe use of this appliance.
If you have a missing or damaged part, please do not return this item to the store. Call Barbour International, Inc. for assistance: 1-800-864-6194 Monday-Friday 7:30am - 4:30pm CST LIMITED WARRANTY Barbour International, Inc.
NOTE TO CONSUMER This LP Gas Cooker is a specialized high pressure gas appliance having greater heat output than traditional kitchen stoves. It is referred to as cooker and appliance in this manual and on warning tags. Same as a kitchen stove, this cooker does not have automatic thermostat controls so must be attended and monitored at all times during use. This LP Gas Cooker is for OUTDOOR USE ONLY! This cooker provides multiple cooking options in addition to brewing beer.
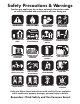
Safety Precautions & Warnings Outdoor gas appliances do not have automatic thermostat contr ols so must be attended and monitored at all times during use.
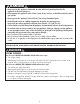
DANGER • Never operate this appliance unattended. A sober, adult must attend and monitor this appliance at all times during use. • Never operate this appliance within 10 feet (3.0m) of any structure, combustible material or other gas cylinder. • Never operate this appliance within 25 feet (7.5m) of any flammable liquids. • Heated liquids remain at scalding temperatures long after the cooking process. Never touch the cooking appliance until liquids have cooled to 115˚F (45˚C) or less.
WARNING GENERAL WARNING • This cooker shall be used OUTDOORS ONLY. DO NOT use in a building, home, garage, balcony, porch, tent or any other enclosed area. Gas cookers shall not be used on or under apartment, condominium balcony or deck. DO NOT install or use in or on recreational vehicles or boats. • This is a portable appliance and is not designed to be installed in cabinetry or enclosed in any manner. • This is appliance is not designed for frying.
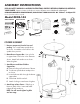
ASSEMBLY INSTRUCTIONS READ ALL SAFETY WARNINGS & ASSEMBLY INSTRUCTIONS CAREFULLY BEFORE ASSEMBLING OR OPERATING YOUR COOKER. Inspect contents in the box to ensure all parts are included and undamaged. FOR MISSING PARTS OR ASSISTANCE, PLEASE CALL 1-800-864-6194 M-F 7:30am - 4:30pm CST. Proof of purchase will be required.
5. Attach Regulator Hose Assembly to Burner Insert brass male end of hose into the threaded hole at the end of the cast iron burner. Use an adjustable wrench to tighten the hose to the burner. Do not over tighten brass hose connector to burner, the air control shutter must be able to easily turn for adjustment of flame quality. If you have over tightened the brass hose connector to the burner and the shutter cannot turn, then unscrew the brass hose connector until the shutter can be easily turned...
LP GAS CYLINDER INFORMA TION NOT SUPPLIED WITH THIS COOKER The LP (Liquid Propane) gas cylinder specifically designed to be used with this cooker must have a 20 lb (9.1 kg) capacity incorporating a Type-1 cylinder valve, an over-filling protection device (OPD), and a protective collar. The Type-1 valve can be identified with the large external threads on the valve outlet. Check your local codes regarding the use of this appliance. To find these codes, see your local LP gas dealer or natural gas company.
WARNING LP GAS CYLINDER • Read and follow all warnings/instructions that are on the cylinder and that accompany this product. • DO NOT connect to a cylinder that uses any other type of valve connection device, including #510 POL cylinder valve with Left Hand Threads. • Never use a gas cylinder if it shows signs of dents, gouges, bulges, fire damage, erosion, leakage, excessive rust, or other forms of visible external damage.
REGULATOR HOSE ASSEMBLY • Use only the regulator hose assembly that is supplied with this appliance. Inspect the hose before each use of the cooker. If there is evidence of abrasion, wear, cuts or leaks, the hose must be replaced prior to the cooker being put into operation. Replace regulator hose assembly at least every two years. This part can be purchased by contacting www.thebayou.com. • Refer to instructions for connecting regulator hose assembly to LP gas cylinder and burner in this manual.
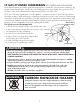
WARNING WHEN TO PERFORM A LEAK TEST : • • • • After assembling your cooker and before lighting for the first time, even if purchased fully assembled. Every time the LP gas cylinder is refilled or if any of the gas components are replaced. Any time your cooker has been moved. At least once per year or if your cooker has not been used for more than 60 days. GAS LEAK TEST INSTRUCTIONS Note: The gas leak test must be performed in an area that has adequate lighting in order to see if bubbles are developing.
POSITIONING THE COOKER 1. Position cooker prior to lighting the burner. 2. Never operate an outdoor cooker appliance inside a building or confined area where ventilation may be restricted. Make sure the LP cylinder and the cooker are placed in an open area. DO NOT obstruct the flow of combustion and ventilation air. 3. Check wind direction. 4. Position cooker DOWNWIND from the nearest structure.
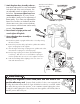
BEFORE LIGHTING CLOCKWISE CLOCKWISE 1 2 COUNTER-CLOCKWISE ON K W IS E Make sure Regulator Valve is OFF IS E CO LIGHTING SE WI - CLO C WI K - CL O C COUNTER-CLOCKWISE CO - TER NOTE: The brass valve on regulator hose assembly controls flame intensity only. It is not an ON/OFF valve. 6 ON O N - C OU 7 SE 5 COUNTER-CLOCKWISE After lighting Burner, OPEN LP Cylinder Valve FULLY BURNER FLAME CHECK Adjust flame height using regulator valve.
PRE-COOKING CHECK LIST AND OPERA TING INSTRUCTIONS WARNING DO NOT operate this cooker until you have read and understand ALL of the warnings and instructions in this manual. Property damage, bodily harm, severe burns and death could result from failure to follow these safety steps. These steps should be performed after the cooker has been assembled, stored, moved, cleaned, or repaired. 1.
STEAMING INSTRUCTIONS Use Bayou Classic® stockpots having baskets elevated above the bottom of the vessel. • Typically 2 to 3 inches of water is used for steaming. Heat up time will be fast so be certain to first have food in the basket. • Once boiling is achieved, reduce cooker flame to the lowest setting. • Using an insulated mitt, carefully lower food basket into the cooking vessel, then cover with lid. (Be certain food is not touching the water.
WARNING Never attempt to lift a brew kettle pot filled with water, even cold water. Lifting a pot filled with liquid can result in serious back and bodily injuries; or splashing of hot liquids can result in serious burns. The handles are designed for carrying empty pots. Although handles are welded to the pot, the attachment could be weakened over time due to bumping during shipment or movement from storage. Use a pump or gravity siphon to transfer liquids from one pot to the other.
TROUBLE SHOOTING TIPS Sometimes the burner does not light or has a only a meager match flame. Other times, the flame blows out, burns yellow, or there is a flame inside the burner tube. These symptoms are common and easy to remedy. The following Trouble Shooting Tips cover most questions and problems associated with outdoor gas cooker appliances. Save this manual for future reference. SYMPTOM #1: Burner lights but the flame remains very small and will not increase for heat-up and cooking.
TROUBLE SHOOTING GUIDE SYMPTOM CAUSE POSSIBLE SOLUTION Burner lights but the flame remains very small Repeated from page 14 Rapid gas flow from propane tank activates EXCESS FLOW safety device because regulator control valve is not in OFF position Repeat lighting instructions and be certain to S-L-O-W-L-Y open cylinder valve one full turn, then S-L-O-W-L-Y open regulator valve to light burner.
Stainless Steel Economy Brew Kettle 20, 30 & 40-Qt. Stainless Steel 6-PC. Brew Kettle Set Stainless Steel Stockpots with Spigot 8, 10 & 16-Gallon 36-Qt. & 44-Qt. 800-775 Brew Spigot 1051 with Bulkhead Fittings for a water tight seal Stainless Steel 24" Brew Paddle 800-772 12" Brew Thermometer 1047 Stainless Steel 2-PC. Spoon Set M5HPR-1 48" Stainless Braided Hose 10 PSI Preset Regulator Brass Control Valve 3/8" Flare Swivel Fitting M7910 10-FT.