
Owner Manual

14
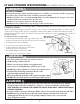
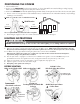
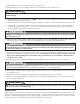
ADJUST Regulator Control Knob
for Flame Height
5
O
N
-
C
L
O
C
K
W
I
S
E
NOTE: The regulator control
knob controls flame intensity
only. It is not an ON/OFF
valve. Practice rotating the
regulator control knob to
become familiar with flame
adjustment.
O
P
E
N
V
A
L
V
E
F
U
L
L
Y
After lighting Burner, OPEN
LP Cylinder Valve FULLY
DO NOT light burner
at air intake
6
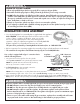
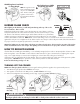
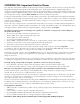
BURNER FLAME CHECK
When lighting for the first time, you will smell paint burning at the top of the cooker
for a few minutes... This is normal.
Adjust flame height using regulator control knob. Rotate air control shutter to achieve
mostly blue flame. The air control shutter mounted on the front of burner helps to control
the amount of air that mixes with the LP gas. A blue flame with little or no yellow flame
indicates a proper air/gas mixture and provides the best heat. Adjust the air control shutter
until the desired flame is achieved. NOTE: Make sure the male fitting on hose is screwed into the burner/air shutter and
tightened securely. Do not over-tighten as the air shutter needs to move freely in order to adjust air intake. Check the attachment
for proper connection everytime propane tank is connected to cooker.
BURNER
FLAME
BLUE
ORANGE
CORRECT INCORRECT
HINT: Before lighting, turn air control shutter on the burner to an almost closed position. This increases the gas portion of the air/gas
mixture and makes the burner easier to light. After lighting, turn air control shutter to an open position to achieve a better flame.
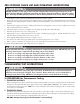
HOW TO REIGNITE BURNER
If burner flame does NOT ignite immediately, or is accidentally extinguished, turn valve on LP Gas Cylinder clockwise to OFF.
Then turn regulator control knob OFF counter-clockwise. Wait 5 minutes for gas to evacuate before re-lighting, then repeat
steps 1-6 to re-light. Always use caution when re-lighting as cooker frame and cooking vessel will be hot.
If the burner does not light within the first few attempts, there is a problem with the gas supply. Turn off the gas at the cylinder
and regulator. DO NOT attempt to operate the cooker until the problem is found and corrected.
Refer to Troubleshooting on Pages 19 - 20.
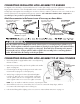
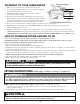
Turn COUNTER-CLOCKWISE
to Disconnect
O
F
F
-
C
L
O
C
K
W
I
S
E
Turn OFF
LP Cylinder.
Close Fully
1
Disconnect
Regulator
3
Turn OFF
Regulator.
Close Fully
2
O
F
F
-
C
O
U
N
T
E
R
-
C
L
O
C
K
W
I
S
E
TURNING OFF THE COOKER
NOTE: Turn off LP gas cylinder valve first to prevent gas from being left in the regulator hose system under pressure.
1. Turn OFF the LP gas cylinder valve clockwise until it stops.
2. Turn regulator control knob to the OFF position, counter-clockwise until it stops.
3. To disconnect Regulator Hose Assembly, turn the large coupling nut counter-clockwise by hand.
WARNING
The LP gas cylinder valve must always be in the OFF or closed position when the cooker is not in use.