
Owner Manual

11
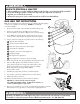
CONNECTING REGULATOR HOSE ASSEMBLY TO BURNER
The Regulator Hose Assembly is a pre-assembled unit. Do not take apart. Simply connect the regulator hose assembly to the
LP gas cylinder and to the cooker. An adjustable wrench is needed when attaching the hose to the burner.
Visually inspect the regulator hose assembly prior to each use. If there is evidence of abrasion, wear, cuts or leaks, the hose
must be replaced prior to the appliance being put into operation. Call 1-800-864-6194 M-F 7:30am - 4:30pm CST or
www.thebayou.com to purchase a replacement Model #M5HPR.
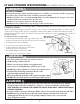
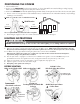
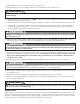
Attach hose connector to the burner in one of two ways as shown below.
Turn Air Control Shutter to
adjust flame quality
Turn CLOCKWISE
Wrench Tighten
OR
Turn CLOCKWISE
Wrench Tighten
Turn Air Control Shutter to
adjust flame quality
Place large end of spring
against Air Control Shutter
Screws may need tightening
DO NOT over tighten!
WARNING
Insure the cylinder valve is CLOSED (valve turned clockwise) prior to connecting the LP gas cylinder to your
cooker. Turn the regulator control knob counter-clockwise to properly close the regulator valve. Read and follow
all instructions and warnings on the supply hose safety tags. Read and follow all warnings in this manual
concerning the safe use of LP gas cylinders and the regulator hose assembly, before connecting cylinder to
cooker. Read and follow all warnings on the LP gas cylinder.
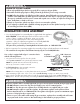
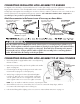
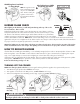
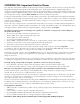
1. Check that cylinder is upright and the valve is closed by turning
the knob clockwise.
2. Remove the protective safety cap from the cylinder valve and the
Type-1 Coupling Nut.
3. Insert the nipple of the large coupling nut into the valve outlet.
Insure that the coupling nut is centered properly.
4. Turn the large coupling nut clockwise by hand and tighten
to a full stop. Take care not to cross thread the coupling nut
onto the cylinder valve. Do not over-tighten the control knob
on the regulator valve. Do not use tools to tighten connection.
NOTE: If you are unable to make the connection, repeat steps 3 and 4.
5. Check that the hose does not contain kinks, does not come into contact with sharp edges, and does
not contact surfaces that may become hot during use.
6. Leak check all fittings before lighting cooker. See section on "Gas Leak Test Instructions" on page 12.
CONNECTING REGULATOR HOSE ASSEMBLY TO LP GAS CYLINDER
Turn Coupling Nut
CLOCKWISE
to Attach
Hand Tighten!
Turn Knob
COUNTER-CLOCKWISE
to OFF position
Upright
position