
Owner Manual


7
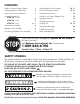
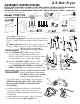
8. Lock Basket Handle into place by inserting handle
into loops on Basket. Then with some pressure,
carefully force Basket Handle Bars around the
clasp on the Basket.
5. Attach Shelf Brackets to Side Shelf
and Fryer using 4 - 3/4" Socket
Bolts/Washers.
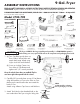
Side Shelf
with Brackets
Underneath
Side Shelf
4. Attach 2 Medium Hex Nuts/Washers on
Side Shelf of Fryer as shown below. Then Slide
Side Shelf onto the nuts on side of Fryer Wall.
Side Shelf on
Fryer Wall
Side of Fryer for Shelf
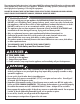
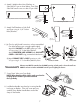
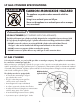
Exhaust vent MUST be attached to the RIGHT opening on back panel so that exhaust flows
AWAY from burner intake and AWAY from the person lighting the burner.
WARNING
6. (a) Check to verify that all connections on the pre-assembled
Gas Inlet/Jet Burner are screwed together tightly.
Attach the GAS INLET to the LEFT opening on side
of Fryer using 1/2" Socket Bolts/Washers.
Attach REGULATOR HOSE ASSEMBLY with GAS INLET
COVER to GAS INLET using pre-attached Hardware.
(b) Attach EXHAUST VENT to RIGHT opening on side
of Fryer using 2 - 3" Socket Bolts/Washers/Nuts.
(b)
(a)
Hex Nuts/Washers attach to threaded studs Fryer Wall
7. Screw Drain Valve onto Fryer Body.
NOTE: When Attaching Drain Valve, make sure that the
Locking Tab for Handle is positioned towards
the Fryer Body.
Side of
Fryer Wall
ON RIGHT
SIDE
ON LEFT
SIDE
EXHAUST VENT
GAS INLET/JET BURNER