
Owner Manual


6
ASSEMBLY INSTRUCTIONS
READ ALL SAFETY WARNINGS & ASSEMBLY INSTRUCTIONS CAREFULLY BEFORE ASSEMBLING OR OPERATING
YOUR FRYER. Inspect contents in the box to ensure all parts are included and undamaged.
FOR MISSING PARTS OR ASSISTANCE, PLEASE CALL 1-800-864-6194 M-F 7:30am - 4:30pm CST.
Proof of purchase will be required.
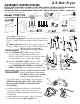
TOOLS REQUIRED:
Adjustable Wrench
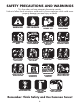
PARTS INCLUDED:
Model #700-709
1 - Fryer Body
3 - Stainless Steel Baskets
1 - Cart Bottom
1 - Gas Inlet/
Jet Burner
1 - Exhaust Vent
1 - Thermometer
1 - Drain Hose
2 - Side Shelf Brackets
1 - Side Shelf
1 - Drain Valve
with 2 Gaskets
1 - Tank Hook
1 - Wingnut
for Tank Hook
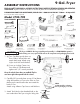
1. (a) Turn Cart Base upside down on
floor. Slide in Wheel Axle and
attach both Large Wheel using
Nylon Lock Nuts and Washers.
(b) Screw on Locking Casters into
front holes of Cart Bottom and
tighten with 1/2" wrench provided.
Once the wheels have been assembled, flip the
cart base right-side up and lock the casters.
This Fryer is HEAVY! Moving, unpacking and assembly is a TWO PERSON operation.
Before lifting onto cart, open lid and remove all components and packaging from inside.
2 - Wheels
2 - Locking Casters
1 - Wheel Axle
1 - Allen Wrench
Allen Wrench, provided
NOTE:
Lock Down Tabs on Casters
before placing Fryer on Cart
CAUTION
9-Gal. Fryer
1- Regulator
Hose Assembly
with Gas Inlet Cover
2 - Nylon Lock Nuts
& 4 - Washers
for Wheels
2 - Medium Hex
Nuts/Washers
for Mounting Side Shelf
4 - 3/4" Socket
Bolts/Washers
for Side Shelf Brackets
4 - Button Cap
Screws/Washers
for Cart Bottom
4 - 1/2" Socket Bolts/Washers
Pre-Assembled onto Gas Inlet
2 - 3" Socket
Bolts/Washers/Nuts
for Heat Exhaust
2. Carefully lift Fryer and place on top of Cart Bottom.
Align the brackets on Fryer to the holes on Cart.
Make sure the tank locater tabs are toward the
back of Cart.
Attach using 4 Button Cap Screws and Washers.
(a)
(b)
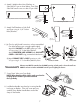
3. Attach Tank Hook to the threaded shaft on the
rear underside of the fryer using the Wing Nut.
1/2” & 5/8” Wrench,
provided
3/8” & 1/2” Wrench,
provided