
Instructions / Assembly

1- Poultry Rack
1. Remove components from the box and packaging.
Turn round frame upside down as shown for proper
assembly.
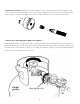
2. Mount Burner Support Bar – Line up holes in
support bar to the holes in the frame. Attach with four
short bolts and four locking nuts. Wrench tighten.
3. Attach Burner and Heat Shield to Support
Bar – Remove locking nut from bottom of burner.
Turn burner upside down and position burner into “U”
of support bar with end of burner turned to the front.
Insert mounting bolt into center hole of bar. Holding
burner in place, position heat shield over bolt. Attach
locking nut and wrench tighten. NOTE: make sure
cutout in heat shield is turned toward end of burner
(front of cooker) to avoid interference.
4. Attach Legs to Round Frame – Slide legs on
frame to match holes. Insert long bolts and attach with
locking nuts. Hand tighten.
5. Return frame assembly to upright position and fully
tighten leg bolts with a wrench.
6. Attach Hose Guard to Heat Shield – Place
hose guard over the burner and align its holes with the
holes in the heat shield. Attach the hose guard with
the small screws, locking washers and wingnuts as
shown.
(continued on next page)
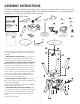
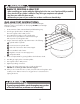
ASSEMBLY INSTRUCTIONS
Tools required:
Carefully assemble this appliance according to these instructions. Inspect contents in the box to ensure
all parts are included and undamaged. Please contact Barbour International, Inc. if any parts appear
damaged or missing. Proof of purchase will be required.
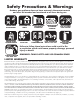
Parts Included:
2
3
4
1
5
6
Adjustable Wrench
Phillips Head
Screwdriver
1-12-in thermometer
Model # 5025
1- Heat Shield
1- Round Frame
1- Burner Support Bar
1- Hose Guard
1- Burner with
Locking Nut
4- Short Bolts
3- Long Bolts
2- Wing Nuts
7- Locking Nuts
2- Serrated Washers
2- Small Screws
1- Air Shutter
1- Spring
5
1- Stockpot with Lid
3- Legs
1- Hose Valve
Regulator (HVR) with Timer
Model # M5HPR-TMR
1- 2-oz Seasoning Injector
Model # 5030
1- Poultry Lift Hook