
Technical data


Modifying and Saving Router Configurations
117347-A Rev. A 3-3
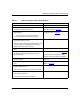
Table 3-1. Tasks to Configure a New or Existing Router
Task Instructions
1. Connect to the router. Refer to Chapter 1.
2. Verify free space on the destination router volume and,
if applicable, compact flash memory.
Refer to “Verifying Available Space on the
Destination Volume” on page 3-5.
3. Make a copy of the configuration file using the Router
Files Manager.
• For new routers, make a copy of
startup.cfg.
• For existing routers, make a copy of
config.
Refer to “Making a Copy of the Existing
Configuration File” on page
3-7.
4. Open a new file or the existing configuration file in any
Configuration Manager mode.
If you are using an existing file in local mode, you must
manually transfer the configuration file to the Site
Manager workstation before opening it.
Refer to Chapter 2.
5. Specify the router’s hardware for a new file (local mode
only).
Refer to Chapter 2.
6. Modify the configuration file.
For example, add a protocol interface or change
parameter values.
Refer to “Configuring a Circuit” on page
3-12.
For instructions on configuring a specific
protocol, refer to the guide for that protocol.
7. Save the configuration file under a new name, for
example,
test.cfg
.
Refer to “Saving Configuration Files” on
page 3-30.
8. Transfer the configuration file to the router (local mode
only).
Refer to “Saving a Configuration File in Local
Mode” on page 3-30.
9. Perform a named boot to boot the router with the
modified configuration file.
This tests the new file before you rename it to
config
.
Refer to Chapter 4.
10. Rename the new configuration file to
config
after the
router boots successfully.
The new file is now the default
config
file.
Refer to Chapter 4.