
Technical data


Configuring and Managing Routers with Site Manager
4-6 117347-A Rev. A
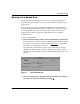
3. For a router with multiple volumes, specify the volume for the boot image
and the volume for the configuration file.
a. Click in the volume box for the boot image (not the box that displays
the name of the boot image file, for example, bn.exe).
A menu lists all available volumes.
b. Choose the volume with the boot image that you want to use.
c. To boot with a different image file, type the file name in the field next
to the volume box.
d. Repeat steps a through c for the configuration file volume and name.
4. Click on Boot.
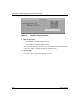
A confirmation window appears.
5. Click on OK.
The router boots using the router software image and the configuration file
you specified.Wait a few minutes for the router to boot.
6. In the main Site Manager window, choose View > Refresh Display to
verify that the router booted correctly.
If the router booted correctly, the new system information appears in the main
Site Manager window.
If Site Manager does not display system information, the router did not boot
successfully. Contact your local Bay Networks Technical Solutions Center for
assistance.
If you can no longer access the router with Site Manager, refer to Using
Technician Interface Software for instructions on using the Technician
Interface to access the router. Contact your local Bay Networks Technical
Solutions Center for assistance.
7. If you are confident the configuration file is stable, go to the next section,
“Copying and Renaming the Configuration File.”