
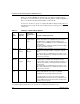
Technical data


Installing and Operating BayStack ARN/DC Routers
2-6
116273-B Rev 00
Using Netboot, Directed Netboot, or Local Boot
When you netboot or local boot the ARN/DC, you must use a command line
interface that accesses the router software. To use a command line interface, you
can:
• Wait for the ARN/DC to local boot (that is, wait for the router to fail
EZ-Install and then attempt to boot using its local configuration file). After the
ARN/DC boots locally, you can log in to the Technician Interface and redefine
the boot process.
• Interrupt the boot process using a break sequence and log in to the ARN/DC
monitor to redefine the boot process.
Using the netboot, directed netboot, or local boot options requires that you:
• Connect any necessary communications cables to access the network.
• Connect a management console.
• Connect the ARN/DC power cable.
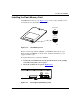
• Install a flash memory card.
See Chapter 1, “Installing the ARN/DC,” for instructions on how to complete
these tasks.
Interrupting the Boot Process
Interrupting the boot process automatically starts the ARN/DC monitor. Using the
ARN/DC monitor allows you to bypass the EZ-Install procedure.
To interrupt the boot process:
1.
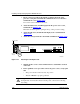
Flip the power switch on the ARN/DC back panel upwards to the on (1)
position.
As the router powers on, your console displays the ARN/DC diagnostic tests.
After successfully completing these tests, the router begins the EZ-Install
procedure and attempts to boot over the network.
Note:
Before you power on the ARN/DC, make sure that you have installed
the router and connected the management console equipment you need (see
“Connecting a Management Console” on page 1-21).