
Technical data


Starting the ARN/DC
116273-B Rev 00
2-5
Using EZ-Install
EZ-Install is the default installation option provided by Bay Networks. This
option requires that your network administrator has set up the network so that you
can start the EZ-Install procedure. In addition, this option requires that you:
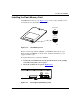
• Install a flash memory card. For instructions, see “Installing the Flash
Memory Card” on page 1-29.
Connect at least one serial (COM) interface to the network. For instructions,
see “Connecting Communications Cables” on page 1-10.
To use EZ-Install:
1.
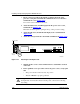
Press the power switch on the ARN/DC back panel to the ON position.
The ARN/DC comes on and activates EZ-Install.
2.
Ensure that the ARN/DC boots correctly.
When the ARN/DC boots, its LEDs flash in a particular order. For
information on checking the ARN/DC front-panel LEDs to ensure that the
installation was successful, see “Ensuring a Successful Installation” on page
3-8.
Note:
If your ARN/DC does not have a COM interface, you must configure
the ARN/DC using one of the other methods such as netboot or directed
netboot over an Ethernet interface. Or, you may local boot the ARN/DC and
run the Quick-Start script. For more information, see “Using Netboot, Directed
Netboot, or Local Boot” on page 2-6.
Note:
If you power on the ARN/DC before the network administrator is ready,
restart the ARN/DC by pressing the reset button on the rear panel. See Chapter
3, “Operating the ARN/DC” for more information on resetting the ARN/DC.