
Technical data


Installing and Operating BayStack ARN/DC Routers
1-8
116273-B Rev 00
3.
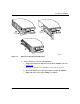
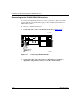
If the holes in the rack’s vertical supports are not threaded for cagenut
screws, insert a cage nut in four locations (Figure 1-3)
.
4.
Holding the ARN/DC in position, align the flanged end of each bracket
with two holes on each side of the vertical rack support (Figure 1-3)
.
It is easiest to complete this step with two people. Be certain that the hole
pairs on either side of the vertical support match horizontally.
Figure 1-3. Installing the ARN/DC in an Equipment Rack
5.
Insert a cagenut screw through each bracket hole and into the
corresponding holes in the rack.
6.
Tighten each cagenut screw with a Phillips screwdriver.
Rail without
Threaded Holes
Use Cage Nut
Cagenut Screw
(4 Places)
ARN0005A
COM3 COM4 COM5
COM
U
D
DD
B1
B2
RLSD
Run
Boot
Fail
Pwr
RPS
Fan
Base
Adapter1
Adapter2
Expansion
DCM
PCMCIA
BayStack Advanced Remote Node
RLSD3
RLSD4
RLSD5
1
2
Serial
Serial
ISDN BRI
withNT1
Tx
Rx
Cl
Tx
Rx
Cl
10BaseT
AUI
Ethernet 1
10BaseT
AUI
Ethernet 2