
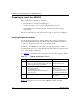
Technical data


Installing and Operating BayStack ARN/DC Routers
1-6
116273-B Rev 00
Installing the ARN/DC
When you are ready to install the ARN/DC, you can do one of the following:
• Position the ARN/DC on a flat, sturdy, horizontal surface.
• Mount the ARN/DC in a standard equipment rack.
Positioning the ARN/DC on a Flat Surface
When positioning the ARN/DC on a flat surface, make sure that the surface is
• Large enough for the ARN/DC to operate properly
• Sturdy enough to support the combined weight of the ARN/DC and any
cables you attach
We recommend that you place the self-adhesive rubber feet on the bottom of the
ARN/DC chassis (shipped with the ARN/DC). These feet protect the surface on
which you position the ARN/DC and provide added friction against the weight of
any cables you attach.
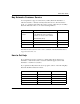
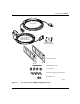
Rack-Mounting the ARN/DC
For this procedure, you need
• Two flange brackets and ten #6 flathead screws (shipped with the ARN/DC).
• A Phillips screwdriver.
• A standard 19-in. equipment rack. If the rack does not have threaded rail
holes, you must attach the four cage nuts shipped with the ARN/DC.
• Four #10 cagenut screws and washers (shipped with the ARN/DC).
To rack-mount the ARN/DC:
1.
Determine how you want the ARN/DC to fit in the equipment rack.
Multiple holes in the flange brackets provide several options for
rack-mounting the ARN/DC. How you attach the flange brackets determines
how far the router extends outside or remains inside the rack. Figure 1-2
shows three of the most common locations for the brackets.