
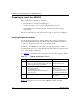
Technical data


Installing and Operating BayStack ARN/DC Routers
1-4
116273-B Rev 00
Supplying Equipment
You may need items that are not included in the ARN/DC accessory package.
Before installing the ARN/DC hardware, ensure that you have all the cables, tools,
and other equipment you need.
Cables
Unless you specifically ordered them, the cables required for your network
configuration are not included in the ARN/DC accessory package. If you do not
have the proper cables, contact your network administrator or see the Cable
Guide.
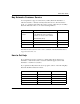
Hardware for Rack-Mounting the ARN/DC
To install the ARN/DC in an equipment rack, you need a Phillips screwdriver and
a rack that meets the following specifications:
• Heavy-duty steel construction
• Electronic Industries Association (EIA) standard hole-spacing
• Width of 19 in. (48.26 cm) and depth of 24 in. (60.96 cm)
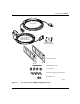
If the rack does not have threaded rail holes, you must use cage nuts (see
Figure 1-1
) with the cagenut screws.
Management Console
To configure startup options and to monitor the results of startup diagnostics, you
can attach an optional VT-100 console or equivalent, such as a PC terminal
emulator. Or, you can attach any AT-compatible modem to allow dial-in access to
startup configuration and diagnostics.
With the optional V.34 Console Modem Module installed, you can connect an
external V.34 modem as a management console.
Note:
To use the Netboot, Directed Netboot, or Local Boot configuration
option (see Chapter 3), connect a management console before turning on the
ARN/DC.