
Technical data


Installing and Operating BayStack ARN/DC Routers
1-2
116273-B Rev 00
Preparing to Install the ARN/DC
Before beginning the installation, verify that:
• Your shipment is complete and undamaged.
• You have the cables, tools, and other equipment that you need.
• Your installation site meets the physical, electrical, and environmental
requirements.
The sections that follow provide information to help you prepare for installation.
Verifying Shipment Contents
You should inspect all items for shipping damage. If you detect any damage, do
not install the ARN/DC. Call the Bay Networks Technical Solutions Center in
your area, as described on page xxiii of “About This Guide.”
In addition to the ARN/DC and this guide, your shipping container contains
several hardware accessories. Verify that the items in the shipping container match
those on the shipment packing list.
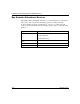
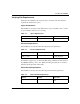
Use Table 1-1
as a checklist when verifying the contents of the shipping container.
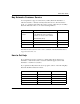
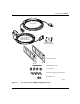
Figure 1-1
illustrates the accessories in the ARN/DC shipping container.
Table 1-1. ARN/DC Shipping Accessories
Check Accessory Use To:
Cable kit (Order No. 110310), containing:
• One 15-foot AT standard molded serial cable
• One null modem crossover adapter
Connect an optional
management console.
Bracket kit, containing:
• Two flange brackets
• Ten #6 flathead screws
• Four #10 cagenut screws with washers
• Four cage nuts
Mount the ARN/DC in an
equipment rack.
(Use the four cage nuts only
if the equipment rack does
not have threaded rail holes.)
Four rubber feet Operate the ARN/DC on a
flat surface.