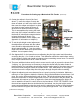
Baumfolder Corporation Instruction Manual Older Folder Models These instructions are written as a generic instruction manual for all older folders. If you have a Mark 2 or any other folder that has fixed right angle(s), where all sections are fastened together, ignore information where it mentions height of unit or movement of any section. The main difference of the fixed frame units is that you must remove the cross carrier to add the stacker after each unit.
Baumfolder Corporation CONTENTS THEORY OF OPERATION 3 REGISTER TABLE ADJUSTMENT 4 REGISTER TAPES AND TUCK IN SHOES 5 PROCEDURE FOR SETTING UP A MECHANICAL PILE FEEDER 6 OPERATING A FRICTION FEED BAUMFOLDER 11 SETTING UP A JOB SETTING UP THE FOLDER 13 CALIBRATION OF THE ZERO BAUMSET 15 STACKER AND STACKER PAN 17 FIRST RIGHT ANGLE / EIGHT-PAGE SECTION 18 USING SLITTER SHAFT ACCESSORIES 20 CENTER TRIM OUT 21 RUN AND CUT MULTIPLE SHEETS AT ONCE 23 SCORING 24 PERFORATING 26 END TRIMS
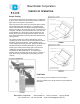
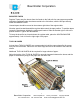
Baumfolder Corporation THEORY OF OPERATION Buckle Folding As the sheet of stock leaves the register section, it is picked up by the #1 idler roll and main drive roll and is driven toward the paper stop in the fold plate. (See figure 1). When the sheet of stock advances to the point where it strikes the fold plate paper stop (See figure 2). The leading edge stops but the remainder of the sheet is still gripped and being driven by the rollers.
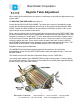
Baumfolder Corporation Register Table Adjustment When setting up the initial job on your folder it is necessary to start with the adjustment of the register table. TO POSITION THE SIDE GUIDE (see figure 4) Loosen the MICRO-ADJUSTING KNOBS. Turn them to the center of the adjusting range. Loosen the thumbscrews (underneath the left side of the register board) holding the SIDE GUIDE.
Baumfolder Corporation REGISTER TAPES Register Tapes carry the sheets from the feeder to the fold rolls. As many tapes as possible should be positioned under the sheets carried to the fold rollers, with the left tape directly under the MARBLE RACK. Unused tapes should be moved to the extreme right side of the register table. Wooden spools located beneath the register table control the tape position. To position tapes loosen the thumbscrew holding the guide spool bracket.
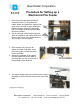
Baumfolder Corporation Procedure for Setting up a Mechanical Pile Feeder 1. Place a strip of paper approximately 2” wide and at least 11” long under the marble holder and against the register side guide. Move the strip of paper toward the feeder keeping it against the side guide until it is a couple of inches past the blow bar into the feeder. 2.
Baumfolder Corporation Procedure for Setting up a Mechanical Pile Feeder (Continued) 6. Loosen the thumbscrew on the air bracket and blow bar; raise the blow bar as high as possible. Tighten the thumbscrew. 7. Loosen the two bolts on the air bracket and move it toward the register table as close as possible without the blow bar rubbing the pull out roll. Tighten the two bolts. 8. Adjust the lever on the blow tube to a straight up position so it can be moved forward or backward in the future.
Baumfolder Corporation Procedure for Setting up a Mechanical Pile Feeder (Continued) 9. Now load about five inches of the stock you are to run on the feed table against the corner front vertical guide and the front vertical guides. The stock should be properly fanned and jogged before loading on the feeder. Keep the stock as flat as possible. Now raise the load with the hand crank until it is about 1-½ inches below the sucker feed wheel. 10.
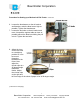
Baumfolder Corporation Procedure for Setting up a Mechanical Pile Feeder (Continued) 13. Center the caliper in front of the feed wheel. To move the caliper, first trip the throw off wheel so it will move side to side then reset the caliper and adjust it to allow one sheet to travel under the throw off wheel but not allow two sheets to pass. This is accomplished by turning the knob at the top of the caliper clockwise to raise the throw off wheel and counterclockwise to lower the throw off wheel.
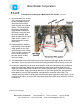
Baumfolder Corporation Procedure for Setting up a Mechanical Pile Feeder (Continued) 18. Turn on the pump control and move the lever on the blow bar so that the top 5 to 8 or 9 sheets of the stock are separating. Open the butterfly valve that controls the blow from the pump and then slowly begin closing it until sufficient amount separate the sheets about ¾ of the length of the sheet. 19.
Baumfolder Corporation Operating a Friction Feed Baumfolder To position the LEFT FEED GUIDE, loosen the wing nuts (underneath the feed table). Position the guide approximately ¼ inch to the right of the register table SIDE GUIDE, and parallel to the left edge of the FEED TABLE. Tighten the wing nuts. Place a sheet of paper to be run against the LEFT FEED GUIDE. Loosen the wing nuts on the RIGHT FEED GUIDE and move it against the sheet.
Baumfolder Corporation Operating a Friction Feed Baumfolder (Continued) To correctly position the FEED PLATE FORK, the inside edge should be ¾ inch in front of the FEED PLATE, as shown here. ADJUSTING FOR PAPER FEEDING Adjust the Retarder Roll to allow a sheet of paper to go between the feed wheel and the retarder roll by moving the ADJUSTING SCREW KNOB up or down by turning it clockwise or counter clockwise.
Baumfolder Corporation Setting up a Job Before you set up any job, check the sample fold. The folder operator should make sure they have enough fold plates in the folder you will be using. For an example: If you have a four-panel wrap around fold, you would need three up plates. That would mean you would either need a six-plate folder in the parallel or an eight-page unit (second section) to run in tandem.
Baumfolder Corporation Setting up a Job (Continued) ( step 3 continued ) strips of paper. (The thickness of paper you are going to run). You want a drag as you pull the strips. If you have a folder with STANDARD TENSION SCREW ROLLER ADJUSTMENT, loosen the TENSION LOCKING NUT and turn the ADJUSTING KNOB clockwise to add tension on the strip of paper or counter clockwise to reduce tension on the strip of paper.
Baumfolder Corporation ( step 7 continued ) thumbscrews. Set the number three FOLD PLATE STOP at three and five eight’s. Tighten the Thumbscrews. 8. Turn one sheet through the folder until it leaves the folder and is ready to enter the SLITTER SHAFTS. Place a PULL OUT TIRE approximately one inch from the left side of the sheet on the top shaft and one PULL OUT TIRE approximately one inch from the right side of the sheet. Turn the hand wheel to allow the folded sheet to leave the Slitter Shaft.
Baumfolder Corporation ( step 4 continued ) counterclockwise, rocking back and forth to be sure the rollers are seated. (Note: When setting the #3 and #5 Baumsets, it will be necessary to turn the handwheel clockwise to roll the strip in place.) 5. Adjust the micro adjustment knob until you can pull the strip of paper out from between the #1 and stationary roll using a steady, light pull. You should feel an even drag of the sheet. 6. Tighten the Baumset lock knob. Remove the pull strips. 7.
Baumfolder Corporation Setting up a Job – Calibration of the zero Baumset (Continued) Once the Baumset has been calibrated or zeroed-in the fold rollers can be set automatically with a designated amount of paper in each Baumset or each roller can be set manually. To calibrate rolls: 1. Be sure all rolls are closed (together). Turn tension screw until washer (A ) is just touching Roll Brg ( B ). 2. Insert one thickness paper (small) into each Baumset ( C ) lift lever ( D ) to insert. 3.
Baumfolder Corporation Setting up a Job – Stacker and Stacker Pan (Continued) ( step 2 continued ) trailing edge of the sheet/signature down so as the next sheet/signature comes out, it does not strike the previous sheet/signature. The Stacker Springs can be bent so they apply enough pressure to hold the sheet/signature in place until the next sheet/signature comes out. This is used when you don’t want to use the Stacker Wheels. A map fold is an example of when you would not use the stacker wheels.
Baumfolder Corporation Setting up a Job – First Right Angle (Continued) 4. Square the guide the same way you squared the register side guide. On older Baumfolders, there are two bolts on each side of the thumbscrew. Loosen the bolts to move the guide. On the newer Baumfolder, they have micro adjustments. Once the guide is squared (90 degrees) with the fold rollers, tighten the bolts. 5.
Baumfolder Corporation Using Slitter Shaft Accessories You can perforate, score, take out trim outs (gutter trim), and end trim on your folder. Once you know how to use them and what they do, the more profitable your folder becomes. Each will be described separately but you can use a combination of any or all them together. Baum produces an Imposition Manuel to show 144 different types of folds and which fold plates to use for each one, plus the layouts. You can write to Baum for your copy.
Baumfolder Corporation Center Trim Out on your Baumfolder The purpose of the center trim, sometimes called gutter trim, is to be able to print signatures two up and trim out the center on the folder and chase on the cross carrier into the second fold section. This allows you to have two signatures at the same time and doubles your production. This is accomplished by mounting four slitter blades on four blade holders.
Baumfolder Corporation Center Trim Out (Continued) When mounting the blade to the blade holder, leave the screws loose, then slide the blade holder and the blade on the slitter shaft before you tighten the screws. This aligns the blade and the blade holder so they slide onto the slitter shaft. The parts and the part numbers are listed below.
Baumfolder Corporation Run and cut multiple sheets at the same time There are times when you have a small sheet to run such as small religious tracks and it would be better if you could run them three or four up. That’s no problem. If you want to slit with no trim out, just install a slitter blade mounted on a blade holder on the top slitter shaft and one on the bottom slitter shaft with the flat sides together as shown in the picture.
Baumfolder Corporation Scoring on your Baumfolder The folder can be used to score a sheet and deliver flat, or score a sheet after a fold or folds have been made. To ensure accuracy in making right angle folds, always score the sheet where the fold or folds are to be made. This applies in all instances when a perforator cannot be used. A rule to remember is to fold up (fold in # 1 or / and #3 fold plate), score down. To fold down (#3 or/and #4 fold plate), score up.
Baumfolder Corporation Scoring (Continued) Scoring against the rubber collar gives you a nice score. For this application, the score blade and the scoring collar is mounted on one shaft and the scoring rubber with metal scoring collar on each side of the scoring rubber on the other slitter shaft. To create a deeper score, squeeze the collars together against the scoring rubber as shown in the bottom picture.
Baumfolder Corporation Perforating on your Baumfolder The purpose in using a perforator is to allow air to escape. With certain types of folds such as wrap around folds, it pockets air and it is not allowed to escape. This causes ripples or “crows feet”. This is not acceptable in quality printing. The cuts in the perforation allow the air to escape. Normally the perforation is in a trimmed area.
Baumfolder Corporation Perforating (Continued) BAUMFOLDER Perforator Blade Chart Perforator Blades for Baumfolders with 7/8” Slitter Shafts Perforator Blades for Baumfolders with 1-1/8” Slitter Shafts Solid Blades Split Blades For more information or to order contact your local Baumfolder Dealer or call or fax the Baum Parts Department at Phone: 800 / 543-6107 Fax: 800 / 452-0947 ** End of Topic – Perforating ** 27 Baumfolder Corporation Ph: 1-800-543-6107 1660 Campbell Rd.
Baumfolder Corporation End Trims on your Baumfolder Taking off END TRIMS has too many advantages to list here. If you have a printed sheet that you want to trim off both sides, you can mount the end trims on the folder and save the operation of the paper cutter. The cut is made on one or both sides and the trim is deflected onto the floor under the folder. To be successful you should have a trim of at least ¼ inch.
Baumfolder Corporation Knock out Perforator Assembly A special Knock-out Perforator is available for improved perfect-binding operations and saddle stitching on your Baumfolder. When signatures are brought from the folder, they are vacuum fed on most types of binders and stitches. With some perforations, the vacuum can pull the sheets apart at the perforations, causing problems with the feeding.
Baumfolder Corporation Appendix A - To Calibrate Caliper Turn Caliper Adj. knob counter clockwise and push down until Throw off wheel contact the Feed Roll. Loosen set screw ( A ) – insert a Dime (10¢ piece) between Caliper squaring block and Throw off wheel setting lever. Make sure Draw roll latch is latched on to caliper reset pin. Apply light pressure down on Caliper adj. knob and tighten set screw ( A ).
Baumfolder Corporation Appendix B - Calibrate Pile High Control Provision is made for raising the pile more or less quickly to compensate for various sizes and thickness of stock. The ratchet mechanism used to raise the pile can be adjusted to provide a 1/32”, 1/16” or 3/32” rise per engagement of the ratchet. To time the feeder for 1/32” or 1/16” rise, remove the cover; position the crank gear and lift operating arm as shown above.
Baumfolder Corporation Appendix B - Calibrate Pile High Control (Continued) To time the feeder for a 3/32” pile rise, rotate the crank great 180 degrees from what is shown in the picture on the previous page. This will reverse the positions of holes A and B. Install the lift operating arm in hole B and adjust the latch pin the same as described for the 1/32 - 1/16 rise adjustment.