BAUM BAUMFOLDER CORPORATION Quality Bindery Equipment Since 1917 FLEXIFOLD 8 PAGE INSTALLATION, OPERATION, & PARTS MANUAL ©Baumfolder Corp., 2003 Printed in U.S.
© 2003 Baumfolder Corporation All Rights Reserved WARNING • Do not operate this machine without all guarding in place. • Do not make adjustments or perform maintenance on this machine with power on. • Keep the machine and the work area clean and free of spills to prevent accidents. • Be sure to replace any safety decals that may have been detached for any reason.
TABLE OF CONTENTS FUNDAMENTAL SAFETY INSTRUCTIONS ............................................................................... 5 1.0 INTRODUCTION ....................................................................................................................... 9 2.0 SPECIFICATIONS ..................................................................................................................... 9 3.0 INSTALLATION .....................................................................................
TABLE OF CONTENTS 10.0 COUNTER OPERATION ....................................................................................................... 16 10.1 Resetting the Total Count ........................................................................................................... 16 10.2 Rate ............................................................................................................................................. 16 11.0 FOLDER OPERATION .............................................
FUNDAMENTAL SAFETY INSTRUCTIONS! The diagrams and descriptions used in these instructions are not necessarily applicable to the specification of the machine supplied. Modifications, made for reasons of technical or operational improvement, are embodied without notice.
FUNDAMENTAL SAFETY INSTRUCTIONS! 1.0.3 These operating instructions are designed to familiarize the user with the machine and its designated use. The instruction manual contains important information on how to operate the machine safely, properly and most efficiently. Observing these instructions helps to avoid danger, to reduce repair costs and downtimes and to increase the reliability and life of the machine.
1.1.9 1.3.2.1 Report any accident that occurs due to a malfunction of the machine though all prescribed safety precautions were observed directly to our agency or to the Baumfolderservice department. Always press the emergency (Not-Stop) button first, if you stop the machine for adjustments or maintenance work which must not be done while the machine is in operation. 1.3.2.2 1.
1.4.1.3 Warning! The electrical equipment of machines is to be inspected and checked at regular intervals. Defects such as loose connections or scorched cables must be rectified immediately. Be careful! Height adjustment devices might cause bruising! 1.4.1.4 Warning! Necessary work on live parts and elements must be carried out only in the presence of a second person who can cut off the power supply in case of danger by actuating the emergency shut-off or main power switch.
1.0 INTRODUCTION Your new Flexifold 8 Page Modular Folder has been designed to give you many years of useful service provided it is installed, maintained, and operated according to the instructions in this manual. Your Flexifold 8 Page is a unique and versatile paper folding machine, capable of folding paper measuring between 3 x 5 inches (7.6 x 12.7 cm) and 14 x 20 inches (35.5 x 50.8 cm), at speeds up to 27,600 sheets per hour of 8 1/2 x 11 (21.6 x 27.9 cm) and up to 41,000 sheets per hour of 3x5 (7.6x12.
WARNING 4.3 Delivery Table Do not plug the power cord into an AC outlet until the Flexifold 8 Page is fully assembled, adjusted and ready to use. Unplug the Flexifold any time disassembly is required. 4.0 ASSEMBLY To install the delivery table, insert the delivery table with the drive wheel toward the fold rolls. Slide the delivery table over both sets of locating pins. The first notch in the front part of the delivery table should rest on the pins. Then drop the rear notch down on the rear dowel pins.
The center notches should seat on the second set of locating pins. Pivot the fold plate hold-downs back into position to secure the fold plates. 6.0 OPERATION Turn the handwheel to be sure that the fold plates are properly installed and not rubbing on the fold rolls. The main power/reset switch (Figure 6.1-1) will completely shut off all power to the operating system. This will stop everything immediately. Plug the fold pan connectors into the side frame. (See figure 4.5-1) 6.
6.4 Use of Handwheel The handwheel is used to help clear jams and for setup. To use the handwheel, shut off the folder, pull out the handwheel and turn it in either direction. Fold Stop Guide Figure 7.4-1 7.0 OPERATOR PANEL 7.
8.0 START UP When power is applied, the system will first test all LEDs, memory and display characters for 3 seconds. I I I I I I I I I I I I I I I I I I I I I I I I I I I I I I I I I I After the self diagnostic phase, the display will show the version number for 3 seconds. If there are no error messages the display will go to the jam detector screen if one of the jam detectors is disabled. If none are disabled or after depressing enter, the display will go to the initialization screen.
When the “ENTER” button is pressed, the fold plates and stacker will move to their new position. While the fold plate motor(s) are running, a PLEASE WAIT message will be displayed. When the motors have stopped, one of two screens will be displayed. PLEASE WAIT TOTAL COUNT ####### If the sheet length data was changed, the single sheet mode screen is displayed. If the sheet length data was not changed, the count screen will be displayed.
9.2 Setting up a special fold. This machine has 3 memory locations that can be used to store special fold settings. These will store the plate settings, the stacker wheel location, and the speed setting for a fold. 9.2.1 To save a nonstandard fold in a memory location 3 Set up the fold as you normally would. Once the speed and folds are set the way you want, press a “MEMORY SET” button. Recall will appear in the display. Press the (-) button to get to the STORAGE screen. 9.2.
10.0 COUNTER OPERATION TOTAL COUNT ####### During normal operation, the display should show the total count (maximum count 9,999,999), This display is known as the count screen. RESET 10.1 Resetting the total count To reset the total count press the “RESET” button, then press the “COUNT” button. TOTAL COUNT ####### 10.2 Rate The “RATE” button is used to display the average pieces per hour, both current and average since the last total counter reset.
11.0 FOLDER OPERATION 11.1 Time The “TIME” button will display the time since the last total count reset and the total hours that the main drive has been on, the customer can not reset this meter. Both hour meters will increment only when the folder is running. The main power will have no affect on these meters. JOB RUN TIME TOTAL HOURS #### ###### NOTE: If a button is not pressed within 2 minutes the machine will return to the operating mode.
11.3 Speed The speed of the machine can be changed by pressing the “SPEED” button while the main drive motor is running or stopped. SPEED 60% CHANGE WITH +/NOTE: If a button is not pressed within 2 minutes the machine will return to the operating mode. Using the “+” and “-” buttons, to adjust the speed. The “+” button will increase the speed gradually, as long as the button is depressed. Once the folder reaches it's maximum speed a message will be displayed until the ENTER button is pressed.
Pressing the “+” button once will increment the plate stop .010". Holding it down for more than 2 seconds will increment the plate stop continuously at slow speed. Holding the “+” button down for more than 5 seconds will increment the plate stop continuously at high speed until you release the button or the plate stop hits the home position switch. Pressing the “-” button once will decrement the plate stop position .010".
Pressing the “-” button will decrement the stacker wheels position at slow speed. Holding the “-” button down for more than 2 seconds will decrement the stacker wheels position at high speed until you release the button or the stacker wheels hit the home position. Once the stacker wheels have reached the home switch the drive is disabled and a message will be displayed for 5 seconds after the “-” is released. After the stacker wheels are in position press the “ENTER” button.
Display shows: FEEDER JAM ENABLED DISABLE ? (+) YES (-) NO OR FEEDER JAM DISABLED ENABLE ? (+) YES (-) NO 2) When the “+” or “-” button is depressed, Display shows: EXIT JAM ENABLED DISABLE ? (+) YES (-) NO OR EXIT JAM DISABLED ENABLE ? (+) YES (-) NO 3) When the “+” or “-” button is depressed, Display shows: TOTAL COUNT ####### PAGE 21 TP10432
12.0 PERFORATING, SCORING & SLITTING Figure 12.1-2) In addition to folding, your Flexifold 8 Page can perforate, score and slit. WARNING Unplug power supply before working on equipment. Be careful when handling perforator and slitting blades. They are extremely sharp. 12.1 Perforating Slide the perforator collar and blade holder to the desired position on the slitter shaft. Re-install the pullout tire assemblies on the right end of the upper and lower shafts.
12.2 Scoring 12.3 Slitting The Flexifold can be used to score a sheet and deliver it flat, or to score a sheet after a fold or folds have been made. NOTE: Slitting accessories are optional on your Flexifold and can be ordered from your BAUMFOLDER Parts Department. To ensure accuracy in making right-angle folds, always score the sheet where the fold is to be made. This applies in all instances when a perforator cannot be used. The Flexifold can be used to cut folded or flat sheets apart.
13.0 MAINTENANCE 13.4 Photo Eyes 13.1 Maintenance and Care of your 814MF cloth. Occasionally wipe off both photo eyes with a dry The Flexifold Air Feed has been designed to give you years of useful service, provided you maintain it according to these instructions. 13.2 Cleaning of Fold Rolls Periodically wipe off the rubber surface of the fold rolls using an approved solvent such as Surewash or its equivalent.
14.0 LANGUAGE SELECTION Switch location, on the electronic board, for language and voltage selection settings.
15.0 DISPLAY MESSAGES The following are other display messages that may appear. KEYBOARD MISSING INSTALL DELIVERY OR PRESS RESET BAD KEYBOARD INSTALL PLATE NO.1 OR PRESS RESET FOLDER OVERLOAD PRESS RESET INSTALL PLATE NO.2 OR PRESS RESET PAN 1 STOP 05.00 IN CHANGE WITH +/- NO TACH. CHECK MOTOR, BELTS, ENCODER CHANGE +/- PLATE NO.
SUREWASH 16.0 MATERIAL SAFETY DATA SHEET NOTICE: Surewash is a product of RBP Chemical Corporation, 150 S. 118th St., P.O. Box 14069, Milwaukee, Wisconsin 53214-0069. Tel. 414/ 258-0911, 800/558-0747. Inhalation of high concentrations may cause respiratory tract irritation and may affect central nervous system. May cause skin irritation. Chronic over-exposure to many petroleum hydrocarbons may cause liver or kidney injury. May cause eye irritation.
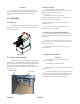
17.0 BASIC THEORY OF BUCKLE FOLDING If a sheet of paper is laid on a flat surface and driven into a stationary object, a buckle or series of buckles will form along the surface of the sheet. If the sheet of paper is pushed into a narrow channel before butting up against the stationary object, the buckles that form within the channel will be of a much smaller size than free-forming buckles. At the end of the channel, however, larger buckles will again start to form.
If the channel is angled to produce a downward pressure, and two folding rollers, spinning as indicated, are placed close to the end of the channel, the larger buckles that start forming there will always be formed downward and be pulled into the rollers, compressing into a fold.
Look at figure 1. You can see that fold plate #1 is angled upwards. Because of this and the configuration of the fold rollers, sheets fed into the #1 plate will always be folded up (i.e. so that the “up” surface of the sheet is folded into contact with itself). Likewise, because fold plate #2 is angled down, sheets fed into it will be down-folds; the “down” surface of the sheet will be folded into contact with itself. The picture shows the plate #2 deflector in position.