IFOLD OPERATORS MANUAL TP10509
TABLE OF CONTENCE IFOLD STARTUP PROCEDURES………..................…...PAGE 1 IFOLD SHUTDOWN PROCEDURES…………................PAGE 1 SCREEN MAINTAINENCE……………….....................….PAGE 1 WARRANTY NOTE………………….……………..............PAGE 1 MAIN SCREEN HELP…………………..........................…PAGE 2 FOLD SELECT HELP………………………..….................PAGE 5 PAPER SELECT HELP……………………..................…..PAGE 6 SUMMARY PAGE HELP………………………..................PAGE 9 ADJUST PARALLEL HELP………………........................
Start up procedures The I-Fold software should start-up automatically when the machine is turned on. If for any reason it does not start up properly cycle power to the machine. If the I-Fold software still will not start up contact your local dealer for support. Shut down procedures It is very important to shut down the I-Fold properly before turning off the machine. Before powering down the machine press the button to start the power down procedure.
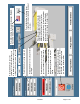
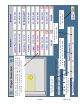
TP10509 Page 2 of 29 Touch this button before turning off the machine. Once the screen says it is safe to turn off your computer then you can turn off the machine Touch this button for troubleshooting help with any problems you may be having Touch this button to see parts and operators manuals for your machine. Touch this button to recall a previously saved job Touch this button to setup a new job Touch this button to go to the summary screen for the current job.
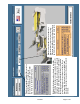
TP10509 Page 3 of 29 Touch these buttons to see the current settings for the fold plates and Baumsets for the indicated fold section. You can also make changes to these settings if necessary. If you do not have an 8 page(2nd station) or a 16 page(3rd station) the buttons will not be displayed. When this box is red it indicates there is a maintenance item that needs your attention. You can touch this button anytime to see recommended maintenance items and how to do them.
TP10509 Page 4 of 29 If this is the first time you have logged on touch the NEW button then type your name and touch enter. It will ask for a password, if you do not enter a password at this time you will never be ask for one in the future. If you type a password and touch enter you will need to enter this password every time you log in. If you have logged in before just type in your initials and touch enter then type in a password and touch enter if necessary.
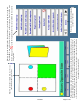
TP10509 Page 5 of 29 Paper orientation shows how to load the paper and how the address or label will come out on the stacker. Example: Load the address or label down and forward (toward the sucker wheel) and the label will come out face up on the stacker. Panels indicates the number of panels in a roll or accordion fold. If the stacker display shows none, the output on the stacker is difficult to determine for the selected fold. This box shows the selected fold.
TP10509 Page 6 of 29 A Touch these boxes to enter a custom paper size. When you touch a box a keypad will pop up. Using the keypad enter the paper custom paper size. Do this for both the width and length. This box shows how the paper is loaded (label or address face down and forward). You can change this from portrait (shown) to Landscape and back by touching the orientation button.
TP10509 Page 7 of 29 Touch this button to go back to the fold select screen. Touch this button to go to the summary screen. Touch this button to go to the main screen. Touch this button to go to the feeder setup screen. Touch this button to see the setup list. The setup list is explained on the next page. Touch this box once the desired paper size and orientation have been selected. The text will change from select this paper size and orientation to fold/paper setup completed.
TP10509 Page 8 of 29 This will come up on the left of any setup screen when the see setup list button is touched. This list shows all of the setup screens needed for the selected fold. You can go to any screen on the list just by touching the corresponding button. The done button shows a green checkmark when the page is completed and the press when setup complete button has been touched. This can help you keep track of where you are in the setup of the job.
TP10509 Page 9 of 29 This area shows the suggested scoring dies for each station to run the selected fold. This area shows the feeder settings. Where to set the non-operator side paper guide and the blow tube settings. Touch this button to see the setup list. The setup list is explained on page 4. These areas show the number of sheets that go under each gapset and the fold plate settings for every station required to do the selected fold.
TP10509 Page 10 of 29 In this area you can enter up to 4 notes with up to 55 characters per note to be saved with a fold job. These could contain information like what speed it ran best at if it needed a slit or a perf and what type of perf. To enter a note just touch one of the gray lines next to a note: and a keypad will pop up (see the next page).
TP10509 Page 11 of 29 Use the keypad to enter a note, the clear button will clear everything in the display, this is recommended if you are entering a new note. The Ins/Del button is used to control what happens when you touch the arrow buttons. If the button displays Ins you are in insert mode the < and > buttons will move the curser left or right then anything you type will be inserted where ever the curser is located.
TP10509 Page 12 of 29 This will come up on the left of any setup screen when the see setup list button is touched. This list shows all of the setup screens needed for the selected fold. You can go to any screen on the list just by touching the corresponding button. The done button shows a green checkmark when the page is completed and the press when setup complete button has been touched. This can help you keep track of where you are in the setup of the job.
TP10509 Page 13 of 29 These rows of boxes shows the number of sheets to be placed under the gapsets. In this example gapset 4 gets 2 sheets. To make a change to one of the settings just touch the box you wish to change and a keypad will pop up. This is shown and explained on page 3. 4 boxes show the settings for the fold plates. To make a change to one of the settings just touch the box you wish to change and a keypad will pop up. This is shown and explained on page 2.
TP10509 Page 14 of 29 This is the current setting (0 or blank = deflect). If a number is displayed touch the C to clear it then enter the desired number. The BK SP button will clear the last number entered. Touch done when you have finished.
TP10509 Page 15 of 29 This is the current setting touch the C to clear it then enter the desired number. Touch done when you have finished. This line indicates the gapset you are making a change to.
TP10509 Page 16 of 29 Touch one of these boxes to set the timer for the maintenance item to the right of that box. When you touch the box a keypad will pop up. Use the numbers to enter the time interval for the selected maintenance item then press done. Enter zero to turn off the selected timer. Click on any of these boxes to see how to perform a maintenance item Press this to return to the main screen After the maintenance is preformed touch the box to reset the timer.
TP10509 Page 17 of 29 This box displays how long it will take to run the entire job. Not including setup or any other down time. Touch here to change the folder speed display from meters per minute to inches per minute. This box displays the sheets per hour. Touch this box to enter the total job size. This box displays the sheets per minute. Touch this box to enter the folder speed you plan to run the job. The default is 60% of full speed.
TP10509 Page 18 of 29 CORPORATION BAUMFOLDER UNIT NAME: IFOLD DISPLAY MOUNTING LOCATION IFOLD DISPLAY DESCRIPTION: ASSEMBLY NUMBER: SHEET 1 OF 1 REV:
TP10509 Page 19 of 29 CORPORATION BAUMFOLDER UNIT NAME: IFOLD DISPLAY ADAPTOR KIT IFOLD DISPLAY DESCRIPTION: ASSEMBLY NUMBER: FK2001484 SHEET 1 OF 2 REV:
TP10509 Page 20 of 29 CORPORATION BAUMFOLDER UNIT NAME: IFOLD DISPLAY ADAPTOR KIT IFOLD DISPLAY DESCRIPTION: ASSEMBLY NUMBER: FK2001484 SHEET 2 OF 2 REV:
TP10509 Page 21 of 29 CORPORATION BAUMFOLDER UNIT NAME: IFOLD DISPLAY MOUNT IFOLD DISPLAY DESCRIPTION: ASSEMBLY NUMBER: FK2001485 SHEET 1 OF 2 REV:
TP10509 Page 22 of 29 CORPORATION BAUMFOLDER UNIT NAME: IFOLD DISPLAY MOUNT IFOLD DISPLAY DESCRIPTION: ASSEMBLY NUMBER: FK2001485 SHEET 2 OF 2 REV:
TP10509 Page 23 of 29 CORPORATION BAUMFOLDER UNIT NAME: DISPLAY-ENCLOSURE IFOLD DISPLAY DESCRIPTION: ASSEMBLY NUMBER: FK2001370 SHEET 1 OF 2 REV:
TP10509 Page 24 of 29 CORPORATION BAUMFOLDER UNIT NAME: DISPLAY-ENCLOSURE IFOLD DISPLAY DESCRIPTION: ASSEMBLY NUMBER: FK2001370 SHEET 2 OF 2 REV:
TP10509 Page 25 of 29 CORPORATION BAUMFOLDER UNIT NAME: IFOLD DISPLAY MOUNT IFOLD DISPLAY DESCRIPTION: ASSEMBLY NUMBER: FK2001426 SHEET 1 OF 2 REV:
TP10509 Page 26 of 29 CORPORATION BAUMFOLDER UNIT NAME: IFOLD DISPLAY MOUNT IFOLD DISPLAY DESCRIPTION: ASSEMBLY NUMBER: FK2001426 SHEET 2 OF 2 REV:
TP10509 Page 27 of 29 CORPORATION BAUMFOLDER UNIT NAME: CABLE ASSY.
TP10509 Page 28 of 29 CORPORATION BAUMFOLDER UNIT NAME: CABLE ASSY.
TP10509 Page 29 of 29 CORPORATION BAUMFOLDER UNIT NAME: SCHEMATIC-IFOLD IFOLD DISPLAY DESCRIPTION: ASSEMBLY NUMBER: FK7600179 SHEET 1 OF 1 REV: