BAUM BAUM 2020 AUTOSET FOLDER W/PILE FEED SERVICE MANUAL TP10512
© 2006 BAUMFOLDER CORPORATION All Rights Reserved WARNING • Do not operate this machine without all guarding in place. • Do not make adjustments or perform maintenance on this machine with power on. • Keep the machine and the work area clean and free of spills to prevent accidents. • Be sure to replace any safety decals that may have been detached for any reason.
TABLE OF CONTENTS I. AUTOSET LIST OF “DO NOTS”………………………………...............PAGE 1 II. AUTOSET MACHINE CONFIGURATION……………………………PAGE 1 III. AUTOSET STARTUP PROCEDURES…………….…………………..PAGE 3 IV. AUTOSET SHUTDOWN PROCEDURES ………………………...…..PAGE 4 V. CLEANING TOUCH SCREEN………………………………………..…PAGE 4 VI. WARRANTY NOTE……………………………………………………...PAGE 4 VII. PARALLEL CALIBRATION…………………………………………..PAGE 4 VIII. 8 PAGE CALIBRATION………………………………………………PAGE 6 IX. 16 PAGE CALIBRATION……………………………………………….PAGE 8 X.
I. AUTOSET: A LIST OF DO NOTS: 1.1 Never initiate Autoset while fold rolls are running. If any of the pans move in or out of deflect the pan deflectors will scrape across the fold roll, damage to the fold roll or pan deflector could occur. 1.2 Never plug in or unplug Autoset communication cables, without turning off Autoset power switch. This includes the pan and stacker cables. Damage to the motor controllers could occur. 1.
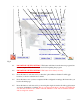
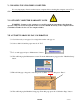
1 2 3 4 5 6 7 8 9 10 11 12 Fig. 4 4-1 DO NOT TOUCH THIS BUTTON. This button will shut down the Autoset program, but not the computer. This should only be used when updating the program 4-2 DO NOT TOUCH THIS BUTTON. This button is for factory use only. 4-3 Press this button to tell Autoset if you have the optional Presser Stacker. It will toggle between yes and no each time it is touched.
4-6 This Button will only appear if the machine type is 0 or 4. It should be set from the factory to the width of your machine. It will toggle between 20”, 26” and 30” each time it is touched. Once the number of plates in the Parallel are set this button will disappear. Verify the settings are correct before setting the number of plates in the parallel. 4-7 Press this button to tell Autoset if you want to display the optional exit sensor count in place of the standard infeed count.
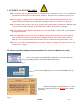
V. CLEANING TOUCH SCREEN COMPUTER It is very important to shut down the Autoset computer before cleaning the computer screen. Use a CRT screen cleaner ONLY on the interface touch screen. VI. AUTOSET COMPUTER WARRANTY NOTE WARNING – Damage to the computer screen will occur if any instrument other than the operator’s finger is used to navigate the Autoset screens. NOTE: Warranty on the computer will be void if this is found to be the case for computer failure. VII. AUTOSET PARALLEL PAN CALIBRATION 7.
7.7 Then press the “Deflect All” button, MUST BE OFF AT THIS TIME. NOTE: FOLDER DRIVE MOTOR 7.8 Set folder speed to 6 on the dial. 7.9 Set folder mode to single sheet mode by pressing the single sheet mode button control panel. on the folder 7.10 Press “Home” button for pan to be calibrated. The pan will move to the home position. 7.11 Press “Set” button for pan to be calibrated. The pan will move its calibration position.
7.20 Press the “Deflect All” button , so that the pan will go to its deflect position. NOTE: FOLDER DRIVE MOTOR MUST BE OFF AT THIS TIME. 7.21 Repeat steps 17.10 through 17.19 for all the pans to be calibrated. 7.22 Turn off folder drive. 7.23 After everything is calibrated, Press the “Home” button to return to the main screen. VIII. AUTOSET 8 PAGE PAN CALIBRATION 8.1 Before starting the 8 page calibration, a 8 page fold must be set in Autoset. 8.2 Get folder ready to run paper.
8.8 Then press the “Deflect All” button, MUST BE OFF AT THIS TIME. NOTE: FOLDER DRIVE MOTOR 8.9 Set folder speed to 6 on the dial. 8.10 Set folder mode to single sheet mode by pressing the single sheet mode button control panel. on the folder 8.11 Press “Home” button for pan to be calibrated. The pan will move to the home position. 8.12 Press “Set” button for pan to be calibrated. The pan will move its calibration position.
8.21 Press the “Deflect All” button , so that the pan will go to its deflect position. NOTE: FOLDER DRIVE MOTOR MUST BE OFF AT THIS TIME. 8.22 Repeat steps 8.11 through 8.20 for all the pans to be calibrated. 8.23 Turn off folder drive. 8.24 After everything is calibrated, Press the “Home” button to return to the main screen. IX. AUTOSET 16 PAGE PAN CALIBRATION 9.1 Before starting the 16 page calibration, a 16 page fold must be set in Autoset. 9.2 Get folder ready to run paper.
9.8 Then press the “Deflect All” button, MUST BE OFF AT THIS TIME. NOTE: FOLDER DRIVE MOTOR 9.9 Set folder speed to 6 on the dial. 9.10 Set folder mode to single sheet mode by pressing the single sheet mode button control panel. on the folder 9.11 Press “Home” button for pan to be calibrated. The pan will move to the home position. 9.12 Press “Set” button for pan to be calibrated. The pan will move its calibration position.
9.21 Press the “Deflect All” button , so that the pan will go to its deflect position. NOTE: FOLDER DRIVE MOTOR MUST BE OFF AT THIS TIME. 9.22 Repeat steps 9.11 through 9.20 for all the pans to be calibrated. 9.23 Turn off folder drive. 9.24 After everything is calibrated, Press the “Home” button to return to the main screen. X. AUTOSET TROUBLESHOOTING GUIDE 10.1 Autoset computer screen not coming up. A) B) C) D) E) F) G) Check power to machine. Check main power switch. Check F8 circuit breaker.
10.4 Autoset stacker not working. Check network fuse in the junction box the stacker is plugged into. A) B) C) D) E) F) G) So if the stacker is connected to the parallel check F25 in the parallel junction box. Also check for 24Vdc between terminal blocks 201 and 202 in parallel junction box. So if the stacker is connected to the 8-Page check F29 in the 8-Page junction box. Also check for 24Vdc between terminal blocks 301 and 302 in 8-Page junction box.
10.7 A single motor moves fast and will not go into position. A) B) Check Encoder connection to drive in pan or stacker junction box. If connection is not seated properly, reseat. If problem persists, replace motor. 10.8 A single motor moves home but computer fails to show finished. A) B) C) D) Open pan junction box and press home switch, does D6 light up on board? If yes go to B). If not go to C).
11.7 Place the new drive into the fold plate electrical box and plug the three connectors “1” onto the new board in the same location and orientation as on the old board. 11.8 Replace the cover and power up the Autoset. Once the computer has restarted press cancel on the HOME ALL pop up. 11.9 To finish the board replacement, go thru the initiation procedure on the next page. 11.
12.6 The indicator box again next to the button will turn gray then after a few seconds turn red . Fig. 6 12.7 Then turn off the plate motor power switch under the main power switch. located on the side of the folder electrical box 12.8 Wait 15 seconds then turn the switch back on. 12.9 This will complete the initiation of the motor drive. Press the “Home” button to return to the main screen. XIII. REPLACING A PAN MOTOR 13.
13.3 Remove the cover from the fold plate electrical box. 13.4 Unplug the (2) connectors 7-2 going from the motor to the drive board. 13.5 Remove the (4) screws 7-1 that connect the fold plate electrical box to the casting. 1 2 3 Fig. 7 13.6 Slide the fold plate electrical box 7-3 off of the motor. 13.7 Remove the (4) set screws from the motor gear hub so it can be removed from the motor shaft. Note: (2) set screws per hole. 13.8 Remove gear 8-1 from motor shaft. 13.
Baumfolder has authorized dealers located throughout the United States. Call toll free, 1-800/543-6107 for parts or the number of your nearest authorized dealer. BAUMFOLDER CORPORATION Quality Bindery Equipment Since 1917 1660 Campbell Road Sidney, Ohio 45365-0728 Phone: 937/492-1281 or 800/543-6107 Fax: 800/452-0947 Internet: www.baumfolder.com E-mail: baumfolder@baumfolder.