BAUMFOLDER CORPORATION Quality Bindery Equipment Since 1917 714 FRICTION FEED FOLDER INSTALLATION, OPERATION, MAINTENANCE & PARTS MANUAL © Baumfolder Corp., 2003 Printed in U.S.A.
© 2003 All Rights Reserved WARNING • Do not operate this machine without all guarding in place. • Do not make adjustments or perform maintenance on this machine with power on. • Keep the machine and the work area clean and free of spills to prevent accidents. • Be sure to replace any safety decals that may have been detached for any reason.
Contents 1.0 INTRODUCTION ....................................................................................................................................................... 4 2.0 SPECIFICATIONS ................................................................................................................................................... 4 3.0 INSTALLATION ..................................................................................................................................................
1.0 INTRODUCTION Your new 714 Friction Feed Folder has been designed to give you many years of useful service provided it is installed, maintained, and operated according to the instructions in this manual. Your 714 Friction is a unique and versatile paper folding machine, capable of folding paper measuring between 3 x 5 inches (7.6 x 12.7 cm) and 14 x 20 inches (35.5 x 50.8 cm).
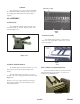
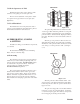
WARNING Slitter Shaft Assembly Do not plug the power cord into an AC outlet until the 714 Friction is fully assembled, adjusted and ready to use. Unplug the 714 Friction any time disassembly is required. 4.0 ASSEMBLY 4.1 Main Unit To assemble the 714 Friction unit, first remove the four bolts holding it to the skid. Place the folder on the stand (See Figure 4.1-1). Figure 4.2-1 4.3 Delivery Table To install the delivery table, loosen the knobs on either side of the stacker table.
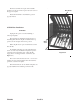
The first notch in the front part of the feed table should rest on the pins. Then drop the rear notch down on the upper dowel pins. #1 Fold Pan Rotate the handwheel to check that the gears are properly meshed. 4.5 Fold Plate Installation WARNING Unplug the AC power cord when installing or removing fold plates. The fold plates are marked #1 and #2 and are not interchangeable. The #1 fold plate is installed in the top position, the #2 fold plate in the lower position.
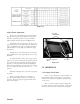
5.0 ELECTRICAL ACCESS D) Locate the point on the chart where the columns for the type of fold and the sheet size intersect. You will notice that there are either two letters or a dash and a letter. These letters and/or dash tell you where to set the paper stop on the fold plate, and whether or not one of the fold plates will be installed in the deflector position. WARNING Unplug the AC power cord before attempting any electrical repair. The motor speed control is located under the lefthand side cover.
Figure 6.2-1 6.4 Feed Table Adjustment Side Guide Locking Knobs On the paper feed table there are two guides which keep the stack of paper properly aligned for feeding into the folder. Adjust these guides to correspond with the different widths of paper being fed. (See Figure 6.4-1) To adjust the paper feed guides, loosen the two side guide locking knobs on each guide.
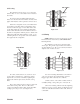
TOP SHAFT 7.2 Check Squareness of Fold Examine the folded sheets on the stacker to make sure that you are getting an even and square fold. There is a skew adjustment on each plate to adjust for a square fold on paper that is not cut square (See figure 6.4-1). 7.3 Use of Handwheel The handwheel is used to help clear jams and for setup. To use the handwheel, shut off the folder, pull out the handwheel and turn it in either direction. Figure 8.
TOP SHAFT 8.2 Scoring The 714 Friction can be used to score a sheet and deliver it flat, or to score a sheet after a fold or folds have been made. To ensure accuracy in making right-angle folds, always score the sheet where the fold is to be made. This applies in all instances when a perforator cannot be used. Attach the scoring blade loosely to the blade holder for mounting on the slitter shaft. Scoring blades can be mounted on either the upper or lower slitter shaft.
Before tightening the blade to the collar, slide the blade with the collar loosely attached on the end of the shaft. Then tighten securely, thus aligning both the blade and collar, allowing free horizontal movement along the shaft. 9.4 Cleaning The Fold Stop Guides The fold stop guides (See figure 4.5-1) should be cleaned once a week with a dry cloth to keep the plate moving properly. Place the blade, mounted on the collar, on the upper shaft in the proper position where the cut is to be made.
SUREWASH 10.0 MATERIAL SAFETY DATA SHEET irritation and may affect central nervous system. May cause skin irritation. Chronic over-exposure to many petroleum hydrocarbons may cause liver or kidney injury. May cause eye irritation. NOTICE: Surewash is a product of RBP Chemical Corporation, 150 S. 118th St., P.O. Box 14069, Milwaukee, Wisconsin 53214-0069. Tel. 414/258-0911, 800/558-0747.