
Instruction manual


After Sales Support TEL: 1300 766 659 28
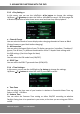
2.6 Timer Settings
Using the
/
buttons
to move to the right or left, select the
Timer Settings
Icon It
is selected when the Timer Settings text appears,
then press OK.
The following screen
will appear. Use the
Up
/Down /buttons to
select the item
or press
EXIT
to cancel.
In the sub-sections below the guide for changing the
NO.
,
Date
,
Time
,
Mode, Event, Channel
and
TimLimit
is explained
2.6.1 NO.
You can set up to 25 timer entries.
Use the
Up
/Down /buttons to
select the
NO
.
item. Use the
/
buttons
to move to the first or 1 timer
.
Use the
Up
/Down
/buttons to
the next item and so on making the changes as in this item by using
the
/
buttons.
All changes below are done using the same change processes with the
remote. Date and time changes use the numeric keys. Repeat steps 1 to 7 for each timer
event. Move to Timer 2,3, etc. and make the changes as required.
Look out for overlaps.
2.6.2 Date
Set the date of the program to record using the remote.
2.6.3 Time
You set the
START
time of the program you intend to record for
Timer
NO.
1. in 24 hour time.
2.6.4 Mode
Set the timer mode to be
Off
, a
Once
or a repeating
Daily
or
Weekly
event.
2. ADVANCED FUNCTIONS WITH THE PVR