
User Guide

2 L61LL-1 BASO Safety Shutoff Device Installation Instructions
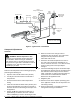
Power Source
Transformer
Thermostat
X
X
L61LL
Safety Shutoff Device
Pilot
Valve
( Valve)
B
Basotrol
Valve
Thermocouple
Lead
Pilot Burner
Gas Line
X
indicates possible
locations for other controls.
76.2 mm (3 in.)
Sediment
Trap
Main Manual
Shutoff Valve
( Valve)
A
BASO
Power Unit
Terminal
Figure 2: Typical L61LL-1 Installation
Setup and Adjustments
Checkout
!
WARNING: Risk of Explosion or Fire.
Follow this or an equivalent checkout procedure
after installation. Before leaving the installation,
verify that the L61LL-1 functions properly and that
the system has no gas leads. Gas leaks can lead to
an explosion or fire, and may result in severe
personal injury or death.
Make sure all components are functioning properly by
performing the following test.
1. Open the main manual shutoff valve (A valve).
2. Test all joints and connections for leaks with a
soap solution.
3. Set the thermostat to the lowest temperature
setting.
4. Close the main manual shutoff valve (A valve) and
the pilot valve (B valve [see Figure 2]) and wait at
least five minutes for unburned gas to escape from
the appliance.
5. Reopen the B valve and ignite the pilot gas. In
approximately one minute, the L61LL-1 device
closes, establishing a circuit to the main gas valve.
6. When the circuit to the main gas valve is
established, open the A valve. The main burner
will ignite from the pilot burner when the
thermostat calls for heat.
7. Disconnect the thermocouple from the L61LL-1.
The main valve should close immediately. If it
closes, reconnect the L61LL-1. If it does not close,
check for wiring errors and repeat Steps 1
through 5.
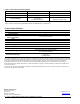
8. Check the millivoltage output of the thermocouple
and milliampere dropout range at the BASO power
unit terminal to see that they meet the values in
Table 1 and Table 2. Step-by-step procedures for
these checks are included with the Y99AB-4
BASO® Test Kit Application Note.
9. Relight the pilot.
10. Observe at least three complete operating cycles
of the appliance to make sure all components are
functioning correctly.
11. Reset the thermostat to a normal temperature
setting before leaving the installation.