
Instructions


19
• When soldering, do not touch any part of the soldering iron except the handle, otherwise you may burn
yourself!
• Alwayssolderonnon-ammablesurfaces.Ensurethattherearenoneighbouringmaterialsthatmaybe
damaged by the heat generated from the soldering iron.
• Always place the hot soldering iron in the holder when it is not in use.
• Improperusemaycauseare.Donotusetheapplianceinareaswithammableorexplosivesubstances.
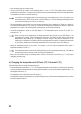
8. Product overview
1
4
3
2
6
5
1 LED screen
2 Temperature control button (-)
3 Temperature control button (+)
4 Temperature unit button °C/ °F
5 On/off button (I = ON / 0 = OFF) (hidden, located on
the rear of the appliance)
6 Connection socket
9. Operation
• Unpack the soldering station and check that all parts are intact. Do not use parts that are damaged.
• Place the soldering station on a solid, heat-resistant surface.
• Place the stand for the soldering iron next to the soldering station. Note the position of the soldering station. If you
are right-handed, place the appliance to your right, or to your left if you are left-handed. Ensure that the stand is
placedonareandheat-resistantsurface.
• Inserttheplugonthesolderingironintothe4-pinconnectionsocket(6)onthesolderingstation.Theplugonlyts
into the socket when the polarity is correct. Note the orientation of the tongue and groove on the socket and plug.
• Tighten the nut to secure the plug in place.
• Place the soldering iron into the stand. Note that the metal base plate on the stand will heat up over time.