
Instructions


• Solder material splashing beyond the working area carries an increased risk
of re, in particular, through delayed smouldering. After splashing of hot solder
material, the work environment must be monitored for a longer time.
• During soldering operations, unforeseen situations may arise, in which prevention
of unwanted heat build-up is required. Therefore, the working area must always be
well lit. The user must have sufcient freedom of movement.
• Consult an expert when in doubt about operation, safety or connection of the
device.
• Maintenance, modications and repairs are to be performed exclusively by an
expert or at a qualied shop.
• If you have questions which remain unanswered by these operating instructions,
contact our technical support service or other technical personnel.
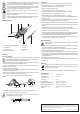
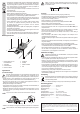
Operating controls
8
7
6
5
41 2 3
1 Flexible metallic arm with alligator clip
2 Heat output dial
3 Soldering iron stand
4 Mains cable and mains plug
5 Soldering iron
6 Solder tip
7 ON/OFF switch
8 Drawer
Operation
a) Product assembly
The German warning label for Hot Surface has been attached to the product.
Warning labels in other languages are supplied with the product. If necessary please
attach the warning label for your language to the product.
• Remove the drawer (8) from the soldering station, so as to obtain access to the holes for
mounting the left and right metallic arms with alligator clips (1).
• The product is delivered with screws and spacers loosely installed on the metallic arms.
Remove the screws and spacers.
• Place one spacer on each metallic arm.
• Insert each metallic arm into the hole on the right and left sides of the soldering station, as
accessible from inside the drawer cavity.
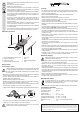
• Place one spacer on each screw, and insert each screw from inside the drawer cavity into the
internal threads of the metallic arms. Tighten the screw snug.
Take care not to cross the threads. Do not over-tighten the screws.
Screw Spacer 1
• Now install the solder tip into the threaded bore at the end of the soldering iron shaft.
You may use ne-grit sandpaper to hold the solder tip.
Never use pliers or other hard metal tools to grasp the solder tip. The solder tip
would be damaged and become useless.
6
5
Threads
b) Soldering
• The work area for any soldering operations must be dry and well ventilated.
• The work surface must be dry, solid, stable, heat-resistant and non-conductive.
• Check that the ON/OFF switch (7) is set to O (off) position.
• Make sure that the solder tip (6) is clean.
• Insert the soldering iron (5) into the soldering iron stand (3).
• Turn the heat output dial (2) counter-clockwise to the lowest power level MIN.
• Connect the mains plug (4) to an appropriate mains socket.
• Switch the soldering iron on by setting the ON/OFF switch to I (on) position.
• Turn the heat output dial clockwise to the desired position between MIN and MAX on the
temperature scale.
• Start working as soon as the tip of the soldering iron is sufciently heated. For this purpose,
check the level of heating of the solder tip on clean solder material.
• Before soldering for the rst time the solder tip should be tinned until fully coated with solder.
• Apply the solder tip to the workpiece, then apply solder to the workpiece at the point of solder
tip contact.
• Then remove the solder tip from the work. Molten solder must cool undisturbed.
• Do not use more solder than necessary, but use just enough to make a good connection.
• Make sure to use the correct type of solder for the workpiece at hand.
• During breaks and after working, insert the soldering iron into the soldering iron stand with
the solder tip pointing downwards, and set the heat output dial counter-clockwise to MIN.
• To switch off the soldering station, set the ON/OFF switch to O (off) position.
• Pull the mains plug from the mains socket and give the soldering station enough time to cool
to room temperature in a safe place and under supervision.
Care and cleaning
Disconnect the product from the power supply. Allow the product to cool sufciently
before cleaning.
• There are no components inside the product that would require maintenance or repair on the
part of the user. Therefore, never open/dismantle the product.
• Do not use any aggressive cleaning agents, rubbing alcohol or other chemical solutions as
they can cause damage to the housing and malfunction.
• Always keep the soldering tip and soldering iron clean. Do not use a le or sandpaper to clean
the soldering tip. This may damage the soldering tip. Use a slightly damp sponge to clean
the soldering tip and remove soldering ux and soldering wire residue. Dry the soldering tip
thoroughly after cleaning.
• Clean the product with a dry, ber-free cloth.
• If the soldering tip is damaged or worn out, replace it with the supplied replacement tip or an
equivalent one.
Disposal
Electronic devices are recyclable waste and must not be disposed of in the
household waste. At the end of its service life, dispose of the product according to
the relevant statutory regulations.
You thus full your statutory obligations and contribute to the protection of the environment.
Technical data
Input voltage/current ............................230 V/AC, 50 Hz
Power consumption ............................. max. 40 W
Protection class ...................................I
Cable length ........................................1.2 m
Temperature range ..............................approx. +150 to +420 °C
Operating temperature/humidity .......... 0 to +45 °C, 20 – 90 % RH
Storage temperature/humidity .............0 to +45 °C, 10 – 90 % RH
Dimensions (W x H x D) ......................108 x 113 x 210 mm (soldering station)
Weight .................................................775 g
This is a publication by Conrad Electronic SE, Klaus-Conrad-Str. 1, D-92240 Hirschau (www.conrad.com).
All rights including translation reserved. Reproduction by any method, e.g. photocopy, microlming, or the capture in
electronic data processing systems require the prior written approval by the editor. Reprinting, also in part, is prohibited.
This publication represent the technical status at the time of printing.
Copyright 2017 by Conrad Electronic SE. *1516976_V1_0317_02_mxs_m_en