
Product Manual


Page 8
the switch to the ON position to resume the
full monitoring capability. The alarm and
pump light will still be on. Push the WHITE
button to silence the alarm.
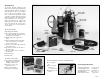
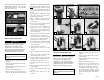
REPLACING THE BACKUP PUMP
Risk of electrical shock or battery explosion,
which can cause serious injury or death.
Wear eye protection. Work in a well-
ventilated area. Do not smoke or allow a
spark or flame in the vicinity of the battery.
Avoid dropping metal tools on the battery.
Review the safety instructions on page 1.
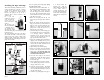
1. Unplug the primary pump from the blue
controller.
2. Remove the charger plug from the back of the
yellow controller.
3. Unplug the backup pump from the back of the
yellow controller.
4. Remove the sensor from the battery.
5. Remove the battery wires from the battery
terminals. Be sure they do not touch each
other while one is connected to the battery.
6. Slowly
loosen the rubber union on the top of
the combination pump assembly to separate
the pipes. The water trapped in the pipe will
pour out into the sump as the rubber union is
loosened.
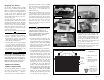
7. Separate the pump assembly from the rubber
union and lift it out of the sump by the
handle on the primary pump.
8. Turn the assembly up side down over the
sump pit to allow the remaining water in the
system to drain.
9. Loosen the screws on the no-hub connector
on the elbow of the backup pump.
10. Unscrew the screw on the bottom of the
pump bracket with a Phillips head
screwdriver, and lift the pump off of the
bracket. Then pull the pump down out of
the no-hub connector.
11. Unscrew the check valve on the elbow of the
backup pump. Now reverse the process.
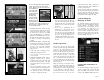
12. Screw the check valve on to the new pump.
(You can use the existing check valve, or
preferably replace it with a new one.)
13. Push the pump and check valve back up into
the no-hub connector, and place the pump
on the pump bracket.
14. Screw the pump onto the bracket.
15. Tighten the hose clamp on the no-hub
connector.
16. Lower the pump system back into the sump
pit.
17. Connect the top of the system to the rubber
union and tighten the hose clamp.
18. Connect the battery cables to the battery
terminals, WHITE to the NEGATIVE (-) post,
and BLACK to the POSITIVE (+) post.
19. Insert the fluid sensor into the top of the
battery.
20. Plug the backup pump into the back of the
yellow controller.
21. Plug the charger into the back of the yellow
controller.
22. Plug the primary pump into the blue
controller.
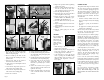
REPLACING THE PRIMARY PUMP
Risk of electrical shock or battery explosion,
which can cause serious injury or death.
Wear eye protection. Work in a well-
ventilated area. Do not smoke of allow a
spark or flame in the vicinity of the battery.
Avoid dropping metal tools on the battery.
Review the safety instructions on page 1.
1. Unplug the primary pump from the blue
controller.
2. Remove the charger plug from the back of the
yellow controller.
3. Unplug the backup pump from the back of the
yellow controller.
4. Remove the sensor from the battery.
5. Remove the battery wires from the battery
terminals. Be sure they do not touch each
other while one is connected to the battery.
6. Slowly loosen the rubber union on the top of
the combination pump assembly to separate
the pipes. The water trapped in the pipe will
pour out into the sump as the rubber union is
loosened.
!
DANGER
2,3
1
REMOVE
4,5
7
6
8
9 10 11
YOU WILL BE DISCONNECTING ALL THE
WIRES. BE SURE THEY DO NOT FALL INTO THE
SUMP PIT.
YOU WILL BE DISCONNECTING ALL THE
WIRES. BE SURE THEY DO NOT FALL INTO THE
SUMP PIT.
!
DANGER