
Product Manual


Page 11
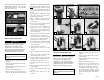
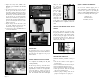
7. Replace the battery cables, WHITE to the
NEGATIVE (-) post and BLACK to the POSITIVE
(+) post.
8. (a) If the new battery has six caps, rinse and
dry the cap from the old battery to remove
any residue. Replace the battery cap that is
2nd from the POSITIVE post with the cap from
the old battery. Insert the fluid sensor in the
cap and put the cap you removed from the
new battery on the old battery. (b) If the new
battery has the sensor hole molded in the top,
press the sensor firmly into the hole. Do not
bend the sensor rod.
9. Plug the charger into the wall outlet. (You
can provide additional protection for the
control unit by using a surge protector.
10. You may have to press the WHITE button to
silence the PUMP alarm.
TEST BUTTON
The TEST button may be used to check the
backup pump and system. Push the TEST button.
This will activate the pump for as long as you
hold the button.
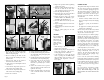
TESTING THE BACKUP FLOAT SWITCH
It is important to manually test the float
switch periodically.
Lift the float up and let go. This will activate
the pump. The control unit will run the pump for
approximately 25 seconds so it can empty all the
water in the sump pit. If there is no water in
the pit, the pump can run dry for this amount of
time. The alarm will sound and the PUMP light
will go on. After
the pump has
stopped, push the
WHITE button to
silence the alarm.
If the WHITE
button is pressed
before the pump
has stopped, the
alarm will go off
temporarily. Wait
for the pump to stop pumping, and then push
the WHITE button to completely silence the
alarm.
TESTING THE PRIMARY PUMP FLOAT
SWITCH
Lift the float within the cage and let it drop.
The pump will run for an additional 10 seconds
after the float returns to the original position.
It will not damage the pump to run it for this
short time if the sump pit is dry. However, do
not hold the float up for an extended time
without water in the sump.
MAINTENANCE CHECK LIST
Maintenance should be performed 1-2 times per
year.
1. Lift the float switches on both pumps as
described above.
2. Remove all debris from the bottom of the pit.
3. Remove all debris floating in the water.
4. Remove all debris from the float switch cage.
5. Fill the pit with water. Make sure the pumps
turn on at the intended levels.
6. While the pump is running, make sure the
pump is evacuating water at a good pace.
PARTS & SERVICE INFORMATION
You can receive technical support, parts or
service information by calling Glentronics, Inc.
at 800-991-0466, option 3, or by visiting the
website at www.basementwatchdog.com. Send
your unit to the following address for repairs:
Glentronics, Inc.
640 Heathrow Drive
Lincolnshire, IL 60069
6
7
POSITIVE
POST
NEGATIVE
POST
8a
9
10
LIFT
FLOAT
LIFT
FLOAT
8b