Frameless Fixed Panel Slider QCI5279 FRAMELESS DOOR / PANEL DOUBLE ROLLER SUPPLEMENT INCLUDED QCI5279 Rev.
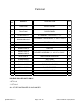
Parts List ITEM NO. NUMBER DESCRIPTION QTY. 1 Fixed Panel GLASS PANEL 1 2 Door Panel DOOR PANEL 1 3 SC925-0001-77 U-CHANNEL, VERTICAL, L - 77" 1 4 SC938-0001-48.5 SC938-0001-60.5 U-CHANNEL, HORIZONTAL, L - 48.5" or 60.5" 1 5 SC892-0001-30 FILLER, L - 30" 1 6 SCV353-0001-75.69 3/8" VINYL, SEAL, L - 75.69" 1 7 RO9AA-090PS ROLLER 2* 8 HA9AS-420PS HA9AS-540PS HEADER ASSEMBLY, L - 42.25" or 54.
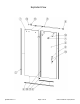
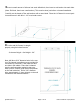
Exploded View QCI5279 Rev.
Tools: To install your New Shower Enclosure, you may need the following: Drill Pencil Hack Saw 1/8” & 3/16” Drill Bit Low Tack Tape Caulk Gun Center Punch Tape Measure Clear Silicone Caulk Files 4’ & 6’ Levels Suction Cups #2 Phillips Screwdriver Safety Notes: This unit is best installed by two people. Handle the glass panels carefully and protect the edges.
Maintenance: Two primary materials are used to manufacture your new shower enclosure: tempered glass and anodized aluminum. To assure a long lasting finish on the enclosure, wipe it down with a towel after each use. For occasional, more concentrated cleaning efforts, we find that Lysol® Non-Abrasive Bathroom Cleaner works extremely well. Be sure that any over spray falling on the aluminum frame is rinsed thoroughly and dried.
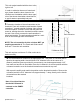
This unit maybe installed with the door to the right or left. In order to minimize chances of water leakage, please install the door closest to the shower head. Installation with the door opposite of the shower head when closed leaves a gap for water to potentially leak past. Door Sliding Direction Unit Centerline 1 Determine location of the unit centerline on the threshold. From unit centerline mark location of panel centerline 1” towards outside of shower.
3 Insert a small amount of silicone into each drilled hole, then insert a wall anchor into each hole. (Note: Drill hole, then insert a wall anchor.) This must be done just before u-channel installation. Carefully cut the heads off the wall anchors with a razor blade. Place the U-Channel in correct position and secure it with #8 x 1-1/2” truss head screws.
5 Insert a wall plug [16] into each drilled hole. Then carefully cut the heads off of the wall plugs [16] with a razor blade. So there is nothing raised above the surface of the wall. Place the u-channel [3] in position and secure it with #8 x 1-1/2” truss head screws [18]. Note: Do not over-tighten the screws. 6 Place 1/8” setting blocks [20] into the U- channel as shown or approximately every 18”.
7 Using suction cups, set the Glass Panel into the Wall S ide U-channels on the appropriate side. Use different sizes of setting blocks to make exposed edges of the glass level and plumb.** Door Side Refer to the sizing chart below to properly orient the Glass Panel according to the unit range. Measurement is from edge of glass to the header bar assembly hole* Exposed edges MUST be level and plumb before moving to next step.
9 After marking, remove header assembly [8]. Drill a 3/16” diameter hole thru the finished wall material at the marked wall location. Drill a 1/8” diameter pilot hole approximately 2” deep into the blocking behind the finish wall material.
The Door guide [11] can now be installed along the threshold. From the edge of the panel glass that was just installed, measure 1 1/2” from the inside of the Horizontal U-channel [4]. Place door guide as shown in picture below, then mark the two holes to drill with a pencil. Insert a small amount of silicon into each drilled hole, then insert a wall anchor into each hole. (Note: Drill hole, then insert a wall anchor.) Carefully cut the heads off the wall anchors with a razor blade.
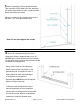
13 Disassemble the Pull Handle [14] and install on the Door Panel [2] . Handle should face outside of shower and the knob on the back side of the Pull Handle [14] should be on the bottom side as shown. 14 Cut Filler [5] to appropriate length to cover the remaining gap between the Panel Glass [1] and the wall. Snap Filler [5] in open top of the Horizontal U-channel [4]. U-channel Filler QCI5279 Rev.
15 Place large Vinyl Seal [15] on Door Panel [2] so that the vinyl edge sticks out towards the Fixed Glass Panel [1]. Then place smaller 3/8” Vinyl Seal [6] on the handle side of the Door Panel [2] so that the vinyl edge sticks out towards the inside of the shower. (See Example) Use silicone to hold in place. 3/8” Vinyl Seal Large Vinyl Seal 16 The larger vinyl seal will need to be cut slightly in order for the header bar to have space to roll freely. See example below. Large Vinyl Seal QCI5279 Rev.
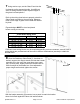
17 On the interior face of the glass, place a strip of low tack tape on the glass about 1/8” to 3/16” away from edge of the u-channel both vertically and horizontally. Run a small bead of silicone along this edge. Next, on the interior, run a bead of silicone between the u-channel and the threshold and also between the uchannel and the wall. After completing, remove the tape before silicone sets. Repeat silicone application process to outside of door.
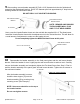
Appendix A - Bottom roller installation Install the top rollers as instructed in step 12. Install the bottom rollers using the same installation method. After using top rollers to adjust the door for level/plumb, align the bottom rollers as shown in example 1. Adjust the bottom rollers so that they are centered vertically with the top rollers. (see example 2). Bottom rollers may not make full contact with the header bar). Tighten all fasteners to secure position of rollers.