
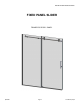
Installation Guide

QCI0280 Page9 Cerfied6/27/14
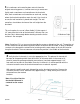
9After marking, remove header assembly [8]. Drill a 1/4” diameter hole approximately 1 3/4”
deep, at the marked wall location.
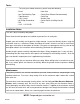
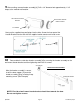
10 Reassemble the roller bar header assembly [8] by securing the header assembly to the
wall mount header bracket and then tightening down the set screws.
NOTE: Flat side of wall mount header bracket should face towards the door.
Do not over-tighten screws.
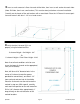
Next, put the supplied large wall plugs into the hole. Screw the inner part of the
Header Bracket into the wall with the supplied socket countersunk head screw.
WALLMOUNTHEADER
BRACKETINSERT
SETSCREWS
WALLMOUNTHEADER
BRACKET
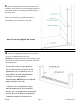
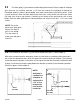
After the header assembly is secure,
install the door stopper [13] onto the
header assembly [8] by screwing in top
mounting screw. (See Example)
COMPLETEDHEADERASSEMBLY
SETSCREWS
MOUNTINGSCREW
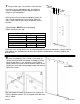
PA
N
E
L
GL
A
S
S
1. 2.