
Installation Guide


SILICONE
QCI5017 Rev. 2 Page 5 of 9 Certified 12/15/16
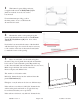
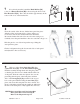
4 Before replacing the track, force a slight
downward bow into it. This will ensure that the
track fits tight to the threshold in the middle.
Run a bead of silicone on both flat surfaces on the
bottom of the track. Then replace the track onto the
threshold using the pencil marks from step #3 as a
guide. Be sure the raised side is on the exterior.
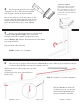
5 Replace one wall jamb and attach it to the wall with
one #8 x 2” truss head screw [D] in the center hole.
Check the wall jamb for plumb and tighten the screws.
Repeat for the other wall jamb.
NOTE: Careful not to overtighten.
Install a Bumper [E] under the Truss Head Screw in the marked
Top and Bottom holes.
Repeat with the other wall jamb.
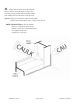
6 This enclosure is equipped with molded nylon T-Locks [F] for safety. When properly installed, the header
is locked in the wall jambs and cannot be accidently removed.
Slide the T-Locks into the header.
Set the header down onto the wall
jamb with the T-Lock fitting into
the space behind the wall jamb.
Measure the wall-to-wall opening at the top of the
wall jambs.
Cut the header 1/16” short of that dimension.
Check for fit.
TIP: Use a miter box to ensure a straight cut
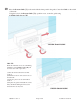
Alternative Method:
Run 2 beads of silicone inside the
pnecil marks on the threshold.
Place the tub track in position over
the silicone, lining it up with the
pencil marks on the threshold from
the previous step.