
Installation Guide

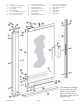
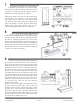

Cut the clear pivot jamb seal vinyl [C] 3/4”
shorter than the pivot jamb [D]. Slide the jamb seal
vinyl into the slot in the pivot jamb. Lubricating the
vinyl with a small amount of soapy water will help
installation. Slide one of the pivot brackets [E] into the
bottom of the pivot jamb. Lock it in place with a #6 x
3/8” truss head screw [F] and a #8-32x1/8” set screw
[G] (a 5/64” Allen wrench [H] is provided).
NOTE: Set screws [F] are pre-installed.
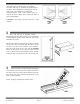
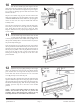
Place the pivot jamb assembly on the curb [A]
with the exterior face lined up with the raised edge of
the curb. Usealevel to plumb the jamb then mark the
mounting hole locations. Remove the jamb and drill the
mounting holes.
For tile or marble walls, drill three 3/16” diameter holes
and insert the plastic wall anchors [J]. Attachments to
fiberglass or acrylic units can be made in two ways. If
reinforcement is built into the wall of the unit, drill
three 1/8” diameter holes to install mounting screws
directly into the reinforcement. If walls are not
reinforce
d, drill 3/16” holes and install plastic wall
anchors or Molly bolts. Molly bolts are not supplied.
Replace the pivot jamb and attach to the wall with three
#8 x 2” truss head screws [K].
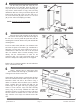
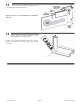
NOTE: Obscure glass or etched glass doors
should be installed with the rough or patterned surface
of the glass to the exterior of the unit.
Glazed doors [L] with obscure or etched glass will have
short rails installed with full width vinyl on both ends.
Determine which end will be the bottom. Using a
mallet or a hammer and wood block (never a hammer
alone), carefully drive the bottom rail [M] over the
bottom edge of the glass and vinyl, (spraying glass
cleaner or water onto the vinyl will make assembly
easier), snug to the factory installed rail. Both rails
should be set back 1/8” from the pivot edge of the door
and the bottom rail should end 1/8” from the strike
edge. Trim the excess vinyl even with the ends of the
rails.
4
5
6
QCI5020 Rev 0 Page 5 Certified 06/21/2016