
Information

Technische Änderungen und Irrtümer vorbehalten. Subject to technical changes and errors.
Vorläufig / preliminary V1.2
Montage
-
und Verarbeitungshinweise
LED-Streifen vergossen / LED-Streifen IP66
Mounting and processing instructions
LED stripe sealed / LED stripe IP66
1. LED-Streifen vergossen / LED strip sealed
(gültig für Artikelnummern: 182002, 182003, 182004, 182006, 182007, 182009, 182011, 182402, 182403, 182405, 182407, 182408,
182410, 182461, 184208, 184210, 184211, 1275457 –
1275470)
1. Trennen Sie den LED Streifen mittig im 90°-Winkel an den markierten Stellen mit Hilfe einer Schere oder Ähnlichem.
Cut the LED strip centered between the designated points at a 90° angle by using a pair of scissors or similar.
2. Nach dem Trennen des Streifens entfernen Sie die Vergußmasse mittels eines scharfen Gegenstandes, sodass die
Lötpunkte freiliegen. Achten Sie darauf, dass Sie keinesfalls den innenliegenden LED Steifen beschädigen!
After separating the LED strip remove the insulation with a sharp object, so that the soldering pads are exposed. Make
sure that you don't damage the internal LED strip!
3. Die Kontaktierung des LED-Streifens erfolgt durch den passenden Connector (Art. 183184 / 183185 / 183186 / 183187)
oder durch Anlöten der Zuleitungen an den vorgesehenen Lötpads (Beschriftung + / - beachten). Beim Löten ist die
max. Lötdauer von <10 Sek. und die max. Löttemperatur von <260°C einzuhalten.
The contact of the LED strip is done by a suitable connector (Item 183184 / 183185 / 183186 / 183187) or by soldering
the leads on the designated solder pads (pay attention to the polarity + / -). When soldering, please be aware of the
max. duration of <10 sec and a max. soldering temperature <260°C.
4. Die Montage des Moduls erfolgt mit dem rückseitig angebrachten doppelseitigen Klebeband. Achten Sie dabei auf
saubere Oberflächen, welche frei von Fett, Öl, Silikon und Schmutzpartikeln sein müssen.
With the double-adhesive tape on the backside you can mount the strip. Please pay attention to clean surfaces, free of
oil, silicone and dirt particles.
5. Um einen dauerhaften Schutz gegen Feuchtigkeit zu erreichen, wird empfohlen, die offenen Enden und freigelegten
Lötpads des LED-Streifens mit einem geeigneten flüssigen Silikon (Art. 532602, 532603) abzudichten (nicht bei
Verwendung eines Connectors) !
To achieve a long-lasting protection against moisture, it is recommended that the open ends and the exposed pads of
the LED strip are sealed (not when using a connector) with a suitable liquid Silicone (Item 532602, 532603) !
Achtung: Die Streifen sind lediglich gegen Spritzwasser geschützt und nicht gegen Strahlwasser/Untertauchen!
Attention: The product is protected against splashing water only and not against water jets/immersion.
2. LED-Streifen IP66 / LED strip IP66
(gültig für Artikelnummern: 182810, 182811, 182813-182817, 182819-182824, 182828)
1. Trennen Sie den LED Streifen mittig im 90°-Winkel an den markierten Stellen mit Hilfe einer Schere oder Ähnlichem.
Cut the LED strip centered between the designated points at a 90° angle by using a pair of scissors or similar.
2. Nach dem Trennen des Streifens entfernen Sie die Ummantelung an den Lötpunkten mittels eines scharfen
Gegenstandes. Sie sollten dabei nicht mehr vom Mantel entfernen, als Sie zum Anlöten der Zuleitungen benötigen.
Achten Sie darauf, dass Sie keinesfalls den innenliegenden LED Steifen beschädigen!
After separation of the strip, remove the shell at the solder points with a sharp object. You should not remove more
from the shell, than you need to solder the leads. Make sure that you don't damage the internal LED strip!
3. Die Kontaktierung des LED-Streifens erfolgt durch Anlöten der Zuleitungen an den vorgesehenen Lötpads (Beschriftung
+ / - beachten). Beim Löten ist die max. Lötdauer von <10 Sek. und die max. Löttemperatur von <260°C einzuhalten.
The contact of the LED strip is done by soldering the leads on the designated solder pads (pay attention to the polarity
+ / -). When soldering, please be aware of the max. duration of <10 sec and a max. soldering temperature <260°C.
4. (zum Abdichten wird Zubehörkit Art. 182829 für Triple Chip/RGB-Streifen bzw. Art. 393638 für Single Chip-Streifen
benötigt) Das Silikon großzügig in die Ecken der Endkappen einspritzen, diese dann auf LED Streifen aufstecken und ca.
2 Min. fest aufdrücken. Bei Streifenenden mit Kabelzuführung vor dem Aufstecken mit einem spitzen Gegenstand ein
Loch in die Endkappe bohren und die Kabel durchführen. Dichten Sie nach dem Aufdrücken der Endkappe diese an
der Übergangsstelle zur Ummantelung (und ggf. um die Kabelzuführungsöffnung) mit Silikon ab.
(for sealing accessory kit 182829 for triple chip/RGB strips respectively 393638 for single chip strips is required)
Inject silicone generously to the corners of the end caps, plug it in then LED strip and press it firmly about 2 minutes.
For strip ends with cable feed before placing, drill a hole into the end cap with a sharp object first, then run the cables
through the hole. After pressing the end cap, additionally seal the contact area to sheath (and possibly to the cable
feed opening) with silicone.
Technische Änderungen und Irrtümer vorbehalten. Subject to technical changes and errors.
Vorläufig / preliminary V1.2
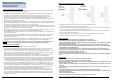
Montage LED-Streifen IP66 / Mounting LED strip IP66
1) 2) 3)
1) Befestigen Sie die Halteclips mittels Schrauben auf dem entsprechenden Untergrund.
Attach the retaining clips with screws to the appropriate ground.
2) Pressen Sie den IP66 LED-Streifen in die Halteclips. Achten Sie darauf, daß Sie auf den Streifen nur an den Stellen Druck
ausüben, an denen sich keine LEDs bzw. elektronische Bauteile befinden.
Insert the IP66 LED strips into the clips. Make sure that you only exert pressure on the points on the LED strip where no
LEDs or electronic components are located.
3) Drücken Sie die Seiten des Halteclips zusammen, um einen verbesserten Halt des Streifens sicherzustellen.
Squeeze the sides of the retaining clip to ensure a better grip of the strip.
Sicherheitshinweise
- Mechanische Belastungen der Bauteile auf den LED Modulen sind zu vermeiden
- Bei der Montage dürfen die Leiterbahnen nicht beschädigt oder unterbrochen werden!
- Nur eine Elektro-Fachkraft darf die Installation von LED Modulen (mit Netzgerät) unter Beachtung aller gültigen
Vorschriften und Normen vornehmen!
- Bitte Polung beachten! Bei falscher Polung erfolgt keine Lichtemission bzw. kann das LED Modul Schaden nehmen!
- Einen sicheren Betriebszustand ermöglicht nur die elektrische Parallelschaltung. Von der elektrischen Reihenschaltung
der LED Module wird ausdrücklich abgeraten.
- Unsymmetrische Spannungsabfälle können zu einer starken Überlastung und Zerstörung einzelner Module führen.
- Bei der Montage auf metallischen Flächen ist zur Vermeidung von Kurzschlüssen an der Stelle der Lötkontakte eine
Isolation zwischen Montagefläche und Modul vorzusehen.
- Auf Maßnahmen gegen ESD während der Montage ist zu achten.
- Auf ausreichende Kühlung des LED-Streifens ist zu achten, z.B. indem man den Streifen auf eine metallische Oberfläche
klebt.
Security Advice
- Mechanical stresses of the devices on the LED modules are to be avoided!
- During the mounting process the PCB may not be damaged or interrupted.
- Only an electronics skilled person is allowed to do the installation of LED modules (with power supply) in consideration
of all valid instructions and norms
- Please pay attention to the polarity! With an incorrect polarity there will be no light emission or the LED module can be
damaged!
- Only a secure operating state submits an electrical parallel connection. Please avoid an electrical series connection of
the LED module.
- Unsymmetrical voltage drop may cause a strong over-loading and destruction of single modules
- To avoid any short circuits at the solder patches by mounting on metallic surfaces, there should be an isolation between
module and mounting surface
- Please be aware ESD while mounting
- There must be a sufficient cooling to be respected, e.g. by sticking to metallic surfaces