TABLE OF CONTENTS 2 MANUFACTURER’S DISCLAIMER 2 WARRANTY AND SERVICE 3 USE OF THIS MANUAL 3 SAFETY GUIDELINES 6 DESCRIPTION OF FIREARM 6 BREAK–IN PROCEDURE 7 SPECIFICATIONS 7 MAJOR COMPONENTS 8 SAFETY MECHANISM 8 LOADING AND FIRING 9 UNLOADING 11 DISASSEMBLY 15 CLEANING AND LUBRICATION 18 TROUBLESHOOTING 20 EXPLODED VIEW AND PARTS LIST
REC10 MANUFACTURER’S DISCLAIMER BFMI will not be responsible for injury, death, or damage to property resulting from either intentional or accidental discharge of this firearm or from its function when used for purposes or subjected to treatment for which it was not designed. WARRANTY AND SERVICE For one year from date of purchase, Barrett Firearms Manufacturing Inc. (BFMI), warrants to the original owner, that this product was manufactured free of defects in materials and workmanship.
barrett.net USE OF THIS MANUAL Read this manual before you use or manipulate your Barrett product. It is important that you understand the principles of safe gun handling in general and the features of this product. This manual is not a substitute for training from a qualified instructor. Important safety topics are discussed in this chapter and throughout this manual. This manual should remain with the product and it should be transferred with the product to subsequent owners.
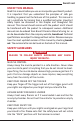
REC10 SAFETY DISTANCE Bullets fired from this rifle may travel as far as 4 miles. Make certain that you have an adequate backstop and are aware of what is beyond your target. HEARING PROTECTION Always wear adequate hearing protection when the rifle is firing; wear both earplugs and shooting muffs together for maximum protection. This includes observers. Observers should always be behind the shooter. EYE PROTECTION Appropriate eye protection should be worn when both shooting and maintaining your rifle.
barrett.net MAINTAIN YOUR RIFLE PROPERLY Performing proper maintenance, as outlined in this manual, insures that your rifle will be safe to shoot and will perform to design specification for many years. Alterations, modifications or adjustments may damage your rifle, make it unsafe to fire and will void warranty claims. STORE YOUR RIFLE SAFELY It is your responsibility to take reasonable precaution to secure your rifle, keep it properly secured and prevent unauthorized use.
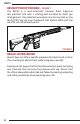
REC10 DESCRIPTION OF FIREARM - FIGURE 1 The REC10 is a semi-automatic, hammer fired, magazine fed, precision rifle with a rotating bolt actuated by direct gas impingement. User-selected accessories may be mounted on the Mil-Std 1913 top rail or on the Barrett Rail System (BRS) with the aid of M-Lok attachment points. FIGURE 1 BREAK–IN PROCEDURE Barrett does not offer a specific procedure for barrel break-in other than checking for obstructions while using your new rifle.
barrett.net SPECIFICATIONS Model Caliber REC10 Carbine .308 Win Barrel Length Barrel Material Twist Rate 16 in CMV Chrome 1:10 in (406.4 mm) Lined (254 mm) Weight Length (Collapsed) 8.0 lbs (3.6 kg) 34.5 in (876.3 mm) Operation: Direct impingement; semi-automatic NOTE: INDIVIDUAL RIFLE SPECIFICATIONS AND WEIGHT MAY VARY PER ORDER AND CONFIGURATION. Barrett reserves the right to change specifications without notification. Check barrett.net for updates. MAJOR COMPONENTS - FIGURE 2 1. 2. 3. 4.
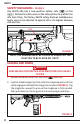
REC10 SAFETY MECHANISM - FIGURE 3 The REC10 rifle has a two-position safety: safe ( ) or fire ( ). Rotate the safety lever to the safe position to prohibit the rifle from firing. The factory REC10 safety features ambidextrous levers and can be adjusted to operate 90 or 45 degrees between safe and fire. FIRE SAFE FIGURE 3 NOTE: THE HAMMER MUST BE COCKED IN ORDER FOR THE SELECTOR TO BE PLACED ON “SAFE”. LOADING AND FIRING WARNING KEEP MUZZLE POINTED IN A SAFE DIRECTION UNTIL READY TO FIRE 1.
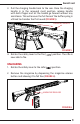
barrett.net 3. Pull the charging handle back to the rear. Once the charging handle is in the rearward most position, release handle with both fingers and let the handle go forward without any assistance. This will ensure the full force of the buffer spring is utilized to chamber the first round (FIGURE 5). CHARGING HANDLE FIGURE 5 4. Rotate the safety lever to the fire ( now able to fire. UNLOADING 1. Rotate the safety lever to the safe ( ) position. The rifle is ) position. 2.
REC10 3. To lock the bolt open, pull the charging handle rearward to hold the bolt carrier to the rear (FIGURE 7-A). While holding the charging handle rearward, depress the bottom of the bolt catch (FIGURE 7-B). Release tension on the charging handle and ensure the bolt is held open. Push the charging handle forward until it latches (FIGURE 7-C). CHARGING HANDLE C A B BOLT CATCH FIGURE 7 4.
barrett.net DISASSEMBLY 1. Ensure rifle is unloaded and clear by following the steps in the UNLOADING section. With the safety on and bolt closed, push the take down pin (rear most pin) until it clears its detent and stops. Push the pivot pin (forward most pin) until it clears its detent and stops (FIGURE 9-A). Take down and pivot pins are captured and cannot be removed. Separate the upper and lower receivers (FIGURE 9-B).
REC10 DISASSEMBLY OF THE BOLT CARRIER - FIGURE 11 1. Remove the firing pin retaining pin from the bolt carrier. Gently push or pull the pin out of the bolt carrier. 2. Remove the firing pin from the bolt carrier. Using a clean soft surface, lightly strike the rear of the bolt carrier to assist in removal (Never use a sharp object to push the firing pin out of the bolt). 3. To remove cam pin, push the bolt into the bolt carrier then rotate the cam pin until the flats will clear the gas key.
barrett.net DISASSEMBLY OF THE BOLT - FIGURE 12 NOTE: DISASSEMBLY OF THE BOLT IS NOT REQUIRED FOR REGULAR CLEANING AND IS NOT RECOMMENDED. DISASSEMBLE BOLT ONLY WHEN EXCESSIVE DEBRIS PREVENTS NORMAL OPERATION OR PARTS ARE DAMAGED. 1. Use a pin punch to remove the extractor pin. Applying downward pressure to EXTRACTOR PIN the rear of the extractor BOLT directly above the extractor spring will aid in removal of extractor pin. Be aware that the extractor spring and extractor are under compression. 2.
REC10 1. Push on the buffer face with finger pressure while holding the buffer retainer down with a suitable tool (FIGURE 13). BUFFER FACE BUFFER RETAINER FIGURE 13 2. Carefully remove the buffer and spring assembly (FIGURE 14). FIGURE 14 NOTE: THE BUFFER RETAINER DOES NOT HAVE TO BE HELD DOWN WHEN REINSTALLING THE SPRING AND BUFFER. NOTE: ASSEMBLY OF COMPONENTS IS THE REVERSE PROCEDURE OF DISASSEMBLY.
barrett.net CLEANING AND LUBRICATION Periodic cleaning and lubrication is important for a long life of high performance from your rifle and prevents the corrosive effects of moisture. Materials used for barrett.net/store. cleaning can be found online at WARNING UNLOAD THE RIFLE BEFORE CLEANING. ENSURE THAT NO LIVE AMMUNITION IS PRESENT DURING CLEANING. CAUTION DO NOT INSERT CLEANING RODS THROUGH THE MUZZLE. THE BARREL CROWN COULD BE DAMAGED WHICH WOULD SEVERELY DEGRADE THE ACCURACY OF THE RIFLE.
REC10 solvent. It is best to clean the muzzle device at the same time the barrel is being cleaned as the bore solvent will help loosen carbon build-up on its interior walls. 6. Clean the bolt face with bore solvent. Use a stiff plastic brush to remove debris from both the extractor and the ejector. Depress the ejector and extractor by hand or a spent casing to test their smooth function. 7. Use dry patches as necessary to remove cleaner from the bolt face and locking lugs 8.
barrett.
REC10 TROUBLESHOOTING MALFUNCTION FAILURE TO FEED FAILURE TO CHAMBER FAILURE TO GO INTO OR OUT OF BATTERY FAILURE TO FIRE FAILURE TO EXTRACT FAILURE TO EJECT 18 CAUSE CORRECTIVE ACTION Did not draw bolt carrier fully to rear Retract bolt carrier fully to the rear Magazine not seated Seat magazine Damaged magazine Replace or repair magazine Damaged cartridge Remove and replace cartridge Dirty or obstructed chamber Clean chamber Obstruction in barrel extension Disassemble and clean Bolt
barrett.
REC10 EXPLODED VIEW AND PARTS LIST 5 4 1 6 3 2 26 20 23 21 24 25 22 19 18 17 27 33 32 31 30 35 34 NOTE: RIFLE COMPONENTS MAY VARY PER CALIBER AND CONFIGURATION. SEE WEBSITE FOR CONFIGURATION INFO.
barrett.
REC10 22 PART NO. 1 2 3 4 5 DESCRIPTION Charging Handle Forward Assist Assembly Forward Assist Spring Retention Screw Upper Receiver QTY.
barrett.net PART NO.
REC10 NOTES 24