
Specifications


62
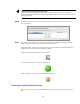
Edit resource permission
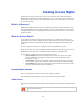
Creating an Access Right
Step 1 Select the type of access right from the action box. The wizard guides the user through the steps
required to create a resource entity in the system.
Step 2 The first step in the wizard is detailing basic information pertaining to the resource to be created.
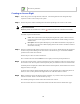
Required!Information!
Mandatory!field s!are!marked!wi t h!a!red!dot!( ).!In f ormation!must!be!entered!for!the se!fields.!
The details required are listed below:
• Name: This required name will be displayed throughout the system. It will be seen and
accessed by those with the right permissions and therefore a sensible naming convention
should be used.
• Description: The description field helps to provide further information to the purpose of
the resource. It can be used to detail anything related to the resource and will be visible to
others where necessary.
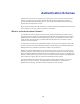
Step 3 Resource permission simply defines what resources a user can access. Within this step the page allows
the user to do just that. Clicking on the down arrow on the ‘Resource type’ reveals all the available
personal resources that can be selected.
The first step is to select a resource from the list.
Once a resource has been selected Add those access rights you wish to provide permission to.
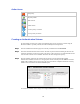
Step 4 As the policy structure states, a resource must belong to a policy. Without a policy the resource cannot
be accessed or used. This step in the wizard requires a policy for which the resource is associated with.
Available polices are displayed to the left hand side and selected policies, which will have the resource
assigned to them, to the right.
To add or remove policies simply highlight the policy in the appropriate box (to add select policies to
the left, to remove, select policies to the right) and use the ‘Add’ and ‘Remove’ buttons.
Step 5 Before creating the resource the wizard provides a summary. If you wish to alter any of the details
select the ‘Previous’ button to revisit and alter any steps.
Once satisfied pressing the ‘Finish’ button will create the new resource.
The new resource will now be visible and accessible from the main ‘Resource Permissions’ page.