
Specifications


44
Delete User Attribute
Edit User Attribute
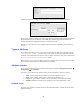
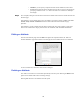
Creating Attributes
Step 1 Select Create User Attribute from the action box at the top right of the page.
Step 2 The basic details of the attribute need to be completed first.
• Name: The name by which the system can reference the attribute.
• Description: Information about the attribute
• Class: Whether the attribute will be a user or policy based attribute.
o User: User attributes become associated with users. Each user will need the value
for this defined either by themselves or the super user
o Policy: This attribute is attributed to a policy instead. The value defined for this will
affect all users associated with the policy so this value only needs to be set once
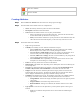
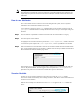
Step 3 The attribute must now be defined.
• Type: The type of attribute.
• Visibility: The visibility of a user attribute is divided into 4 scopes:
o User or admin, use, view, override: This is the most relaxed level of visibility.
Both the Super User as well as a user can fully manage the attribute
o User use and view, admin change: Here the user is able to see the attribute, use it
where necessary but cannot change the value associated with the attribute
o User use, admin view or change: The user is restricted further by only being able to
use the attribute managed solely by the Super User
o User Confidential: The responsibility is reversed only the user has access to this,
the Super User cannot manage nor visibly see this attribute
• Label: The name by which users can reference the attribute
• Default Value: The default value, depending on the visibility this value can be altered by the
user or Super User.
• Category: The placement holder for the attribute, a new tab under Personal Details (User
Console My Account Personal Details) is created with this value as its title.
• Weight: The order of where it should be placed in the category if there is more than one
attribute under the same category. The higher the weight the lower down the list it will be
shown. Weight is defaulted to 0 by placing an attribute at the top of the list.
• Validation: The validation class to use. The appliance comes with a set of default validators
for each type of attribute. Some validators come with parameters that can be altered:
o StringValidator: min and max length, trim blank spaces and even regEx or patterns
can be used
o IntegerValidator: min and max range values can be set
o BooleanValidator: nothing can be defined, the validator checks for true or false
only
• Type Option: You can also use this parameter to provide specific options to each type of
attribute.
o Text: for text attributes this parameter can be used to define the width that gets
displayed.