
Specifications


106
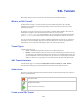
Step 1 To create a new SSL tunnel, first click the “Create Tunnel” action from the SSL tunnel main page.
This will then start the wizard, the first page of which follows.
• Name: The name to be used to identify the SSL tunnel.
• Description: A description of the SSL tunnel.
• Add to favorites: A checkbox that if selected will add the SSL tunnel to the favorites of the
appropriate accounts.
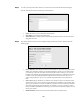
Step 2 Once all the relevant values have been completed simply click the Next button. This will show the
following page.
• Source Interface: The interface the local server will listen on. This can be any valid local IP
address. For example, it could be your network IP address in which case you would connect
to <hostname>.com in this case other external hosts will be able to connect to you via your
hostname. This replaces the original allow external hosts parameter. It could also be 127.0.0.1
in which case the local loopback address localhost will be used. In this case only you can
connect using localhost or 127.0.0.1. It could also be blank in which case it will listen on
both.
• Source Port: The port number to use with the source interface. The port on which the client
Agent creates a server that is connected via the tunnel to the destination on the network. This
can be any port number (over 1024 on UNIX based systems) and is the number that should be
used when configuring the client application. For example, if you were connecting a tunnel
from port 60025 to an SMTP server running on port 25 on the host mail.mycompany.com, the
source port is 60025.
• Destination Host: The name of the host that forms the other end of the tunnel.