
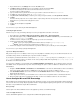
Specifications


1.
2.
1.
2.
3.
4.
5.
1.
2.
3.
The request is added to the section.My Remote Assistance Requests
Step 2. Launch the Remote Assistance Request
As soon as the helpdesk administrator has contacted you and requests access to your system,
Click on your remote assistance request to launch the session.
Once the assistance session has started, you can communicate with the assistant. Click the icon on the bottom of the screen toChat
view and send messages.
When the session is closed, the request will be deleted from the list.
Providing Remote Assistance
A helpdesk- or system administrator with the appropriate access rights can respond to
remote assistance requests sent by standard users and then connect to the remote
system to provide assistance. All modifications to a request will trigger an email
notification to both the owner of the request as well as to the assigned assistant. In
order to provide remote assistance, the assistant must have the following Resource
(see ):Rights Access Rights
Related Articles
Remote Assistance
Requesting Remote Assistance
Remote Assistance Create - Allows creating of assistance requests for other users.
Remote Assistance Edit - Allows editing of the details of an assistance request that has been submitted, such as the assigned assistant,
the scheduled time and the status of the request.
Remote Assistance View - Allows viewing of all existing assistance requests, as well as connecting to a remote system that is requesting
assistance.
Remote Assistance Delete - Allows closing of any assistance requests that are still open.
To provide remote assistance, complete the instructions given in the following steps:
Step 1. Access the Remote Assistance Request
Step 2. Connect to the Remote System
Step 3. Close the Remote Assistance Request
Create a Request for other Users
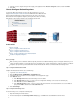
Step 1. Access the Remote Assistance Request
Log into the . SSL VPN web interface
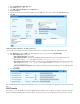
Go to the RESOURCES > Remote Assistance page.
Verify that you have selected the correct user database on the top right of the page.
Check the Remote Assistance Requests section. The list displays all requests that have been submitted by standard users and allows
editing of the details, such as the assigned assistant, status and scheduled time. The Available From column displays the requested
times of assistance. An asterisk (*) means that no specific time is requested.
To view and modify the details click the link next to the request.Edit
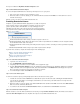
Step 2. Connect to the Remote System
To work on an assistance request, you will generally require a direct connection to the remote system.
To initiate the connection, click the link associated with the request. This will set the status to . Launch Waiting for Connection When the
user responds, the status will be set to In Progress, and an RDP session to the remote system still be launched. You may refresh the
page to see the status change.
Once the assistance session has started, select from the taskbar from the context menu under Show Chat Window View Remote Assist
.ance You can now communicate with the user.
To send files via the chat client in the window, select Remote Assistance Send File from the context menu.Connection
Step 3. Close the Remote Assistance Request
When the assistance session has finished, terminate the connection by closing the window. (This will also set the status to Remote Assistance I
if the field is set to .) Once the request is closed, it will be deleted from the list.nactive One-Time Request No